Article Number: 000130520
PowerVault TL2000 / TL4000 Tape Library - How to Upgrade the Firmware for the Tape Library and Tape Drives
Summary: This article provides information on how to upgrade the firmware for the Tape Library and Tape Drives for the PowerVault TL2000 / TL4000 Tape Library.
Article Content
Symptoms
 Note: This article is part of the Dell PowerVault knowledge library, available here.
This article explains how to upgrade the firmware for the Tape Library and Tape Drives for the PowerVault TL2000 / TL4000 Tape Library.
Information and where to download ITDT can be found on this article.
 Note: If at any time there is a complication, technical issue or some other issue, please contact Dell Technical Support for assistance. Contact is at the bottom of this page.
Table of content:
Tape Library Firmware Update
- 1st Method - Tape Library (Medium Changer) using the RMU (Remote Management Unit)
- 2nd Method - Tape Library (Medium Changer) using ITDT-DCR
Preferred Method.Tape Library (Medium Changer) using the RMU (Remote Management Unit)
The following describes how-to upgrade or apply the TL2000 / TL4000 tape library (medium changer) firmware using the RMU:
- If the RMU or Web Interface is not configured, please use the following links to setup / configure the RMU:
- Using the IP Address configured to the RMU / Web Interface, connect to it using a web browser like - Internet Explorer®, Firefox®, or Chrome®.
- Once in the RMU / Web Interface, use the following menu path - Service Library > Upgrade Firmware
- Download the appropriate firmware from Dell's Support site.
- At this time, make sure that the backup software services are stopped. If necessary, stop and disable these services, and restart / reboot the server.
- After the firmware has been downloaded and extracted, go back to the RMU / Web Interface.
 Note: Take note or remember the location of where the firmware files where downloaded and extracted.
- In the top center section of the page, you will see "Upgrade Library Firmware" (Figure 1).

Figure 1: RMU Firmware Upgrade
- Select or click on "Browse" and browse to the locate where the Library Firmware file is located.
- Select the file, and once back to the Upgrade Firmware page, the "Update" button can be selected.
If the button is "grayed-out", the "Update" button cannot selected, and this means that the Library Firmware was not selected. - After the firmware has been upgraded for the tape library and/or tape drive(s) - it is highly recommended that the server be restart / rebooted.
- Once this is done, start the backup software services, and see how the backup software has engaged the tape library and/or tape drive(s).
- If the firmware for the tape library and/or tape drive(s) are not seen as updated, please engage the appropriate backup software vendor for technicial support regarding this issue.
Alternate Method. Tape Library (Medium Changer) using ITDT-SE
 Note: For either Windows® or Linux®, Java® is a required component for this installation of ITDT-DCR.
Supported JREs (Java Runtime Environment) are:
- Java® 1.4.2_17 by Sun Microsystems and higher
- Java® 1.4.2 SR11 by IBM Corporation and higher
The following describes how-to upgrade or apply the TL2000 / TL4000 tape library (medium changer) firmware using ITDT-DCR (Dell Customer Release):
- Download the appropriate firmware from Dell's Support site.
- At this time, make sure that the backup software services are stopped. If necessary, stop and disable these services, and restart / reboot the server.
- After the firmware has been downloaded and extracted, go to or browse to the location where the files where extracted.
- Use the README_itdt_dcr.txt for the installation procedure for both Windows® and Linux®.
- Select the Scan button, once ITDT-DCR is running.
- Select the tape library that you would like to update with the firmware.
- Browse to the location where the firmware files where extracted.
- Choose the appropriate tape library firmware file and click Open.
- When the firmware update has completed, ITDT-DCR should show a PASSED result next to the updated tape library (Figure 2).
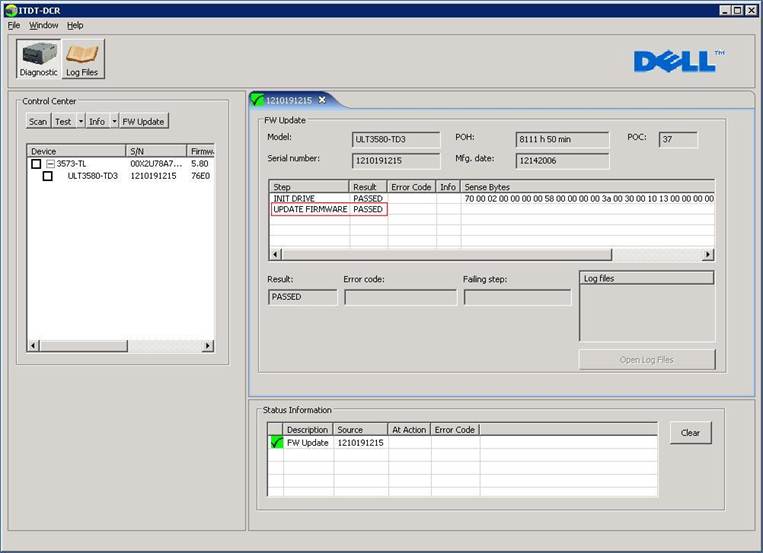
Figure 2: ITDT-DCR Firmware Upgrade
- After the firmware has been upgraded for the tape library and/or tape drive(s) - it is highly recommended that the server be restarted / rebooted.
- Once this is done, start the backup software services, and see how the backup software has engaged the tape library and/or tape drive(s).
- If the firmware for the tape library and/or tape drive(s) are not seen as updated, please engage the appropriate backup software vendor for technicial support regarding this issue.
Preferred Method. Tape Drive(s) Using ITDT-DCR
 Note: For either Windows® or Linux®, Java® is a required component for this installation of ITDT-DCR.
Supported JREs (Java Runtime Environment) are:
- Java® 1.4.2_17 by Sun Microsystems and higher
- Java® 1.4.2 SR11 by IBM Corporation and higher
The following describes how-to upgrade or apply the TL2000 / TL4000 tape drive(s) firmware using ITDT-DCR (Dell Customer Release):
- Download the appropriate firmware from Dell's Support site.
- At this time, make sure that the backup software services are stopped. If necessary, stop and disable these services, and restart / reboot the server.
- After the firmware has been downloaded and extracted, go to or browse to the location where the files where extracted.
- Use the README_itdt_dcr.txt for the installation procedure for both Windows® and Linux®.
- Select the Scan button, once ITDT-DCR is running.
- Select the drive that you would like to update with the firmware.
- Browse to the location where the firmware files where extracted.
- Choose the appropriate tape drive firmware file for that tape drive and click Open.
- When the firmware update has completed, ITDT-DCR should show a PASSED result next to the updated drive (Figure 2 - above).
- After the firmware has been upgraded for the tape library and/or tape drive(s) - it is highly recommended that the server be restarted / rebooted.
- Once this is done, start the backup software services, and see how the backup software has engaged the tape library and/or tape drive(s).
- If the firmware for the tape library and/or tape drive(s) are not seen as updated, please engage the appropriate backup software vendor for technicial support regarding this issue.
Alternate Method. Tape Drive(s) using the RMU (Remote Management Unit)
 Note: Upgrading the tape drive through the RMU, generally takes about 5 minutes. However, it can take longer, and some times can fail more than using the Preferred Method listed above.
The following describes how-to upgrade or apply the TL2000 / TL4000 tape drive(s) firmware:
- If the RMU or Web Interface is not configured, please use the following links to setup / configure the RMU:
- Using the IP Address configured to the RMU / Web Interface, connect to it using a web browser like - Internet Explorer®, Firefox®, or Chrome®.
- Once in the RMU / Web Interface, use the following menu path - Service Library > Upgrade Firmware.
- Download the appropriate firmware from Dell's Support site.
- At this time, make sure that the backup software services are stopped. If necessary, stop and disable these services, and restart / reboot the server.
- After the firmware has been downloaded and extracted, go back to the RMU / Web Interface.
- In the top center section of the page, you will see "Upgrade Drive" (Figure 1).
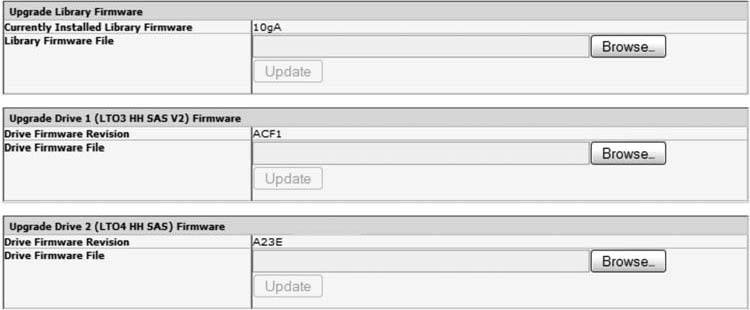
Figure 1: RMU Firmware Upgrade
- Select or click on "Browse" and browse to the locate where the Library Firmware file is located.
- Select the file, and once back to the Upgrade Firmware page, the "Update" button can be selected.
If the button is "grayed-out", the "Update" button cannot selected, and this means that the Library Firmware was not selected. - After the firmware has been upgraded for the tape library and/or tape drive(s) - it is highly recommended that the server be restart / rebooted.
- Once this is done, start the backup software services, and see how the backup software has engaged the tape library and/or tape drive(s).
- If the firmware for the tape library and/or tape drive(s) are not seen as updated, please engage the appropriate backup software vendor for technicial support regarding this issue.
Cause
-
Resolution
-
Article Properties
Affected Product
Servers, PowerVault TL2000, PowerVault TL4000
Last Published Date
22 Sep 2021
Version
5
Article Type
Solution