Article Number: 000128816
A guide to the Buttons and Input methods for the Latitude 12 Rugged 7202 and Latitude 12 Rugged Extreme 7212 Tablets
Summary: This is a guide to a number of unique features on the Dell Latitude 12 Rugged 7202 and Latitude Rugged Extreme 7212 Tablets.
Article Content
Symptoms
The Dell Latitude 12 Rugged 7202 and Rugged Extreme 7212 Tablets has several unique features. This article takes you through the placement and use of the buttons on the system. It takes you through how to get the best out of the input interfaces on the system.
Table of Contents:
- Using the buttons on the Latitude 12 Rugged 7202 and Rugged Extreme 7212 Tablets
- Using the Touch keyboard and Stylus
- Using Gestures
Using the buttons on the Latitude 12 Rugged 7202 and Rugged Extreme 7212 Tablets
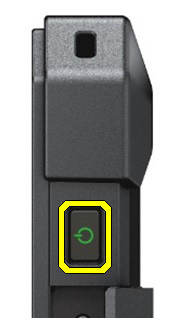
(Fig.1 Power Button)
The power button is located along the top edge of the table at the right-hand side.
The basic behaviors of the power button are outlined below:
- Press the power button down for a few seconds until the Power Button LED lights up and release it:
- If tablet is off, in sleep mode or in hibernate mode, it turns on the tablet.
- If tablet is on, it puts the tablet in sleep mode.
- Press and hold on the power button (for approximately 10 seconds) to force the shutdown of the tablet.

(Fig.2 Home Button)
The Home/Windows button is located on the Bottom edge of the tablet at the Front.
The Home/Windows button behavior in the Windows environment is as follows:
- When the tablet is on, pressing this button accesses the Start screen.
- When in Idle State, pressing the button wakes the tablet.
The table below shows the different functional buttons. When pressed together, they perform different operations:
 Note: The timing of these buttons may be difficult. It may help to press and hold the Windows button slightly before the other key, and then release both.
Windows Button Behavior
| Buttons | Results |
|---|---|
| Windows + Power | An alternative for + + which invokes the Windows Security Screen with options below:
|
| Windows + Volume Up (+) | Opens up Narrator a basic screen reader. To close Narrator, press both buttons again. |
| Windows + Volume Down (-) | An alternative for . The user can press these two buttons to capture screenshots. Screenshots are stored in Pictures > Screenshots folder. |

(Fig.3 Volume Buttons)
The volume buttons are located on the Bottom edge of the tablet at the Front.
In Windows Mode:
- Press the Volume Up (+) button to increase the tablet's volume.
- Press the Volume Down (-) button to decrease the tablet's volume.
For Boot Menu mode:
- Press the Volume Up (+) button during system boot to initiate a one-time boot menu.
- Press the Volume Up (+) button to navigate the boot menu options from top down and bottom to up.
- Use the Volume Down (-) button to enter your selection.
For BIOS/System Setup mode:
- Press and hold the Volume Down (-) button during system boot to enter the BIOS/System Setup.

(Fig.4 Button Rotation)
The rotation lock button is located on the Bottom edge of the tablet at the Front.
This button allows you to lock the display orientation to the default.

(Fig.5 Programmable Buttons)
The Programmable buttons are located on the Bottom edge of the tablet at the Front.
Below is the list of the programmable features that you can configure:
- Stealth mode on and off.
- Camera shutter release.
- Camera flash on and off.
- Flashlight on and off.
- Screen rotate lock.
- Wireless on and off.
- Microphone mute.
- Application link.
- Barcode reader actuation.
- Mag Stripe reader actuation.
If you are interested in more information about how to program the Programmable Buttons, please check out the article that is linked below:
Resolution
Using the Touch keyboard and Stylus
The Dell Latitude Rugged 7202 and Rugged Extreme 7212 Tablets uses several input devices:
Using the Stylus, Active Stylus Pen or Finger on a Touch Keyboard
The touch keyboard and handwriting recognition make it easy to enter text into your applications with the stylus pen or finger. Some applications, such as Windows Journal, allow you to write with the stylus pen directly into the application window.
Touch Keyboard
Some of the Windows text input boxes bring out the touch keyboard automatically when you tap the boxes. If it does not come out, you can open the touch keyboard by clicking or tapping the keyboard icon on the system toolbar, as shown below:

(Fig.2.1 Keyboard Icon)
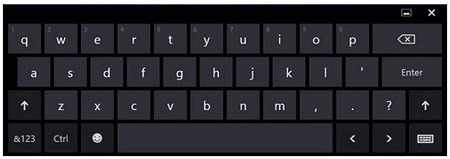
The on-screen touch keyboard functions like a standard keyboard.
The default view of the keyboard shows the most commonly used keyboard keys and fills the entire width of the screen. It can be used to enter text by tapping the keys with your stylus pen or finger.
- You can access additional symbol and number keys using the &123 button on the lower-left corner.
- Hundreds of emoticons are available from the emoticon key to the left of the space bar (in between the and <@> keys).

(Fig.2.2 Onscreen Keyboard)
Entering Text
Below are the various keyboard layouts that you can use in the touch keyboard to input text:
| Icon | Picture | Function |
|---|---|---|
 Standard Layout Touch keyboard |
 |
The touch keyboard is like a standard keyboard, but you enter text by tapping the keys with your tablet's pen or finger. |
 Thumbs Layout keyboard |
 |
The Thumbs keyboard has additional number keys in the middle compared to the standard touch keyboard. The thumb keyboard view is optimal for thumb typing while grasping the tablet from the sides. You can change the size of these keys. Place your finger on the three vertical dots and slide left or right (selecting from small, medium, and large). |
 Handwriting recognition |
 |
The writing pad and character pad convert handwritings into typed text. You can write continuously on the writing pad, like writing on a piece of lined paper. Use the character pad to enter one character at a time. The character pad converts your handwriting to typed text, one letter, number, or symbol at a time. However, it does not take the context of the full word into account and does not take advantage of the handwriting dictionary. To switch to the character pad in Input Panel, tap Tools, and then Write character by character. |
 Full Touch keyboard |
 |
The full keyboard displays all the keys that you see on most physical keyboards. This includes the number keys, the F1 - F12 function keys, and modifier keys, such as the key. To access the full keyboard, you need to enable the standard keyboard layout option in Settings > Change PC Settings > PC and devices > Typing. |
To minimize the Touch Keyboard layout, simply click Hide keyboard.
Stylus (Optional)
 Note: A passive stylus is shipped with the tablet, while an active stylus is sold separately.
Calibrating the Pen
 Note: I would not use the Windows Tablet-PC pen calibration tool with the Latitude 7212 Rugged Extreme Tablet. These systems touch screen uses a self-calibration process that is adversely affected by using any additional calibration software.
To calibrate, go to the Control Panel > Tablet PC Settings
Using the Stylus Pen as a Mouse
You can use the pen the same way you use a mouse or touch pad with a notebook computer. Holding the pen near the display makes a small cursor appear. Moving the pen moves the cursor.
Pen Usage
| Appearance | Action | Function |
|---|---|---|
 |
Gently tap the pen tip on the screen of your tablet. | Same as the single-click on a mouse. |
 |
Gently tap the pen tip twice in quick succession on the screen of your tablet. | Same as the double-click on a mouse. |
 |
Touch the pen on the screen and hold it in place momentarily until Windows draws a complete circle around the cursor. | Same as the right-click on a mouse. |
Pen Flicks
Pen flicks enable you to use the pen to perform actions that normally require a keyboard, such as pressing or using the directional arrow keys. Pen flicks are quick, directional gestures. You simply quickly draw a short line in one of eight directions. When a pen flick is recognized, the tablet PC performs the action that is assigned. The image below depicts the default pen flick settings.

(Fig.2.3 Pen Flicks)
Using Gestures
The Dell Latitude 12 Rugged 7202 and Rugged Extreme 7212 Tablets has a multi-touch display. (This means you can operate the tablet by touching the screen.)
Gestures
| Gesture Actions | Functions |
|---|---|
| Touch Tap gently on the display with your fingertip.  |
|
| Touch and Hold Touch and Hold your finger on the display.  |
|
Drag and Drop
 |
|
| Swipe or Slide Move your finger in a vertical or horizontal direction on the display.  |
|
| Zoom in Touch the display with two fingers and then move your fingers apart.  |
|
| Zoom out Touch the display with two fingers and then move your fingers closer together.  |
|
| Rotate Touch the display with two or more fingers and then move the fingers in a clockwise or counter-clockwise arc.  |
|
Right-Click
To perform a right-click in your tablet, touch and hold your finger for 2 seconds on any section of the screen or an icon. Then release your finger.
The options menu should appear on the screen.
Article Properties
Affected Product
Latitude 7212 Rugged Extreme Tablet, Latitude 7202 Rugged Tablet
Last Published Date
21 Feb 2021
Version
3
Article Type
Solution