Article Number: 000141662
How to Use and Troubleshoot the Dell P1914S / P2014H Monitors
Summary: Guide for using and troubleshooting Dell P1914S / P2014H Monitors.
Article Content
Resolution
Table of Contents:
- Using the Monitor Self-Test
- Using the Built-In Diagnostics
- Common Monitor Issues
- Product Specific Issues
- USB Issues
This article provides the information on and offers guidance for troubleshooting issues with the Dell P1914S and P2014H monitors.
Using the Monitor Self-Test
The monitor provides a self-test feature that allows you to check whether your monitor is functioning properly. If your monitor and computer are properly connected but the monitor screen remains dark, run the monitor self-test by performing the following steps:
- Turn off both the computer and the monitor.
- Unplug the video cable from the back of the monitor. To ensure proper Self-Test operation, remove all digital (white DVI connector) and analog (blue VGA connector) cables from the back of the computer.
- Turn on the monitor.
 NOTE: The floating dialog box should appear on-screen (against a black background) if the flat panel display cannot sense a video signal and is working correctly. While in self-test mode, the power LED remains blue. Also, depending upon the selected input, one of the dialogs shown below will continuously scroll through the screen.
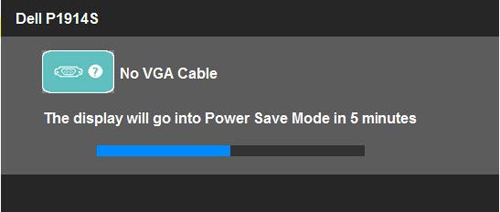

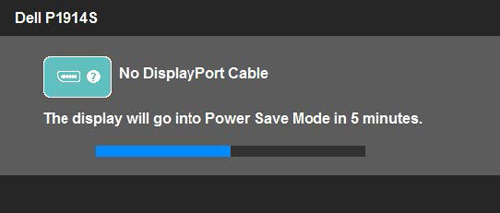
- This box also appears during normal system operation, if the video cable becomes disconnected or damaged. The monitor will enter Power Save Mode after 5 minutes if left at this state.
- Turn off the flat panel display and reconnect the video cable; then turn on both the computer and the flat panel display.
If the flat panel display screen remains blank after using the previous procedure, check the video controller and computer, because the flat panel display is functioning properly.
 NOTE: Self-test feature check is not available for S-Video, Composite and Component video modes.
Using the Built-In Diagnostics
The monitor has a built-in diagnostic tool that helps you determine if a problem you are having with the display is a problem with the monitor, your computer, or your video card.
 NOTE: You can only run the built-in diagnostics when the video cable is unplugged and the monitor is in self-test mode.
To run the built-in diagnostics:
Your monitor has a built-in diagnostic tool that helps to determine if the screen abnormality you are experiencing is an inherent problem with the monitor, or with the computer and video card. To run the built-in diagnostics:
- Ensure that the screen is clean (no dust particles on the surface of the screen).
- Unplug the video cable(s) from the back of the computer or monitor. The monitor then goes into the self-test mode.
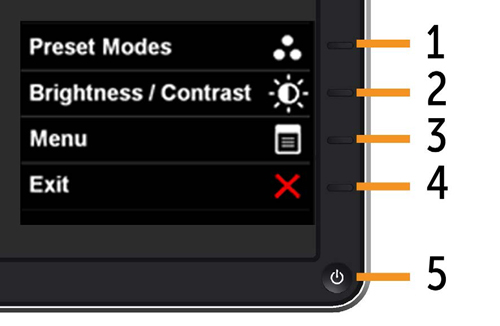
- Press and hold Button 1 and Button 4 simultaneously for 2 seconds. A gray screen should appear.
- Carefully inspect the screen for abnormalities.
- Press Button 4 on the front panel again. The color of the screen should change to red.
- Inspect the screen for abnormalities.
- Repeat steps 5 and 6 to inspect the display in green, blue, black, white, and text screens.
- The test is complete when the white screen appears. To exit, press the Button 4 again. If you do not detect any screen abnormalities upon using the built-in diagnostic tool, the monitor is functioning properly. Check the video card and computer.
If you do not detect any screen abnormalities upon using the built-in diagnostic tool, the monitor is functioning properly. Check the video card and computer.
Common Monitor Issues
| Common Symptoms | What You Experience | Possible Solutions |
|---|---|---|
| No Video/Power LED Off | No Picture |
|
| No Video/Power LED On | No picture or no brightness |
|
| Poor Focus | Picture is fuzzy, blurry, or ghosting |
|
| Shaky/Jittery Video | Wavy picture or fine movement |
|
| Missing Pixels | LCD screen has spots |
|
| Stuck-on Pixels | LCD screen has bright spots |
|
| Brightness Problems | Picture too dim or too bright |
|
| Geometric Distortion | Screen is not centered correctly |
|
| Horizontal/Vertical Lines | Screen has one or more lines |
|
| Synchronization Problems | Screen is scrambled or appears torn |
|
| Safety Related Issues | Visible signs of smoke or sparks |
|
| Intermittent Problems | Monitor malfunctions on and off |
|
| Missing Color | The picture is missing a color |
|
| Wrong Color | Picture has incorrect colors |
|
| Image Retention from a Static Image Left on the Screen | Faint shadow from the static image is visible on the screen |
|
 NOTE: When using DVI-D input, the positioning adjustments are not available.
 NOTE: When using DVI-D input, the Pixel Clock and Phase adjustments are not available.
Product Specific Issues
| Specific Symptoms | What You Experience | Possible Solutions |
|---|---|---|
| Screen Image Is Too Small | Image is centered on screen but does not fill the viewing area |
|
| Cannot Adjust the Monitor with the Buttons on the Front Panel | OSD menus do not appear on the screen |
|
| No Input Signal when User Controls Are Pressed | No picture, the LED is bright blue |
|
| The Picture Does Not Fill the Entire Screen | The picture does not fill the height or width of the screen |
|
 NOTE: When using DVI-D, the Auto-Adjust function will not be available.
Soundbar Issues
| Specific Problems | What Users Experience | Possible Solutions |
|---|---|---|
| USB interface is not working | USB peripherals are not working |
|
| High Speed USB 2.0 interface is slow | High Speed USB 2.0 peripherals working slowly or not working at all |
|
Article Properties
Affected Product
Dell P1914S, Dell P2014H
Last Published Date
10 Apr 2021
Version
4
Article Type
Solution