Article Number: 000129462
How to Troubleshoot 077-901 & 077-907 Paper Jam Errors on the 3110cn / 3115cn / 3130cn Dell Laser Printers
Summary: Troubleshoot and resolve 077-901 & 077-907 Paper Jam Errors on the 3110cn / 3115cn / 3130cn Dell Laser Printers.
Article Content
Symptoms
Table of Contents:
- How to Troubleshoot 077-901 & 077-907 Paper Jam Errors on the 3110cn / 3115cn / 3130cn Dell Laser Printers
- 3110cn/3115cn:
- 3130cn:
This article provides information on "How to Troubleshoot 077-901 & 077-907 Paper Jam Errors on the 3110cn / 3115cn / 3130cn Dell Laser Printers"
1. How to Troubleshoot 077-901 & 077-907 Paper Jam Errors on the 3110cn / 3115cn / 3130cn Dell Laser Printers
If the Paper Jam error is displayed on the LCD Panel of your Printer, please try the following troubleshooting steps to resolve the issue.
- Turn off the Power on the Printer and remove the communication cables (USB or Ethernet, depending on your set-up).
- Verify the print media is compatible by ensuring it is within media specifications in the User Guide.
- Note the frequency of the paper jam on the printer.
- Ensure that the Paper you are using is set to the same size as the job you are trying to print.
- Try Printing a Menu Settings Report:
- Press the Menu Button on the printer.
- Highlight Reports/List and Select.
- Highlight System Settings or Printer Settings (depending on your specific printer model) and Select.
- The Report should now Print.
- If the Report Prints, reconnect the Communication cable and Print a Windows Test Page.
How to Print a Windows Printer Test Page - If both the Windows Test page and Settings Page prints, then the hardware is working as designed.
- If the Paper Jam Error recurs, continue troubleshooting below:
- Remove and reseat the paper tray.
- Pull the tray out of the printer until it stops.
- Hold the tray with both hands, lift the front slightly, and remove it from the printer.
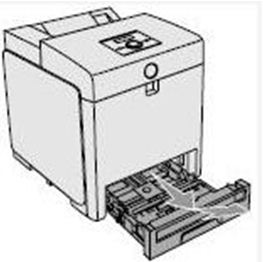
- Re-insert the paper tray into the printer and push it until it stops.
- Run diagnostics on the registration sensor by entering Customer Mode (diagnostic mode).
- Power off the printer.
- Hold down the Up and Down Arrow buttons on the printer and power the printer on.
- Release your fingers from the keys when the message Diagnosing... appears.
- Customer Mode and ESS Diag are displayed.
- Press the Down Arrow button until IOT Diag appears and press the Select button.
- On the LCD, Digital Input appears.
- Press the Down Arrow button until Digital Input appears and press the Select button.
- Press the Down Arrow button until DI-3 appears and press the Select button twice.
- Remove the 250-sheet paper tray.
- Insert a piece of paper into the paper path of the registration assembly.
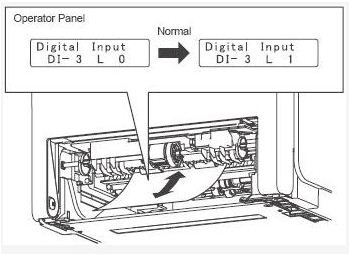
- The counter on the Operator Panel increases by 1 every time the paper passes the sensor. If the number does not increase by 1, please contact Dell Technical Support.
- Press the Cancel button to stop this test.
- Remain in Customer Mode and try a continuous feed test from Tray 1:
More info can be found in the 3110cn User's Guide , 3115cn User’s Guide or the 3130cn User’s Guide.
Back to Top2. 3110cn/3115cn:
- Select IOT Diags.
- Select Digital Output.
- Highlight D0-1 and press Select Twice to begin motor.
- Highlight D0-b and press Select Twice to begin motor, you should hear a change in pitch of the motor.
- Highlight D0-29 and press Select Twice to begin motor, you should hear a change in pitch of the motor.
- Highlight D0-5b and press Select Twice to begin motor, you should hear a change in pitch of the motor.
- Highlight D0-2f and press Select Twice to begin motor, you should hear a change in pitch of the motor.
- The paper should now feed.
More info can be found in the 3110cn User's Guide , 3115cn User’s Guide or the 3130cn User’s Guide.
Back to Top3. 3130cn:
- Select IOT Diags.
- Select Digital Output.
- Highlight D0-0 and press Select Twice to begin motor.
- Highlight D0-5 and press Select Twice to begin motor, you should hear a change in pitch of the motor.
- Highlight D0-a and press Select Twice to begin motor, you should hear a change in pitch of the motor.
- Highlight D0-5b and press Select Twice to begin motor, you should hear a change in pitch of the motor.
- Highlight D0-29 and press Select Twice to begin motor, you should hear a change in pitch of the motor.
- Highlight D0-2f and press Select Twice to begin motor, you should hear a change in pitch of the motor.
- The paper should now feed.
- If the paper feeds with no issue, restart the Printer in normal mode and try printing another test page.
- If the Test page does not print or the paper jammed during feed test, please try another Transfer Belt and Fuser Assembly from a working Printer (if available) and clean the Feed Rollers.
- If the paper jams with a working Transfer Belt and Fuser Assembly, or none is available, please contact Dell Technical Support for further advice.
More info can be found in the 3110cn User's Guide , 3115cn User’s Guide or the 3130cn User’s Guide.
If these steps do not correct the problem, please contact Dell Technical Support.
Back to TopArticle Properties
Affected Product
Dell 3110cn Color Laser Printer, Dell 3115cn Color Laser Printer, Dell 3130cn Color Laser Printer
Last Published Date
21 Feb 2021
Version
3
Article Type
Solution