Article Number: 000128714
Alienware AW3418DW and AW3418HW Monitor Troubleshooting Guide
Summary: General troubleshooting steps to resolve common queries with the Alienware AW3418DW and AW3418HW curved panel displays.
Article Content
Symptoms
Summary: Setting up and general troubleshooting tips for your Alienware AW3418DW or AW3418HW Monitor
|
|

Table of Contents:
- Setting up the Game Enhance Mode
- AlienFX Lighting Set up (Auto and Manual)
- Downlight Control
- Integrated Diagnostic Self-Test
- Assembling the Cable Cover
- Disassembling the Cable Cover
- Nvidia G-SYNC setup requirements
- AW3418HW and AW3418DW High-frequency noise (Flicker) issue
- Light leakage on four corners of the screen
- The monitor does not wake when the monitor is set to sleep mode.
Cause
Setting up the Game Enhance Mode
The AW3418DW and AW3418HW displays support "Game Enhance Mode" which offers three available functions to enhance your gameplay experience:
- Timer: This allows you to disable or enable the timer at the upper left corner of the display. The timer shows the time elapsed since the game starts. Select an option from the time-interval list to measure your target game rate
- Frame Rate: Selecting On allows you to display the current frames per second when playing games. The higher the rate, the smoother the motion appears
- Display Alignment: Activate the function to help ensure the perfect alignment of the video contents from multiple displays
Using the On-Screen Display (OSD) Menu:
Go to OSD ->Game -> Game Enhance Mode-> Select Timer, Frame Rate, or Display Alignment (See Figures 1, 2, and 3.)

Figure 1. - Setting the Game Enhance Mode in the OSD
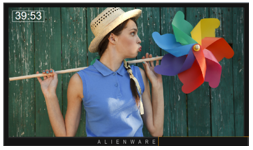
Figure 2. - Timer selected

Figure 3. - Frame Rate selected
The Display Alignment option allows you to display the anchor pattern to accurately align multiple displays where an image is presented over more than one display.
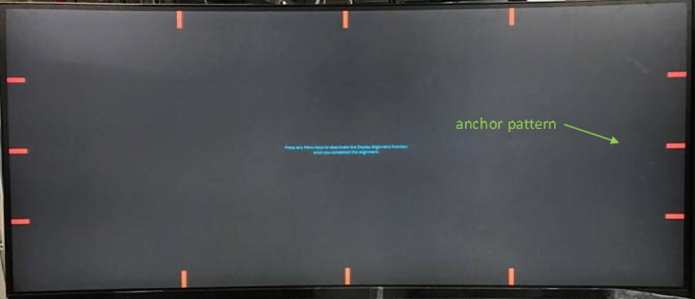
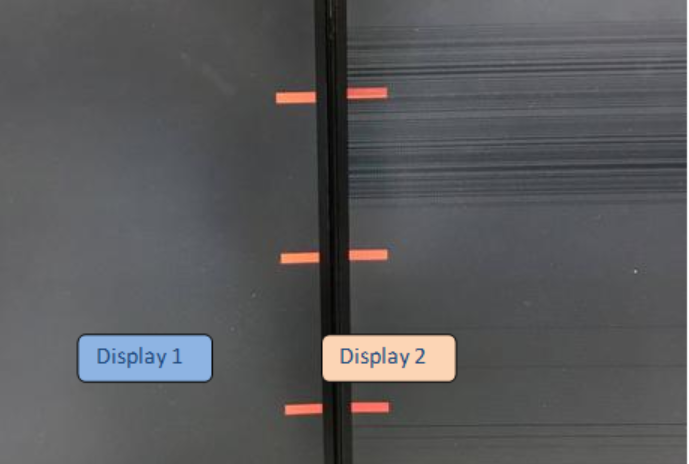
Figure 4. - Display Alignment selected showing the anchor tabs
Resolution
AlienFX Lighting Set up (Auto and Manual)
The AW3418DW and AW3418HW provide "AlienFX Lighting" functionality for you to adjust the lighting color of following four zones:
- Zone 1: Alienware logo lighting and Triad lights on the back
- Zone 2: Stand of the monitor
- Zone 3: Downlights on the bottom of the monitor
- Zone 4: Power button.
AlienFX Lighting offers the following two different adjusting modes:
- Color: It allows you to manually specify an LED lighting color from the list of 20 available colors
- Spectrum: When you select On, the LED lighting automatically glows and changes colors in a sequence of spectrum: Red, orange, yellow, green, blue, indigo, and violet
To automatically set-up AlienFX Lighting:
Go to the OSD->AlienFX Lighting->Spectrum->Select "On" (See Figure 5.)
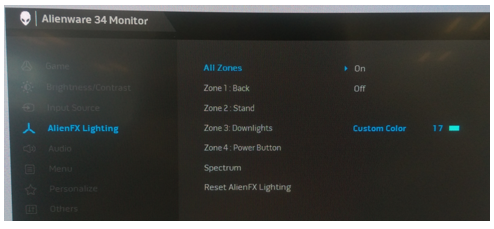
Figure 5. - Automatic setup of AlienFX Lighting
To manually set-up AlienFX Lighting:
- Go to OSD.
- Go to AlienFX Lighting.
- Select All Zones, Zone 1, Zone 2, Zone 3, or Zone 4.
- Select Custom Color.
- Select a color from the list of 20 available colors. (See Figure 6.)
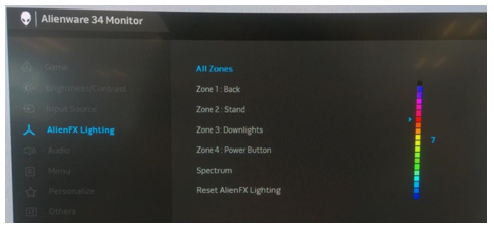
Figure 6. - Manual setup of AlienFX Lighting
The location of the four lighting zones (See Figure 7.)
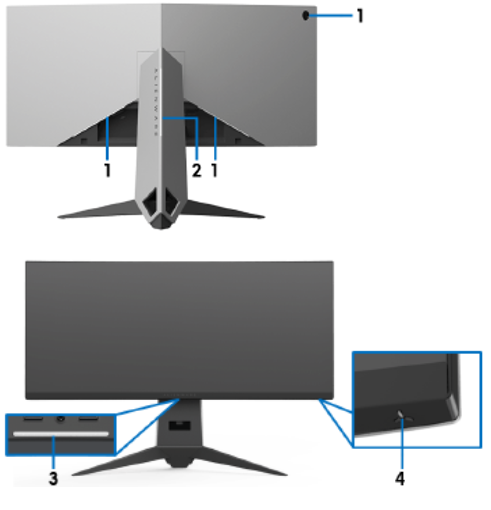
Figure 7. - Location of AlienFX Lighting zones
Downlight Control
Both AW3418DW and AW3418HW displays have downlights in the bottom of the monitor. You can tap the touch sensor to turn the downlights on or off.
When the monitor is set up, tap the touch sensor to turn the downlights on or off. (See Figure 8.)
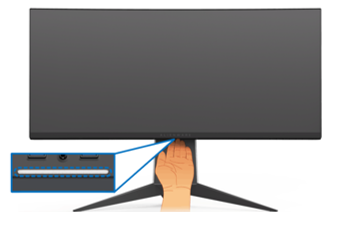
Figure 8. - Control for the monitor downlighting
NOTE: The factory setting is always on, the downlights are active if the power cable is connected.
NOTE: When the Spectrum function is on, the downlights are turned off.
| Monitor State | Downlight Status | |
|---|---|---|
| While Spectrum Off | While Spectrum On | |
| On | O | X |
| No Signal | O | X |
| Standby | O | X |
Integrated Diagnostic Self-Test
Each AW3418DW & AW3418HW monitor has an integrated diagnostic tool that helps you to identify the screen abnormality you are experiencing. You can determine if it is an inherent problem with your monitor, or with your computer and video card.
To run the integrated diagnostics:
- Ensure that the screen is clean (no dust particles on the surface of the screen).
- Unplug the video cables from the back of the computer or monitor. The monitor then goes into the self-test mode.
- Press and hold Button 3 for 5 seconds. A gray screen appears after 1 second. (See Figure 9.)
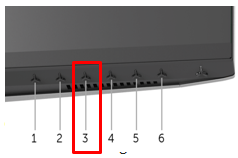
Figure 9. - Accessing the monitor self-test using the OSD controls
- Carefully inspect the screen for abnormalities.
- Press Button 3, and the color of the screen changes to red.
- Inspect the display for any abnormalities.
- Repeat steps 5 and 6 to inspect the display in green, blue, black, and white screens.
- The test is complete when the white screen appears. To exit, press Button 3 again.
If you do not detect any screen abnormalities upon using the integrated diagnostic tool, the monitor is functioning properly. Check the video card and computer.
NOTE: You can run the integrated diagnostics only when the video cable is unplugged and the monitor is in self-test mode.
NOTE: For AW3418DW and AW3418HW, the gray screen delays one second to appear.
NOTE: AW3418DW and AW3418HW do not show a text pattern because they are the G-sync models.
Assembling the Cable Cover
The AW3418DW and AW3418HW have a cable cover to assemble with the back cover of monitor.
If you want to assemble the cable cover, slide the cable cover over until it snaps into place. (See Figure 10.)
NOTE: Check position 6 on the monitor back cover and cable cover.
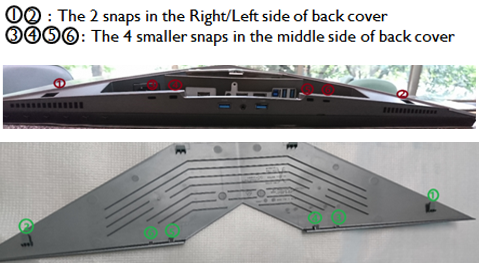
Figure 10. - Cable cover snap locations
To assemble the cable cover with the back cover of the monitor:
- Position the Right and Left snaps.
- Slide the cable cover over until it snaps into place.
- Press down on the cable cover and let the middle snap hook up with the holes.
- Ensure it all snaps into place and there is no significant gap between the cable cover and back cover. (See Figure 11.)
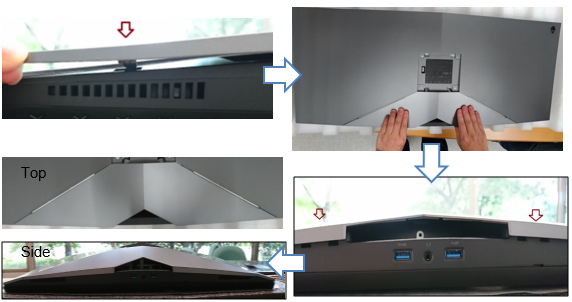
Figure 11. - Cable cover installation process
NOTE: If any snap does not click into place, it is difficult to put the cable cover on correctly. (The cable cover is slanted) You can easily damage the snaps of the cable cover. (See Figure 12.)
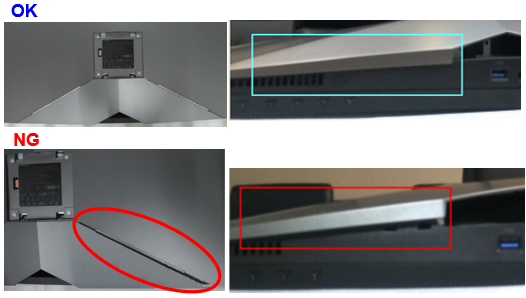
Figure 12. - Correct and incorrect cable cover installation examples
Disassembling the Cable Cover
The AW3418DW and AW3418HW have a cable cover to assemble with the back cover of the monitor.
If you want to disassemble the cable cover, gently slide off the cable cover from the back cover of the monitor. You must prevent it from breaking the snaps on the cable cover.
To disassemble the cable cover from the back cover of the monitor:
Using your thumbs, apply gentle pressure on the cable cover to horizontally slide it off from the monitor. (See Figure 13.)
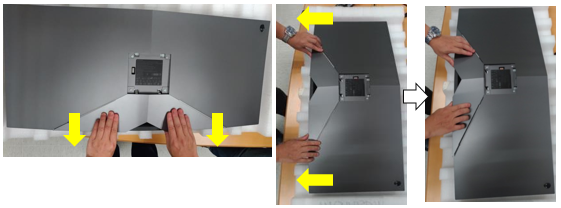
Figure 13. - Cable cover removal
NOTE: Do not pull on the cable cover directly. Otherwise, it may damage the cable cover. (See Figure 14.)
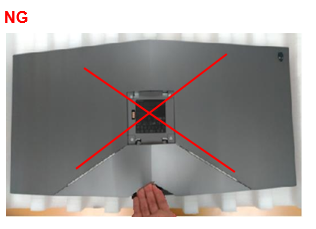
Figure 14. - Incorrect cable cover removal
Nvidia G-SYNC setup requirements
The AW3418DW and AW3418HW monitors contain a G-SYNC module for gaming at high refresh rates. See the hardware requirements below to configure your G-SYNC monitor.
G-SYNC minimum system requirements Desktop:
- GPU: NVIDIA GeForce GTX 650 Ti BOOST GPU or higher
- Driver: R340.52 or higher
- Operating System: Windows 10, Windows 8.1, Windows 8, or Windows 7
- It must support DisplayPort 1.2 directly from the GPU
NOTE: Go to NVIDIA's official website to find out whether your NVIDIA graphics card supports the G-SYNC feature.
NVIDIA G-SYNC MONITORS FREQUENTLY ASKED QUESTIONS (FAQs):
How to enable G-SYNC on your computer:
- Right-click the Windows desktop and select "NVIDIA Control Panel" or launch the "NVIDIA Control Panel" application from your Start menu.
- Select "Display" from the links on the left and choose "Set up G-SYNC."
- Check the box titled "Enable G-SYNC."
- Click "Apply." (See Figure 15.)

Figure 15. - G-Sync setup steps - Select "Set up Multiple Displays" from the links on the left.
- Set the "AW3418DW" or "AW3418HW " as the primary display.
- Click "Apply." (See Figure 16.)
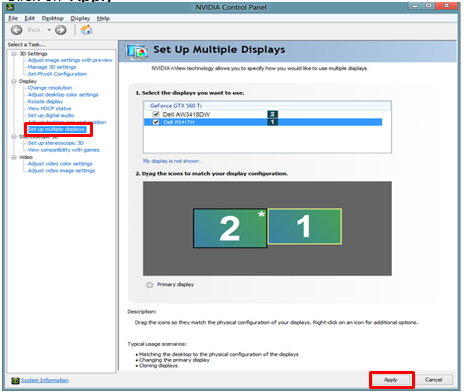
Figure 16. - Multiple Display Configuration - Select "Manage 3D settings" from the links on the left.
- Set Monitor Technology to "G-SYNC." (See Figure 17.)

Figure 17. - Managing 3D settings for G-Sync
AW3418HW and AW3418DW High-frequency noise (flicker) issue
Overclock support is mainly for motion display (Games and Videos).
High - Frequency Noise (Flicker) may be seen when Overclock is enabled. This symptom disappears when Overclocking is disabled.
How to check if Overclocking is turned on:
- Press on "Menu Key"(No.5) to launch the following information on-screen.
- Check "Overclock" shows "On" or "Off. " (See Figure 18.)

Figure 18. - Enabling Overclock option
How to disable Overclocking:
- Enter OSD menu->Select "Game"=>Select "Overclock" =>Switch from "On" to "Off"
Light leakage on four corners of the screen
The AW3418DW and AW3418HW monitors have a curved screen. Due to this design, the optimal viewing position should be at the center of the screen.
Light Leakage Testing:
- Light leakage inspections should not be performed in dark rooms.
- All Dell monitors are inspected per industry standard, which is with 70-lux ambient lighting (similar to typical office lighting) and the pattern of 16-Gray levels. (Any visual inspection should be done in the same manner.)
- Due to the screen curvature, some corners of the screen may appear yellowish or pinkish especially when displaying a dark image in a dark room. This is normal monitor behavior for a curved screen and typically does not affect overall viewing performance
Workaround:
- Inspect the condition of the monitor.
- Perform the monitor inspection of the monitor in a normally lighted (not dark) room
- Small light leakage at the corners is normal and should not affect the viewing experience under normal lighting conditions. (See Figure 19.)
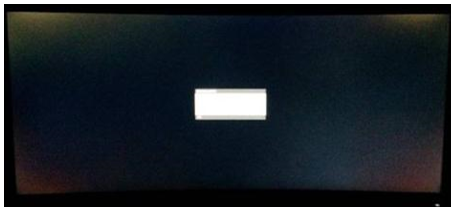
Figure 19. - Light leakage in display corners
NOTE: This is the technical performance and limitation for curved monitors.
The monitor does not wake when the monitor is set to sleep mode
You may encounter a situation where the AW3418DW/AW3418HW display does not wake using either keyboard or mouse input after the display enters the sleep mode. Powering off, then powering on the display resolves the issue until the monitor sleeps again.
The Nvidia G-sync module within the AW3418DW or AW3418HW display is turned off after the monitor enters sleep mode. This is in order to meet the power consumption of 0.5 W in sleep mode. This state ignores the mouse movement.
There is no issue when the computer is set for sleep mode. Both computer and monitor wakes from sleep with Mouse movement.
Recommended Solution:
- Press any front panel button on the monitor once and the monitor recovers from sleep.
- Power cycling the monitor allows the monitor to wake from sleep.
Article Properties
Affected Product
Alienware 34 Monitor AW3418DW, Alienware 34 Monitor AW3418HW
Last Published Date
08 Sep 2023
Version
4
Article Type
Solution