


This post is more than 5 years old
41 Posts
2
17105
XPS 8900 CPU cooler upgrade - much quieter and cooler operation
I upgraded my GPU recently and noticed that my CPU fan was making more noise than I remembered - sort of a droning noise. I checked my CPU temps and discovered that, at idle, the CPU was hitting 38-42C.
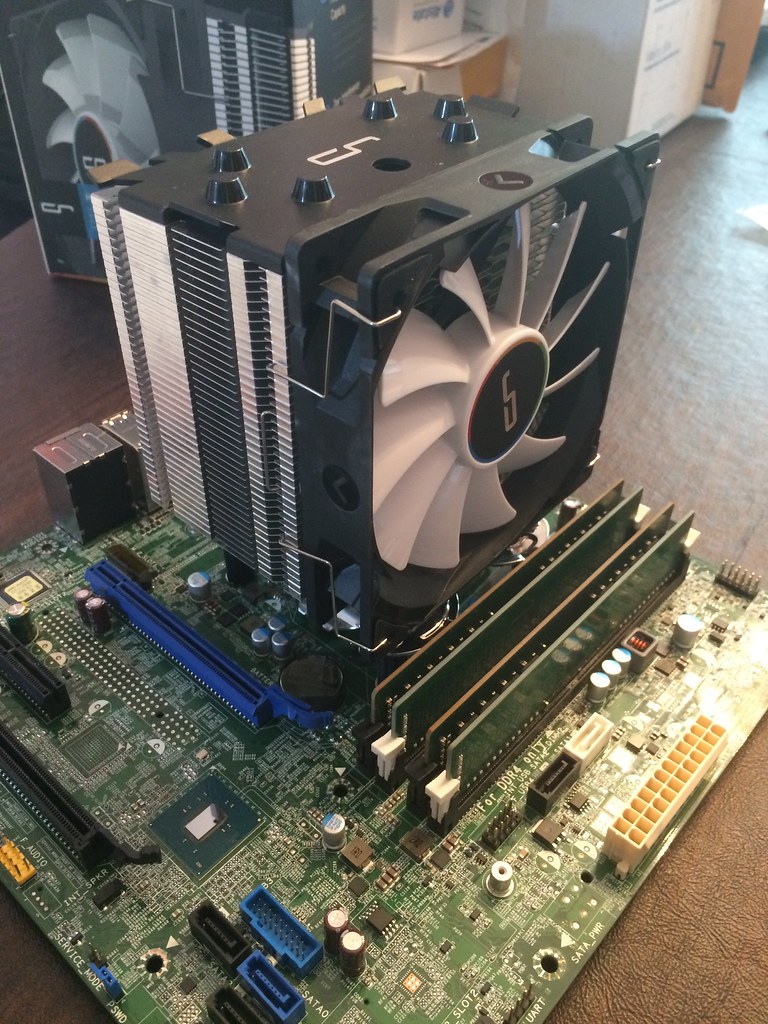
I decided to upgrade my cooling. The main limitation (besides the fact that Dell has a non-standard CPU backplate setup) is the somewhat narrow case on the XPS 8900 doesn't allow installation of most of the inexpensive high-performance coolers because they are too tall by 1/2" - 3/4". Then I found the Cyrorig H7, which has three heat pipes, a huge heatsink, and 120mm fan all in a package that is "only" 145mm high - just short enough to fit in the case. I installed it yesterday and it works GREAT. Very happy with it, initially at least.
I also swapped out the stock Sunon case fan for a Cooler Master Blade Master 92mm fan, which is quieter but similar CFM specs.
Overall the computer is now quieter at 100% load than it was at idle before. And my CPU temps have dropped by 15 degrees C. Great upgrade. I made a video on how I did it here:
...and here are a couple of pics:

JarrodSmith
41 Posts
0
October 5th, 2016 21:00
The 8900 does not have any control or reporting on the fan headers via BIOS, but I think the Dell diagnostics has a section for testing it. I also happen to know that if you unplug or obstruct the cpu or case fans while the system is running, next time the machine boots it will first run a diagnostic on both fans after POST, and before booting the OS.
Someone asked about my temps with a busy GPU: If I let the Heaven benchmark run alone for awhile, everything maxxed out, I see average CPU temps in the mid 40s, max CPU temps in the low 50s, and GPU temps of around 70C. The GPU is overclocked to 2GHz and the VRAM to 4GHz. I'm more or less elated with this. Screenie of the Heaven score attached.
To really tax it, I let both prime95 and the Heaven benchmark run for around an hour, simultaneously. GPU temps are hovering around 70-74, average CPU temps of 58-62C, and max CPU temps of 68-70C. The computer is only gently humming. I am claiming success, but still plan to take it two steps further with the new PSU (plan to run it in "eco" mode so the PSU fan won't run unless the system is drawing a good bit of current) and temperature-controlled intake fan.
HanoverB
798 Posts
0
October 5th, 2016 22:00
Thanks guys for the bios info regarding the fan profiles and sharing your results and mods.
Creamiepie
53 Posts
0
October 6th, 2016 01:00
All of my fans stop when it goes to sleep. I still think having your own speed controller on the fans is the best way to control the temp inside the case. Maybe you can do what I did and have the exhaust on a fan controller and have one of the intake with the sensor or just buy 2 noctua fans and use it as intake and exhaust. The problem I found is that there are very limited high cfm 90mm fans that you can buy if you are planning of replacing the stock exhaust and dont want any case modifications. For me if I need to cut a piece of metal out of the case to fit fans and such it is time to change the case.
With the new cards coming out and knowing I have tamed a hot 980ti with my setup I think the 8900 will be sitting for a loongg time on my desk before I change it. The next thing I want to do is get my hands on some 16 gig ddr4s and have 64gig of ram on the machine. I think this was confirmed by someone here and I think I read it somewhere on the web.
HanoverB
798 Posts
0
October 6th, 2016 10:00
I agree with Creampie on this as well in regards to focusing more on better control of the exhaust fan. The heat that builds up in these cases is because the hot air isn't vented efficiently.
As the case heats up from the system under load, in addition to the warm air from the GPU (especially if you have a fan design which blows warm air back into the case), heat builds up in the XPS case due to a couple of factors:
1) the design of the case and poor air circulation
2) conservative fan curve on the 3 pin header that controls the rear exhaust fan.
To help 1) the case design problem, adding a front intake fan automatically helps circulation by adding airflow into the case. This helps temps right away by aiding the pressure gradient. Any fan in that location helps because you are improving airflow. But typically a large fan that moves a lot of air will give you better results especially when you consider temp/noise ratios.
You will get likely get a 3-4 degree reduction in temps. A small fan turning high RPM's might get you an additional 1 -2 degrees, but the noise from that fan will be an issue. I can tell you from personal experience that a noisy fan in that front location is really annoying........hence Creampies suggesting putting a quieter Noctua fan in that location is a good idea. Corsairs Quiet AF fans are good there as well if you can go 120mm or even 140mm... you will get more air moving into the case as well.. It can be done without cutting into the case, or go for it like DanH has.
To help 2) the conservative fan curve of the 3 pin header, you take the rear exhaust fan off it. That fan curve is pretty conservative and it doesn't kick in soon enough once the system is under load and the hot air builds up in the case and it's the runaway train effect. Temps just get out of hand.
So putting a fan under a controller like Creamiepie suggests, or perhaps the fan you intended to use in the front in that location with a thermal sensor will help. If you dont want a controller, I would simply put a Noctua 3 pin fan in that exhaust location running at a fixed 1200-1600 RPM (depending on your noise tolerance) and powered by a 12v molex from your PSU. Now you have a fan that will be continuously pulling hot air out of the case preventing that situation that arises due to the conservative fan curve from using the 3 pin header.
Those Noctua fans come with a Low Noise Adapter so you can change speeds if you want to. I like the Noctua NF-A9 using the LNA at 1250 RPM fan at that location. Or you can use a controller as it is rated up to 1600 RPM.
Now Creampie mentioned fooling the 3 pin header. You have that problem because there is no fan connected to it in this fan modification. You bypass that problem by putting the front intake fan on that header as he suggests. You want that fan turning low RPM's and with an airflow type fan, pushing as much air as possible, as quiet as possible. That 3 pin header is perfect for that.
DanH also mentioned removing the rear tabs as well. I know you have a sound card there, but that would help if you were able to.
If you are running 1920 x 1080 you will probably not have any of these problems as your temps are great. I might just add a intake fan just to improve airflow. Maybe just swap those two fans you are changing out and put the temp control fan as exhaust?
These are just some suggestions if you step up to 4K or 21:9 resolutions, especially 3440 x 1440. Those additional pixels create havoc when gaming, but the extra real estate is real nice just for day to day work as well. Thinking you will see some of these higher end 34" displays sub $500 as BF rolls around.
Note: I personally haven't played around with the XPS 8700/XPS 8900. Before you change fans on the headers I would run a program like HWinfo to see how those motherboard fan headers perform under load. I am assuming that the bios control of the fans on those machines are similiar to the XPS 8500. That 3 pin header on the XPS 8500 runs that exhaust fan from 900-1200 RPM. Problem is it really doesn't increase the fan speed quickly enough to 1200 RPM under load which creates the heat issues in the XPS 8500.
Perhaps the XPS 8700 and XPS 8900 bios fan curves are better. Check that out first if you do further fan mods down the road as that will certainly affect the info shared here.
Dan-H
1.2K Posts
0
November 6th, 2016 20:00
EDIT: It turns out there was a video posted here and I didn't see it.
http://en.community.dell.com/support-forums/desktop/f/3514/t/19993539
I tripped across this video where a Cryorig H7 was added to an XPS 8900 and thought I'd share. I did not think it would fit, and the video shows an innovative way to work around the screws in the backing mount.
Dan-H
1.2K Posts
0
November 6th, 2016 20:00
I want to also add ( and Mods, please delete if this is not OK) that the H7 is on sale for $30 at new egg, which is a heck of a deal.
I ordered two and intend to upgrade the cpu cooler / fan in the two 8700s that are used for gaming.
I'll post some pics when they are installed.
edit: I'll post my pics in the original thread here:
http://en.community.dell.com/support-forums/desktop/f/3514/t/19993539
Rochii
1 Message
0
November 13th, 2016 20:00
I have the 8700, and wish I had found this while I was making modifications to my system. I was changing out the case, and was going to put a new fan after doing so. Wasn't until I realize dell had their own backplate on the motherboard. Thought all hope was lost, so I just left the stock heat sinker/cooler. But what you show is not only removing, but modifying the back plate! I just had a question before I did it for myself and installed the Hyper Cooler Master 212 Evo. After removing the, what i guess is screws, from the backplate would I be able to use the LGA 1150 screws provided with the cooler? Obviously, nothing would be blocking it. Just want to be certain. Thanks for the video, really made me happy.
Dan-H
1.2K Posts
0
April 8th, 2017 10:00
The video is spot-on. Thanks for posting it.
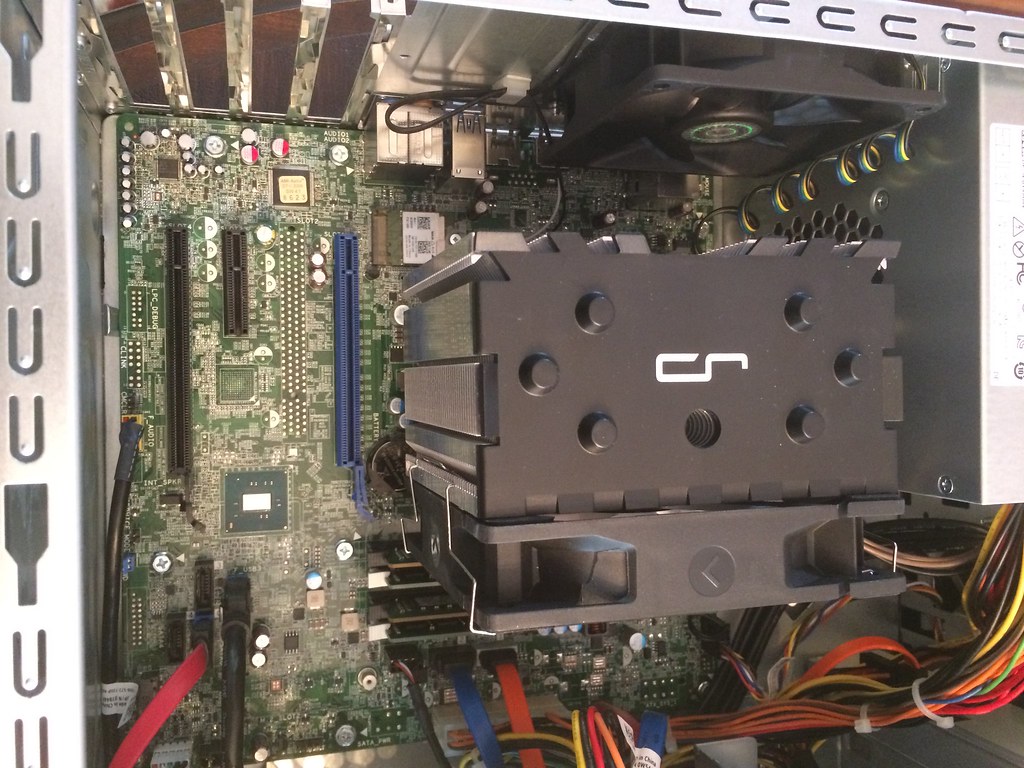
I finally got around to mounting an H7 in two of our XPS 8700s. Here is one of the systems with H7 and the other cooling mods to get the temps reasonable.
Case exhaust fan is a noctua NF B9, which comes with a Y connector powering the 120mm front fan.
PCI blanks below the graphics card are removed providing an easy exit path for the heated air from the graphics card.
The hard drive is in the HD2 position. The HD bay has been removed completely. A 2.5" SSD is in the second optical bay,
Cable routing is a rats nest, even with a modular PSU. There are just no good ways to cleanly route the cables.
CPU temps under stress testing resulted in a 15C drop. This was combined CPU and GPU stress tests that generate a lot of heat in the case. After an hour CPU temps remained in the mid-high 50C range vs bumping up into the high 60C / low 70C range during heavy gaming.
Overall a fantastic upgrade and I very much appreciate the video.
Dan-H
1.2K Posts
0
May 18th, 2017 13:00
this link may get moderated. it is to the eBay search page for PCI 6+6 pin to single 8 pin power adapter.
www.ebay.com/.../i.html
soroka69
18 Posts
0
June 1st, 2017 18:00
This is the picture the Dell with high performance heat sink
1 Attachment
Dell XPS 8900.jpg
memlay
1 Message
0
September 3rd, 2017 10:00
Thank you. This saved me the trouble of purchasing a cooler that would not fit the case.