Article Number: 000160908
How to Mount and Unmount the driver packs using iDRAC9
Summary: How to mount or unmount the driver packs using iDRAC9 to install or deploy the operating system on a Dell PowerEdge Server.
Article Content
Instructions
The following article provides information about mounting and unmounting driver packs using iDRAC9 on a Dell PowerEdge Server.
Table of Contents:
Mounting and Unmounting drivers
When Installing or Deploying an Operating System (OS) on a Dell PowerEdge Server, addition hardware drivers are required for the Operating system to be installed. The drivers for a specific OS can be extracted on-demand into a dynamic USB partition with the volume label "OEMDRV." The OS installer consumes the drivers from the OEMDRV partition at the time of OS installation. This gives the operating system all the required drivers that are required to complete the install. Reducing the number of devices requiring additional drivers after the install. Once you have completed the install, the OEMDRV partition can be unmounted after use.
This is a one of many alternative methods of installing the operating system. Example: PXE booting multiple servers, the Dell Drivers are provided to the operating system during install and you are not required to enter the LifeCycle controller for each system.
Driver pack supported Operating systems
- Windows Server 2019
- Windows Server 2016
- Windows Server 2012 R2
- Red Hat Enterprise Linux 6.10 x64
- Red Hat Enterprise Linux 7.6 x64
- SuSE Enterprise Linux 15 x64
- For VMware, see SLN288152 to download customized VMware that includes drivers.
Prerequisite
iDRAC9 Firmware 3.30.30.30 or greater and the Dell OS Driver Pack are required.
The Dell OS Driver Pack this is preinstalled to the Motherboard flash memory if you bought the operating system with your server. If the Operating system was not part of the order, you can add it.
Download the iDRAC9 Firmware 3.30.30.30 or later.
- Access to the Support Site, enter the service tag of your system or click Browse all products and select your product.
- Click DRIVERS and DOWNLOADS tab then in the Category select iDRAC with Lifecycle Controller. Download the latest iDRAC update then upload to the iDRAC's update and roll back section.
Download the Dell OS Driver Pack Downloaded from Support Site. -
- Access to the Support Site, enter the service tag of your system or click Browse all products and select your product.
- Click DRIVERS and DOWNLOADS tab "Dell OS Driver Pack" in the keyword box. Dell OS Driver Pack Download the latest iDRAC update then upload to the iDRAC's update and roll back section.
 Note: When the driver pack is mounted, the LifeCycle Controller is not available during post for firmware updates.
*The system shows LifeCycle Controller not available on post.
* iDRAC shows SUP018: A Firmware update operation is already in progress. Wait for the update operating to conclude then retry.
Unmount drivers pack after the operating system has been installed to return the LifeCycle Controller to normal operation.
 Note: If the operating system has already been installed, you can also mount the drivers from the iDRAC to expose OEMDRV partition to the operating system. Then within the operating system, you can search for new drivers. This searches the local hard drive and also the OEMDRV partition.
Mount or Unmount Drivers using iDRAC9 UI
- Log in to the Server's iDRAC. Go to 1.Configuration > 2.Virtual Media > 3.Mount Drivers
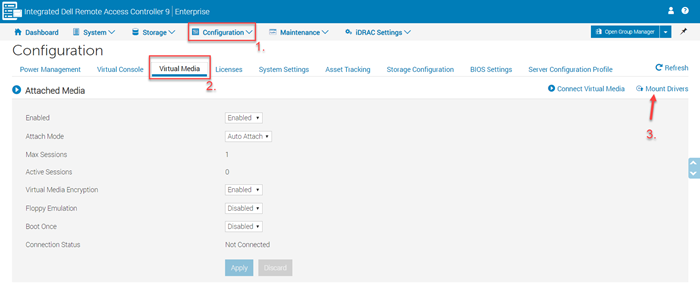
- Click the Mount Drivers button.
- The operating system can be selected from the drop-down box.
The Expose duration is 18 hours by default.

- Click Job Queue and wait until the job is 100% before booting to your operating system media using F12 > USB/DVD/PXE or Virtual Media.
- Install the operating system as normal, during the install the operating system installer consumes the drivers that are mounted.
Unmount Drivers using iDRAC
Go to 1.Configuration > 2. Virtual Media > 3. Unmount Drivers button is displayed if the drivers are already mounted.
Drivers should be unmounted after the operating system has been installed.
Mount or Unmount Drivers using RACADM
Mount Using Local or firmware RACADM.
- Determine what driver packs are available using local RACADM:
racadm driverpack getinfo
Or, using remote RACADM:
racadm –r (iDRAC IP) -u (USER) -p (PASSWORD) driverpack getinfo
The output of these commands gives you the driver pack and a number.
- Mount using local RACADM:
racadm driverpack attach –i <driver pack number>
Or, mount using remote RACADM:
racadm –r (iDRAC IP) -u (USER) -p (PASSWORD) driverpack attach –i <driver pack number>
- Unmount local RACADM or Firmware RACADM
racadm driverpack detach
Or, unmount using remote RACADM:
racadm –r <iDRAC IP> -u <USERNAME> -p <PASSWORD> driver pack detach
Article Properties
Affected Product
iDRAC9, PowerEdge R240, PowerEdge R340, PowerEdge R440, PowerEdge R540, PowerEdge R640, PowerEdge R6415, PowerEdge R740, PowerEdge R740XD, PowerEdge R740XD2, PowerEdge R7415, PowerEdge R7425, PowerEdge R840, PowerEdge R940, PowerEdge R940xa
Last Published Date
19 Nov 2021
Version
7
Article Type
How To