How to Use and Troubleshoot the Dell S2417DG Gaming Monitor
Summary: Learn how to setup and use Dell S2417DG Gaming monitor. Find troubleshooting instructions for common video or display issues.
Symptoms
Article Summary: This article provides information about How to use and troubleshoot your Dell S2417DG Gaming Monitor, troubleshooting steps to common issues related to monitors, overview of NVIDIA G-SYNC and other features and answers to some frequently asked questions.
Table of Contents:
- Key features
- Overview of NVIDIA G-SYNC and NVIDIA 3D Vision
- Specifications
- Setting up your monitor
- Dell LCD Monitor Pixel Guidelines
- Using the On-Screen Display (OSD) menu
- Reset to factory settings
- Troubleshooting
- Documentation
- Frequently Asked Questions - FAQ
Key Features
The Dell S2417DG is an NVIDIA 3D Vision Ready gaming monitor offering one of the best gaming display performance along with a list of features to match up with gamers' speed of reaction while displaying clear and undistorted images for the best gaming experience. The Dell S2417DG NVIDIA certified monitor is capable of the new NVIDIA 3D LightBoost™ technology to provide you with brighter and clearer 3D images. You can use an NVIDIA 3D kit to enable stereoscopic vision for 3D games and movies. Some of the key features of this monitor are:
- NVIDIA G-Sync-enabled and NVIDIA 3D Vision Ready monitor, with a high refresh rate of 144 Hz (165Hz with overclock) and a rapid response time of 1 ms.
- Resolution: Up to 2560 x 1440 through DisplayPort and HDMI, with full-screen support or lower resolutions
- Tilt, Swivel, Pivot, Height Adjustment capability
- Removable stand and VESA 100mm mounting holes for flexible mounting solutions
- Digital connectivity with DisplayPort and HDMI
- Equipped with one USB upstream port and four USB downstream ports
- Analog backlight dimming control for flicker-free display
- The color modes also offer different game modes, including First-Person Shooter (FPS), Real-Time Strategy (RTS), and Role-Playing Game (RPG).
Overview of NVIDIA G-SYNC and NVIDIA 3D Vision
NVIDIA G-SYNC
NVIDIA G-SYNC is a groundbreaking new display technology that delivers the smoothest gaming experience ever. G-SYNC’s revolutionary smoothness is achieved by synchronizing display refresh rates to the GPU in your GeForce GTX-powered desktop or laptop, eliminating screen tearing and minimizing display stutter and input lag.
NVIDIA G-SYNC System Requirements
| Desktop Computer | Notebook Computer | |
|---|---|---|
| GPU | G-SYNC features require an NVIDIA GeForce GTX 650 Ti BOOST GPU or higher. | NVIDIA GeForce GTX 980M, GTX 970M, or GTX 965M, SLI configurations are also supported. |
| GPU Driver Version | R340.52 or higher | R352.06 or higher |
| System Requirement | DisplayPort 1.2 directly from GPU | |
| Operating System | Windows 10, Windows 8.1, Windows 8, or Windows 7 | |
 For a complete list of supported GPUs, go to
  website.
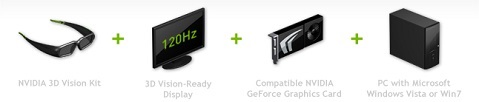
NVIDIA 3D Vision
NVIDIA 3D Vision® technology delivers stereoscopic 3D images for gamers, movie-lovers, and photo enthusiasts when configured with NVIDIA GPUs, NVIDIA 3D Vision active shutter glasses, and 3D Vision-Ready display projector. Dell S2417DG monitor comes with the new NVIDIA 3D LightBoost™ technology to provide you with brighter and clearer 3D images.
NVIDIA 3D Vision requires the following:
- NVIDIA 3D Vision Kit
- 3D Vision Ready display (Dell S2417DG monitor)
- Compatible with NVIDIA GeForce graphics video card
- Personal computer with Microsoft Windows 10, Windows 8.1, Windows 8, Windows 7, or Windows Vista
Minimum System Requirements
- Microsoft Windows Vista, Windows 7, Windows 8/Windows 8.1, or Windows 10 32/64-bit
- Intel Core 2 Duo or AMD Athlon X2 CPU or higher
- 1GB of system memory (2GB is recommended)
- 100 MB free hard disk space
For a comprehensive list of NVIDIA G-SYNC supported Video Cards (GPU) see the NVIDIA website .
.
Specifications
This section provides some specifications of the Dell S2417DG Gaming Monitor. For more information about the Dell S2417DG Gaming Monitor, see the User Guide at the Dell Support website.
| Feature | Dell S2417DG |
|---|---|
| Maximum Resolution | 2560 x 1440 at 144 Hz |
| Luminance Output | 350 cd/m² (typical) |
| Contrast Ratio | 1000 to 1 (typical) |
| Video Input Connectors | HDMI 1.4 DisplayPort 1.2 |
| Screen Type | Active Matrix - TFT LCD |
| Video Display Capabilities | 480p, 576p, 720p, 1080p, 480i, 576i, 1080i, QHD |
Setting Up Your Monitor
This section provides information about How to Set up Your Monitor.
- Attaching the Stand - see the Setting Up The Monitor section in the User's Guide on Connecting the Stand to your Dell S2417DG Monitor.
- Connecting the Monitor - see the Dell knowledge-base article How to Connect a Monitor to a Dell Computer for more information. Alternatively, you can also see the Setting Up The Monitor in the User's Guide for your Dell S2417DG Monitor.
Dell LCD Monitor Pixel Guidelines
For more information, see Dell LCD Monitor Pixel Guidelines knowledge-base article.
Using the On-Screen Display (OSD) Menu
For more information about Using the On-Screen Display (OSD) Menu, see the Operating Your Monitor section in the User Guide for Dell S2417DG Gaming Monitor.
Reset to Factory Settings
To reset your Dell S2417DG Monitor to Factory Settings, follow these instructions:
- Press Button 3 (Figure 1) on the monitor to enter the On-Screen Display (OSD) Menu.
- Press Button 1 or Button 2 to highlight Others option in the menu and press Button 3 to select.
- Press Button 1 or Button 2 to highlight Factory Reset option in the menu and press Button 3 to select.
- Press Button 3 to confirm the reset action.
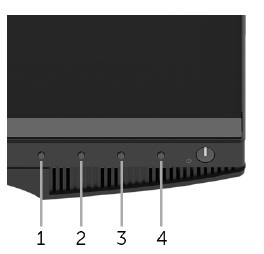
Figure 1: Front Panel Buttons
Back to Top
Troubleshooting
Your monitor provides a self-test feature that allows you to check whether the monitor is functioning properly. If the monitor and computer are properly connected but the monitor screen remains dark, run the monitor self-test by performing the following steps:
- Turn off both your computer and the monitor.
- Unplug the video cable from the back of the computer. To ensure proper Self-Test operation, remove all digital cables (DVI, HDMI, or DisplayPort) from the back of the computer.
- Turn on the monitor.
- Turn off your monitor and reconnect the video cable, then turn on both your computer and the monitor.
If your monitor screen remains blank after you use the previous procedure, check your video card (GPU) and computer, because your monitor is functioning properly.
Your monitor has an integrated diagnostic tool that helps to determine if the screen abnormality you are experiencing is a problem with the monitor or with the video card on your computer.
 You can run the integrated diagnostics only when the video cable is unplugged and the monitor is in Self-Test mode.
- Ensure that the screen is clean (no dust particles on the surface of the screen).
- Unplug the video cables from the back of the computer or the monitor. The monitor now enters self-test mode.
- On the front panel, press and hold Button 1 and Button 4 simultaneously for two seconds. A gray screen appears.
- Carefully inspect the screen for abnormalities.
- Press Button 4 on the front panel again. The color of the screen changes to red.
- Inspect the display for any abnormalities.
- Repeat step 5 and step 6 to inspect the display in green, blue, black, white and text screens.
- The test is completed when the white screen appears.
- Press Button 4 to exit the Built-In diagnostics.
 If you do not detect any screen abnormalities upon using the integrated diagnostic tool, the monitor is functioning properly. Check the video card (GPU) and the computer.
Disable the Monitor Deep Sleep mode if you notice any of the two scenarios mentioned below. Follow the instructions mentioned to 'Disable the Monitor Deep Sleep Mode.
Scenario 1
Your Dell S2417DG Monitor may appear to flash while in DC Off mode when connected to Chromebook. Chromebooks automatically enter sleep mode if the device is left unused for more than 5-6 minutes.
Scenario 2
Your Dell S2417DG Monitor resets to an incorrect resolution of 640 x 480 when connected using a DisplayPort cable. This issue may occur even after reseating the DisplayPort cable multiple times.
Disable the Monitor Deep Sleep Mode by following these steps:
- Press Button 3 to enter the On-Screen Display (OSD) Menu.
- Use Button 1 or Button 2 and highlight Others. Press Button 3 to select the option.
- Select Monitor Deep Sleep (Figure 2) option and Press Button 3 to Disable.
 Pressing any button (except the Power button) on the front panel of your Dell S2417DG Monitor may also wake up the monitor after it goes into deep sleep.

Figure 2: Monitor Deep Sleep Mode in the On-Screen Display (OSD) Menu.
Your Dell S2417DG Monitor may enter 'Power Save Mode' when you try to run the Self-Test.
The Dell S2417DG Monitor does not support Self-Test Feature Check (STFC). When the monitor does not detect any signal, it displays the message "Enter Power Save Mode" for 15 seconds and then goes into Deep Sleep Mode.
You can try to wake up the monitor by moving the mouse or pressing any key on your keyboard.
It is recommended to use the DisplayPort cable (1.8m) that was shipped with the monitor. Longer DisplayPort cables may cause the monitor to display a blank screen.
You may notice that the Dell S2417DG monitor entering sleep mode when connected to a Dell docking station (DA100, D3100, or MKS14).
To resolve this issue, change the screen resolution settings on the personal computer to 1920 x 1080. To change the screen resolution on your personal computer.
In Windows 7, Windows 8 and Windows 8.1:
- For Windows 8 and Windows 8.1 only, select the Desktop tile to switch to the classic desktop view.
- Right-click the desktop and click Screen Resolution.
- Click the dropdown list of the Screen Resolution and select 1920 x 1080.
- Click OK
In Windows 10:
- Right-click the desktop and click Display Settings.
- Under Customize your display window, scroll to the bottom and click Advanced display settings.
- Click the dropdown list next to Resolution and select 1920 x 1080.
- Click Apply.
The Dell S2417DG monitor may not be able to display at an optimal resolution when connected to a personal computer with an AMD graphics video card.
To resolve this issue, disconnect the display cable (HDMI or DisplayPort cable) and reconnect the cable to the monitor.
| Common Problem | What User Experiences | Possible Solution |
|---|---|---|
| No Video - Power LED Off | No picture |
|
| No Video - Power LED On | No picture or no brightness |
|
| Poor Focus | The picture is fuzzy, blurry, or ghosting. |
|
| Shaky or Jittery Video | Wavy picture or fine movement |
|
| Missing Pixels | LCD screen has spots. |
|
| Stuck-On/Off Pixels | LCD screen has bright spots. |
|
| Brightness Problems | Picture too dim or too bright. |
|
| Geometric Distortion | The screen not centered correctly. |
 When using DisplayPort input, the positioning adjustments are not available. When using DisplayPort input, the positioning adjustments are not available.
|
| Horizontal or Vertical Lines | The screen has one or more lines. |
 When using DisplayPort input, the positioning adjustments are not available. When using DisplayPort input, the positioning adjustments are not available.
|
| Synchronization Problems | The screen is scrambled or appears torn. |
|
| Safety-Related Issues | Visible signs of smoke or sparks |
|
| Intermittent Problems | The monitor malfunctions on and off. |
|
| Missing Color | The picture does not have color. |
|
| Wrong Color | Picture color is not good. |
|
| Image Retention from a Static Image Left on the Monitor for a Long Period | A faint shadow from the static image appears on the screen. |
|
| Specific Symptoms | What User Experiences | Possible Solution |
|---|---|---|
| USB interface is not working. | USB peripherals are not working. |
|
| High-Speed USB 3.0 interface is slow. | High-Speed USB 3.0 peripherals working slowly or not working at all |
|
| Wireless USB peripherals stop working when a USB 3.0 device is plugged in. | Wireless USB peripherals responding slowly or only working as the distance between itself and its receiver decreases |
|
Documentation
To view or download the User's Guide or Manuals for your Dell S2417DG Monitor, follow these instructions:
- Go to the Dell Manuals website.
- Click the View Products button under Browse for a Product.
- Select Monitors and Projectors and then Select Monitors.
- From the list, click Dell S2417DG Monitor.
- Click PDF next to the required document.
- Click More Languages to view the list of available language options.
- Click PDF next to the preferred choice of language.
Frequently Asked Questions
NVIDIA G-SYNC is a groundbreaking new display technology that delivers the smoothest gaming experience ever. G-SYNC’s revolutionary smoothness is achieved by synchronizing display refresh rates to the GPU in your GeForce GTX-powered desktop or laptop, eliminating screen tearing (Figure 3) and minimizing display stutter and input lag. The result: scenes appear instantly, objects look sharper, and gameplay is super smooth, giving you a stunning visual experience and a serious competitive edge.
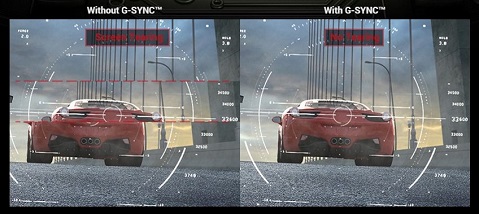
Figure 3: Without G-SYNC V/s With G-SYNC
NVIDIA 3D Vision® technology delivers stereoscopic 3D images for gamers, movie-lovers, and photo enthusiasts when configured with NVIDIA GPUs, NVIDIA 3D Vision active shutter glasses, and 3D Vision-Ready display or projector.
Minimum Requirements
- Microsoft Windows Vista, Windows 7, Windows 8/Windows 8.1, or Windows 10 32/64-bit
- Intel Core 2 Duo or AMD Athlon X2 CPU or higher
- 1GB of system memory (2GB is recommended)
- 100 MB free hard disk space
For a comprehensive list of NVIDIA G-SYNC supported Video Cards (GPU) see the NVIDIA website .
.
- Compatible Video Card (GPU) which supports NVIDIA G-SYNC technology.
- Install the latest Video Card drivers. See System Requirements for NVIDIA G-SYNC for more information.
- Enable the G-SYNC feature in the NVIDIA Control Panel.
- Requires DisplayPort video input
 NVIDIA G-SYNC technology supports only DisplayPort video input. Using DVI to DisplayPort or HDMI to DisplayPort converters/adapters is not supported.
For a comprehensive list of NVIDIA G-SYNC supported Video Cards (GPU) see the NVIDIA website .
.
NVIDIA G-SYNC feature is automatically enabled on all supported computers. If it is not, you can manually enable to NVIDIA G-SYNC feature using the NVIDIA Control Panel by following these instructions:
- Ensure that the latest versions of NVIDIA GPU drivers are installed. If not, go to NVIDIA website to download and install the latest drivers for your graphics card.
- Right-click the Windows Desktop and select NVIDIA Control Panel.
- Select Display on the left pane and then choose Set Up G-SYNC.
- Check the box next to Enable G-SYNC (Figure 4).
- Select Set Up Multiple Displays on the left pane.
- Set the G-SYNC capable monitor as the primary display.
- Select Manage 3D Settings on the left pane.
- Under the Global Settings tab, locate Vertical Sync (Figure 5).
- Click the drop-down and select G-SYNC.

Figure 4: NVIDIA Control Panel

Figure 5: Vertical Sync
Ultra Low Motion Blurs (ULMB) feature on the Dell S2417DG Monitor helps have lesser motion blur by backlight effect while you are watching fast-moving images (Figure 6).
Video Card (GPU) installed should support the NVIDIA G-SYNC feature.
ULMB and NVIDIA G-SYNC feature cannot be enabled simultaneously. You can choose to eliminate screen tears or improve motion resolution but not both.
 This function is available when the refresh rate is set to 85Hz, 100Hz or 120Hz.
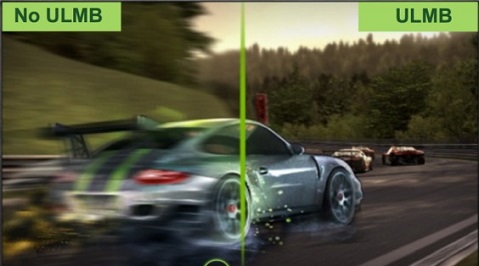
Figure 6: Without ULMB V/s With ULMB
| Main Function | Detail | Default Setting | |
|---|---|---|---|
| ULMB |
|
Uses backlight strobing to reduce motion blur. It is only available on refresh rates of 85Hz, 100Hz or 120Hz. |
|
| NVIDIA G-SYNC | Reduce Screen tearing and lag. | NVIDIA G-SYNC completely eliminates tearing, adding to the overall smoothness of gameplay. | NVIDIA G-SYNC is enabled by default. |
Disable NVIDIA G-SYNC using NVIDIA Control Panel.
- Right-click the desktop screen and select NVIDIA Control Panel in the menu.
- Click the + symbol next to Display.
- Click Set-up G-SYNC.
- Clear the box next to Enable G-SYNC.
Setup Ultra Low Motion Blur (ULMB) using the On-Screen Display (OSD) Menu
- Ensure that NVIDIA G-SYNC is disabled in the NVIDIA Control Panel.
- Press Button 3 on the Monitor. Use Button 1 or Button 2 and select Display in the menu.
- Use Button 1 or Button 2 to highlight ULMB (Figure 7).
- Press Button 3 to confirm the selection.
 Ultra Low Motion Blur is available only when the monitor refresh rate is 85Hz, 100Hz or 120Hz.
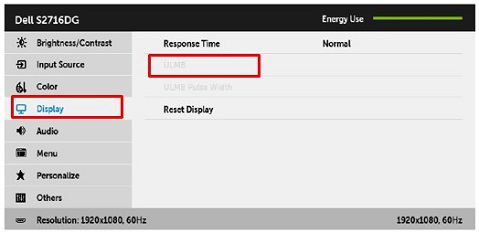
Figure 7: ULMB Mode in On-Screen Display (OSD) Menu
To verify the ULMB functionality on your Dell S2417DG Monitor, perform the following steps:
Requirement:
- Ensure that your computers Graphics Card (GPU) is compatible with NVIDIA G-SYNC.
- Ensure that the NVIDIA G-SYNC feature is disabled in the NVIDIA Control Panel.
- Verify if ULMB is enabled on the Dell S2417DG Monitor using the On-Screen Display (OSD) Menu.
Test ULMB functionality by following these steps:
- Step 1: Go to http://www.testufo.com/ website on your computer.
- Step 2: Enable and Disable the ULMB feature on your Dell S2417DG Monitor.
- Verify that the image is clear and not blurry as shown in Figure 8.
If the image is blurry, try to Disable and Enable the ULMB feature using the OSD Menu on your Dell S2417DG Monitor.

Figure 8: ULMB Test (Without ULMB V/s With ULMB)
- Ensure that your computer meets the NVIDIA G-SYNC System Requirements. See the NVIDIA G-SYNC section for more information.
- If required, download and install the latest NVIDIA Graphic Card drivers from the NVIDIA Drivers
 website.
 - Check if your Dell S2417DG Monitor is connected to your computer using the DisplayPort cable.
- Enable NVIDIA G-SYNC using NVIDIA Control Panel.
- Check the NVIDIA G-SYNC functionality using the Demo Test.
- Download the "Pendulum Demo" software from the NVIDIA G-SYNC
 website.
 - Check for G-SYNC functionality within the "Pendulum Demo." Different modes (V-Sync Off, V-Sync On, G-SYNC) are displayed (Figure 9).
- Click each mode to verify if they are working.
- The Pendulum Demo does not allow you to click G-SYNC if the NVIDIA G-SYNC feature is not working.
- Download the "Pendulum Demo" software from the NVIDIA G-SYNC

Figure 9: Pendulum Demo Test