XPS 8930 и Precision 3630: Громкий треск вентилятора при загрузке
Сводка: Информация о том, как устранить громкий шум вентилятора при загрузке XPS 9830 и Precision 3630.
Симптомы
В следующей статье представлена информация о том, как устранить громкий шум вентилятора при загрузке XPS 9830 и Precision 3630.
Издает ли вентилятор громкий шум при загрузке XPS 8930 в корпусе Tower или рабочей станции Precision 3630?
Сообщается, что при загрузке XPS 8930 или Precision 3630 из системы может быть слышен громкий дребезжащий шум.
Это может произойти, если 4-контактный кабель блока питания проложен неправильно, и четырехконтактный кабель питания создает физические помехи лопастям вентилятора корпуса.
Причина
Разрешение
Действия по устранению неполадок
Эту проблему можно устранить, просто переместив 4-контактный кабель блока питания в положение, при котором он не сможет взаимодействовать с вентилятором корпуса.
Дополнительную информацию можно найти по следующей ссылке:
- Руководство по техническому обслуживанию XPS 8930
- Руководство по техническому обслуживанию Precision 3630 в корпусе Tower
Следующие действия помогут подтвердить и исправить прокладку кабеля блока питания (руководства по рисункам можно найти в руководстве по обслуживанию).
-
Снимите боковую панель системы, поместив устройство с левой стороны лицевой частью к себе. Потяните фиксатор на левой стороне задней части корпуса. Правая крышка корпуса выдвигается, и ее можно поднять и снять с корпуса.
-
Чтобы рассмотреть внутренние компоненты системы, необходимо повернуть блок питания в сторону (в системах с блоком питания мощностью 95 Вт необходимо снять вентилятор и радиатор в сборе перед выполнением следующих инструкций).
-
В обеих системах блок питания установлен на шарнире. Положив систему на бок, найдите фиксатор под разъемом кабеля питания блока питания и фиксатор в правом верхнем углу задней панели ПК.
-
Сдвиньте оба переключателя фиксаторов влево и поднимите блок питания на шарнире в направлении передней части компьютера.
-
-
Убедитесь, что 4-контактный кабель блока питания проложен правильно.
-
Если он проложен правильно, перейдите по следующей ссылке:
-
Если кабель блока питания создает помехи для вентилятора корпуса, перейдите к следующему шагу.
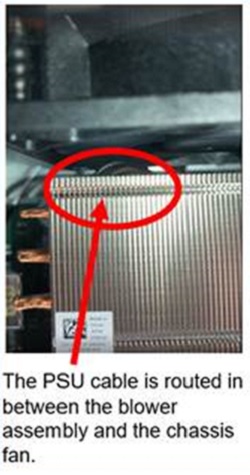
(Рис. 1 Кабель блока питания между вентилятором радиатора и вентилятором корпуса)
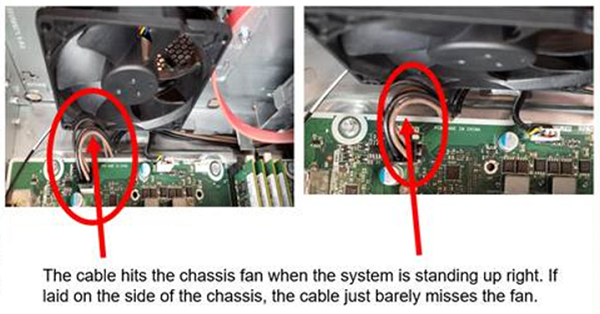
(Рис. 2. Кабель блока питания прижимает вентилятор корпуса)
-
-
С помощью зажима для большого пальца на боковой стороне 4-контактного кабеля блока питания отсоедините его и вернитесь к блоку питания.
-
Теперь необходимо проложить кабель, как показано на следующем рисунке. 4-контактный кабель блока питания проходит вдоль левого нижнего края корпуса вдоль левой стороны системной платы. Он прокладывается под вентилятором корпуса и возвращается в разъем на системной плате, из которого был извлечен.
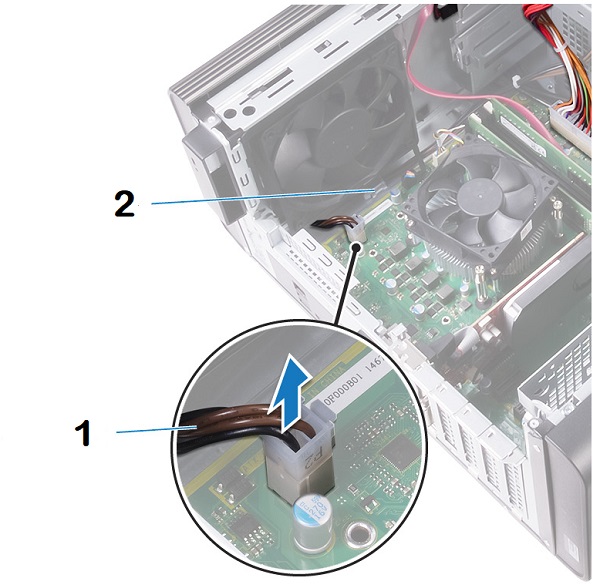
(Рис. 3 Правильная прокладка кабеля блока питания)
| Номер | Описание |
|---|---|
| 1 | 4-контактный кабель блока питания подключается в левом нижнем углу системной платы рядом с вентилятором корпуса. |
| 2 | Проложите кабель под вентилятором корпуса (если система оснащена зажимом и крюком, используйте их для фиксации кабеля). |
-
Поверните блок питания вниз до фиксации (Для системы мощностью 95 Вт на этом этапе необходимо заменить вентилятор и радиатор.) Возьмите правую боковую крышку и закрепите ее вдоль правого края корпуса, затем опустите ее вниз к левому краю. Нажмите на левый край, пока он не зафиксируется и не раздастся щелчок.
-
Поднимите компьютер и подключите кабель питания и периферийные устройства, а затем выполните загрузку. Шум исчезает?
-
Если это не произошло или вы не можете выполнить ни одно из этих действий, обратитесь в службу технической поддержки Dell для получения дальнейшей помощи в решении этой проблемы.
 Примечание. В системах, произведенных до июля 2019 года, под вентилятором корпуса нет удобного зажима и крючка, поэтому просто проложите кабель под вентилятором корпуса, не закрепляя его.