Réinstaller Windows à l’aide de l’image de récupération du système d’exploitation Dell
Résumé: Découvrez comment télécharger une image de récupération du système d’exploitation Dell à l’aide de l’outil de récupération OSISO et restaurer votre système d’exploitation Windows. Ceci est idéal pour des scénarios tels que des pannes d’ordinateur, des remplacements de disque dur ou d’autres problèmes logiciels. ...
Instructions
- Windows 11 prend uniquement en charge l’option Automated by SupportAssist.
- Dell Technologies recommande que les ordinateurs pris en charge utilisent Dell SupportAssist OS Recovery Automated by SupportAssist pour une expérience de récupération optimale. Consultez notre article Restauration de votre ordinateur à l’aide de SupportAssist OS Recovery pour obtenir des instructions sur la restauration. Pour obtenir la liste des ordinateurs prenant en charge SupportAssist OS Recovery, consultez la matrice de support de Dell SupportAssist OS Recovery.
Cet article Restauration ou réinstallation de Microsoft Windows sur un ordinateur Dell fournit d’autres options de restauration et de réinstallation pour réinitialiser ou réinstaller Windows 11 ou Windows 10 sur votre ordinateur Dell.
Si votre ordinateur ne prend pas en charge Dell SupportAssist OS Recovery, Dell fournit des images de récupération du système d’exploitation en ligne. Il s’agit de l’image Windows qui a été installée en usine sur votre ordinateur. L’outil Dell OS Recovery fournit une interface simple pour télécharger et créer rapidement un disque USB amorçable afin de réinstaller le système d’exploitation.
Éléments nécessaires :
- Numéro de série de l’ordinateur Dell sur lequel vous souhaitez installer le système d’exploitation
- Télécharger et installer l’outil Dell OS Recovery (pris en charge uniquement pour les systèmes d’exploitation Windows 11 ou Windows 10)
- Lecteur flash USB vide avec au moins 16 Go d’espace disponible
- Microsoft .NET Framework 4.8.1 ou version ultérieure
- Droits administrateur et au moins 16 Go d’espace de disque dur disponible pour télécharger l’image de récupération du système d’exploitation Dell
- Une connexion réseau filaire pour la stabilité du réseau (recommandé)
- Désactivez tout logiciel antivirus pendant le téléchargement (recommandé)
La personnalisation Dell de l’image de récupération du système d’exploitation inclut le système d’exploitation Windows et tous les pilotes de périphérique installés en usine pour cette plate-forme spécifique.
Utilisation de l’outil Dell OS Recovery pour créer un support de récupération USB sur un ordinateur Windows :
L’outil Dell OS Recovery vous aide à télécharger l’image de récupération du système d’exploitation personnalisée pour votre ordinateur Dell et à créer un support de récupération USB. L’outil Dell OS Recovery vous permet de télécharger l’image de récupération du système d’exploitation Microsoft Windows préinstallée sur votre ordinateur Dell.
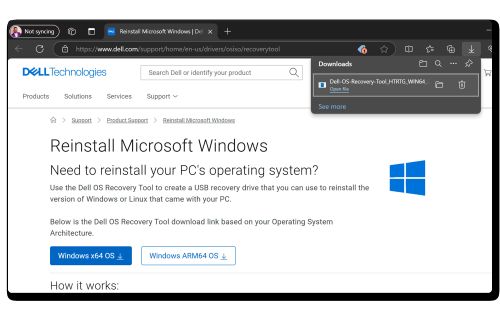
Téléchargez et installez Dell OS Recovery Tool.
- Accédez à la page Dell OS Recovery Tool .
- Choisissez la version X64 ou ARM64 en fonction de l’architecture de votre ordinateur et enregistrez le fichier dans le dossier Téléchargements .
- Double-cliquez sur le programme d’installation et suivez les instructions qui s’affichent à l’écran pour installer l’outil.
Création du support de récupération du système d'exploitation Dell
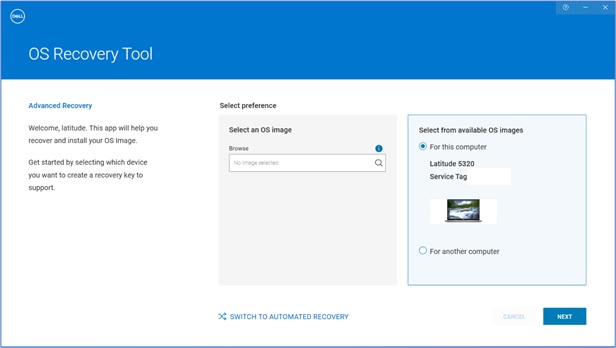
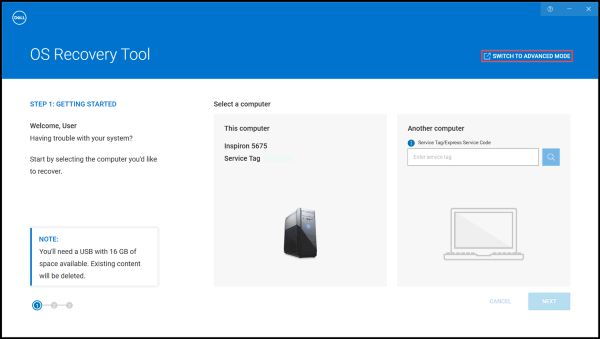
- Lancez l’application Dell OS Recovery Tool.
- Identifiez l’ordinateur nécessitant le support de récupération à l’aide du numéro de série.
- Si vous téléchargez l’image de récupération sur l’ordinateur Dell concerné, sélectionnez For this computer, puis cliquez sur NEXT et passez à l’étape 7 de cette section.
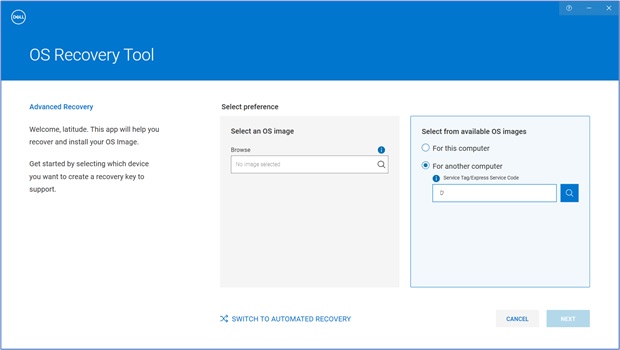
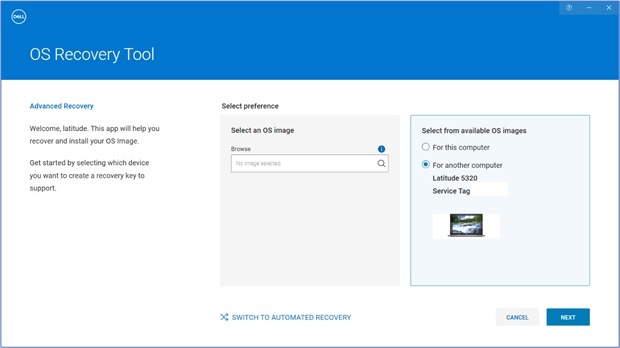
- Si vous utilisez un autre ordinateur en état de marche pour créer le support de récupération, choisissez Sélectionner pour un autre ordinateur, saisissez le numéro de série de l’ordinateur pour lequel vous souhaitez créer un support de récupération, puis cliquez sur l’icône Loupe pour rechercher l’identité de l’ordinateur.
Remarque : si le numéro de série de votre ordinateur Dell n’est pas reconnu, contactez le support technique Dell.
- Après avoir identifié l’ordinateur, cliquez sur SUIVANT.
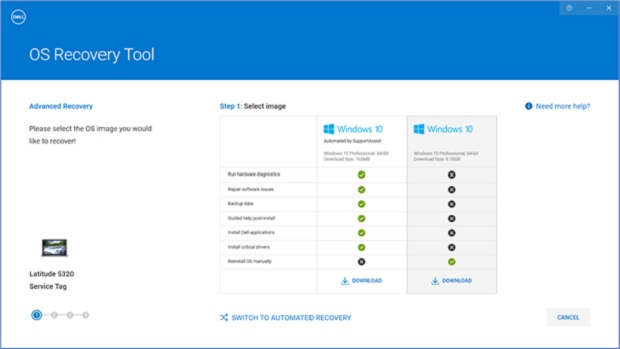
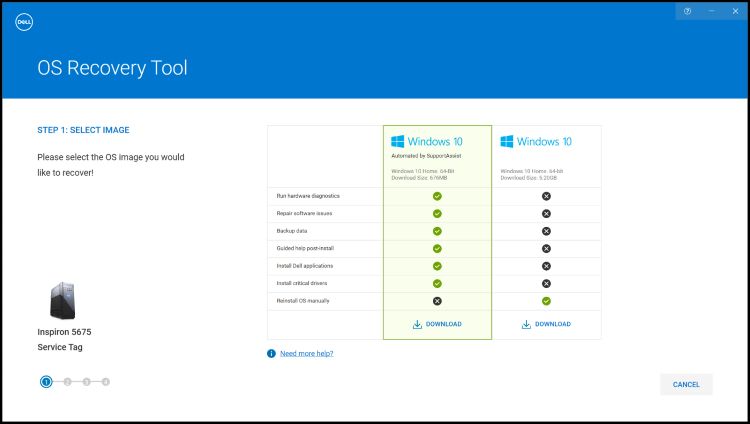
- Les images de récupération disponibles pour l’ordinateur s’affichent.
Remarque : L’outil Dell OS Recovery identifie le système d’exploitation d’origine préinstallé sur l’ordinateur Dell. L’outil Dell OS Recovery ne fournit pas de systèmes d’exploitation alternatifs à télécharger. L’image de récupération Automated by SupportAssist est sélectionnée par défaut.
- Sélectionnez l’image Non-Automated by SupportAssist, puis cliquez sur TÉLÉCHARGER.
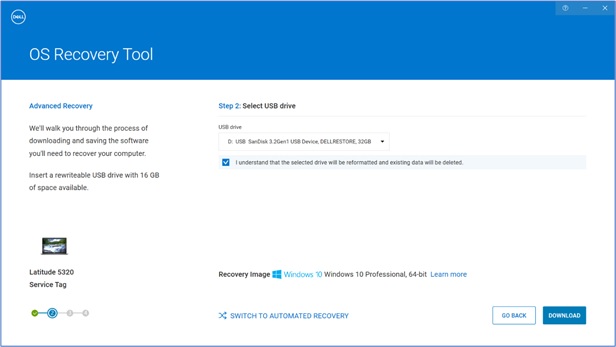
 Avertissement : Dell Technologies recommande vivement de sauvegarder toutes les données importantes présentes sur la clé USB. L’outil Dell OS Recovery Tool formate la clé USB, ce qui entraîne la suppression irréversible de toutes les données qu’elle contient.
 - Déconnectez tous les lecteurs USB connectés à l’ordinateur.
- Connectez une clé USB disposant d’au moins 16 Go d’espace de stockage disponible. Cette clé USB est formatée pour créer le support de récupération USB.
- Sous USB Drive, sélectionnez la clé USB que vous souhaitez utiliser pour créer le support USB de récupération.
- Cochez les cases à côté de la déclaration I understand that the selected drive will be reformatted and existing data are deleted.
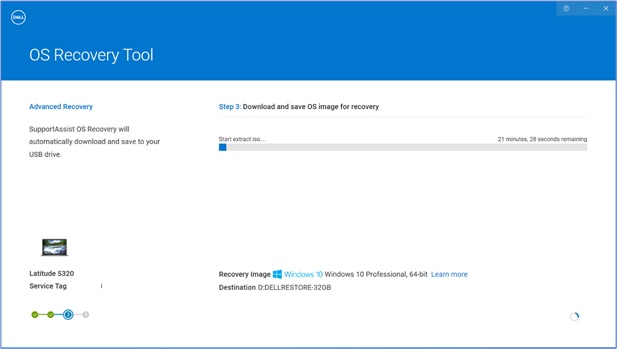
- Cliquez sur Download.
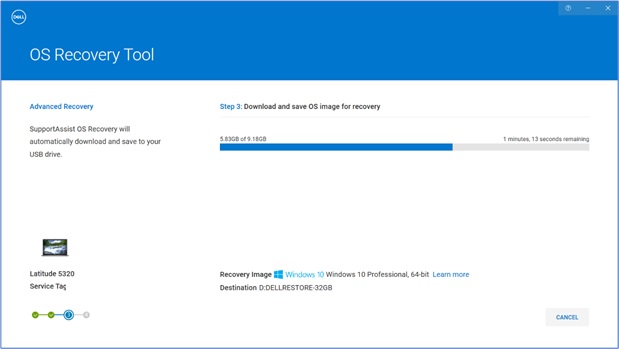
- L’image de récupération du système d’exploitation est téléchargée et vérifiée.
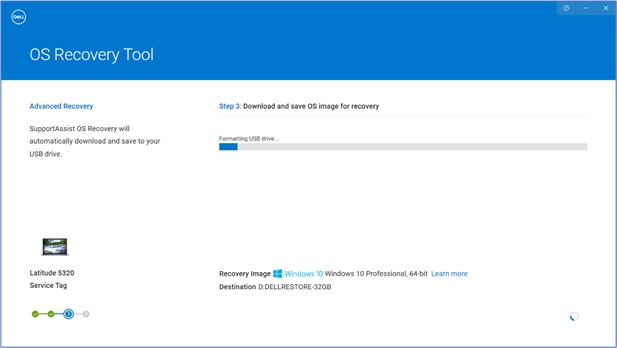
- L’image de récupération est montée sur la clé USB.
- Une fois le support de récupération USB créé, un écran récapitulatif s’affiche.
- Cliquez sur Fermer.
- La création du support de récupération est terminée.

Utilisation du support de récupération USB pour l’installation du système d’exploitation
Installer Microsoft Windows 11, Windows 10, Windows 8.1 ou Windows 7
- Connectez le support de récupération USB à l’ordinateur Dell sur lequel vous souhaitez installer Microsoft Windows 8.1 ou 7. Pour installer Windows 11 ou Windows 10, voir l’article Restauration de votre ordinateur à l’aide de SupportAssist OS Recovery.
- Redémarrez l'ordinateur.
- Sur l’écran du logo Dell, appuyez plusieurs fois sur la touche F12 jusqu’à ce que le message Preparing one time boot menu s’affiche en haut à droite de l’écran.
- Dans le menu de démarrage, sous Démarrage UEFI, sélectionnez le lecteur de récupération USB et appuyez sur Entrée.
- Lorsque la configuration Windows s’affiche, sélectionnez les préférences de langue et de clavier.
- Dans la fenêtre d’installation de Windows, cliquez sur Installer maintenant.
- Lisez le contrat de licence et sélectionnez J’accepte les termes du contrat de licence pour poursuivre l’installation.
- Dans la fenêtre, Quel type d’installation voulez-vous effectuer ?, cliquez sur Personnalisée (Option avancée).
- Dans la fenêtre Où souhaitez-vous installer Windows ?, sélectionnez le plus grand disque interne comme partition principale, puis cliquez sur Suivant.
Si la partition principale affiche 0 Go en espace libre, sélectionnez Espace non alloué et cliquez sur Suivant. - Le programme d’installation de Windows crée automatiquement une partition, la formate et commence l’installation de Windows.
- Le processus d’installation prend un certain temps et votre ordinateur peut redémarrer plusieurs fois.
Informations supplémentaires
Questions fréquentes
Puis-je créer un support de système d’exploitation avec un fichier ISO existant dans l’outil de récupération du système d’exploitation Dell ?
Oui, le Mode avancé de l’outil de récupération du système d’exploitation Dell vous permet de créer un support de récupération USB. Ce support utilise un fichier image du système d’exploitation au format de fichier ISO. Ce support est utile si vous avez téléchargé l’image de récupération du système d’exploitation à l’aide d’un appareil Linux, Mac ou Android.
Comment créer un support de récupération USB à l’aide d’une image ISO
- Téléchargez et installez l'outil de récupération du système d'exploitation Dell sur un ordinateur Windows.
- Cliquez sur Démarrer, puis ouvrez l’application Dell Operating System Recovery Tool.
Remarque : Cliquez sur Oui dans la fenêtre Contrôle de compte d’utilisateur (UAC). Le compte d'utilisateur Windows doit disposer de privilèges d'administration pour installer l'outil de récupération du système d'exploitation Dell.
- Cliquez sur Rechercher (icône de la loupe).
- Dans la fenêtre ouverte, accédez à l’emplacement du dossier où vous avez enregistré le fichier image ISO du système d’exploitation.
- Sélectionnez le fichier .iso, puis cliquez sur Ouvrir.
- Cliquez sur Next.
- Connectez à l’ordinateur une clé USB avec au moins 16 Go d’espace de stockage disponible. Cette clé USB est formatée pour créer le support de récupération USB.
- Sous Lecteur USB, sélectionnez la clé USB que vous souhaitez utiliser pour créer le support de récupération USB et cochez le bouton Je comprends que la clé sélectionnée sera reformatée et que les données existantes seront supprimées.
Avertissement : Dell Technologies recommande vivement de sauvegarder toutes les données importantes présentes sur la clé USB. L’outil de récupération du système d’exploitation Dell formate la clé USB, ce qui entraîne la suppression irréversible de toutes les données qu’elle contient.
- Sélectionnez le Type de partition :
- GPT : Windows 10 et Windows 11
- MBR : tous les autres systèmes d’exploitation
- Pour commencer à créer un support de récupération USB, cliquez sur Graver le système d'exploitation.
- Une fois le processus terminé, vous êtes redirigé vers l’écran principal du Mode avancé.
Quelle est la différence entre les images de récupération Windows 10 et Windows 10 Automated by SupportAssist ?
L’image de récupération Windows 10 ou Windows 11 vous permet de formater le disque dur et d’installer une nouvelle copie de Windows 10. La taille de fichier de cette image de récupération est considérablement supérieure à celle de Windows 10 ou Windows 11 automatisée par SupportAssist.
L’image de récupération Windows 10 et Windows 11 automatisée par SupportAssist peut créer un support de récupération USB pour les ordinateurs Dell qui prennent en charge SupportAssist OS Recovery.
SupportAssist OS Recovery est pris en charge sur certains ordinateurs Dell exécutant un système d’exploitation Microsoft Windows 10 ou Windows 11 installé en usine par Dell.
Principales fonctionnalités de SupportAssist OS Recovery :
- Scan Hardware : exécutez une analyse diagnostique sur votre ordinateur pour détecter les problèmes matériels.
- Repair System : permet de résoudre les problèmes courants qui peuvent se produire avant que votre ordinateur démarre dans le système d’exploitation. Cette option vous permet d’éviter d’avoir à restaurer votre ordinateur à ses paramètres d’usine.
- Back Up Files : permet de créer une copie de vos fichiers personnels sur une unité de stockage externe.
- Restore System : permet de restaurer le système d’exploitation et les applications par défaut à leur état initial au moment de l’expédition de votre ordinateur depuis l’usine Dell.
- Cloud Image Restore : permet de télécharger et installer le nouveau système d’exploitation sur votre ordinateur, ainsi que les pilotes et applications par défaut.
Pour en savoir plus sur SupportAssist OS Recovery, consultez l’article suivant de la base de connaissances Dell : Réparez et restaurez votre ordinateur à l’aide de SupportAssist OS Recovery.
Qu’est-ce que Dell SupportAssist OS Recovery et comment l’utiliser sur mon ordinateur Windows 10 ou Windows 11 ?
Dell SupportAssist OS Recovery offre un environnement de récupération comprenant des outils qui permettent de diagnostiquer et de dépanner les problèmes qui peuvent se produire avant que votre ordinateur démarre dans le système d’exploitation. Lorsque votre ordinateur ne parvient pas à démarrer le système d’exploitation, après plusieurs tentatives, il démarre automatiquement SupportAssist OS Recovery. Cet environnement de récupération vous permet de diagnostiquer les problèmes matériels, de réparer votre ordinateur, de sauvegarder vos fichiers ou de rétablir les paramètres d’usine de votre ordinateur.
SupportAssist OS Recovery est pris en charge uniquement sur certains ordinateurs Dell qui exécutent un système d’exploitation Microsoft Windows 10 installé en usine Dell. Pour obtenir la liste des ordinateurs sur lesquels SupportAssist OS Recovery est disponible, voir la matrice de support de Dell SupportAssist OS Recovery sous Documentation de support Dell SupportAssist OS Recovery.
Comment puis-je télécharger l’image de récupération du système d’exploitation avec un ordinateur non Dell ?
L’image de récupération du système d’exploitation Dell peut être téléchargée avec un ordinateur non Dell.
- Sur un ordinateur Windows : Dell Technologies recommande d'utiliser l'outil de récupération du système d'exploitation Dell pour télécharger l'image de récupération du système d'exploitation et créer le support de récupération USB. Consultez la section Utilisation de l'outil de récupération du système d'exploitation Dell de cet article.
Comment puis-je télécharger la version 32 bits de l’ISO Windows ?
L’image de récupération Windows de Dell est disponible pour les systèmes d’exploitation Microsoft Windows 64 bits. La version 32 bits de Windows n’est pas disponible pour le téléchargement.
Que dois-je faire si le téléchargement ISO échoue ?
L'outil de récupération du système d'exploitation Dell peut mettre en pause et reprendre le téléchargement en cas de problème de connectivité réseau. Le téléchargement reprend lorsque la connexion réseau est rétablie.
La taille des fichiers d’image de récupération standard du système d’exploitation au format de fichier ISO est comprise entre 5 et 16 Go. (La taille du fichier varie selon les différents systèmes d’exploitation.) Une fois le fichier téléchargé, l'outil de récupération du système d'exploitation Dell vérifie l'intégrité du fichier avant de créer le support de récupération USB. Le temps de téléchargement et de vérification de l’intégrité du fichier peut varier en fonction de la vitesse du réseau et de la taille du fichier.
Que dois-je faire si le message d’erreur « Not enough space on drive » (Espace insuffisant sur le lecteur) s’affiche lors du téléchargement du fichier ISO ?
Il est possible que vous receviez le message d’erreur « Not enough space on drive ». lors du téléchargement d’un fichier volumineux via une application en ligne Dell telle que l’outil Dell OS Recovery. Cela est dû à un manque d’espace sur le disque dur où sont enregistrés les fichiers. La taille de certaines images de récupération du système d’exploitation peut atteindre 16 Go.
Pour corriger cette erreur, libérez de l’espace disque supplémentaire sur le disque dur. Pour plus d’informations sur la libération d’espace disque sous Microsoft Windows, voir les articles suivants de la base de connaissances Dell : Libération d’espace disque dans Microsoft Windows.
Si vous disposez d’un disque dur externe ou secondaire avec plus d’espace disque, sélectionnez ce disque pour y enregistrer les fichiers.
Que dois-je faire si l’option « Récupérer à partir d’un disque » est manquante lors de l’installation de Windows 10 ?
Vous pouvez essayer de résoudre ce problème en utilisant un disque USB d’une autre marque. Certaines marques de disques USB peuvent générer ce problème.
L’image de récupération contient-elle les derniers pilotes de périphérique pour mon ordinateur Dell ?
Il est possible que l’image de récupération du système d’exploitation ne contienne pas les derniers pilotes de périphérique pour votre ordinateur Dell. Les pilotes de périphérique les plus récents sont disponibles sur Dell.com/support/drivers. Une fois que le système d'exploitation est installé, Dell Technologies vous recommande de télécharger et d'installer les pilotes de périphériques les plus récents.
Pour en savoir plus sur le téléchargement et l’installation des pilotes de périphérique, consultez notre guide Téléchargement et installation de pilotes Dell.
Comment activer Microsoft Windows après la réinstallation du système d’exploitation ?
- Windows 11, Windows 10, Windows 8.1 ou Windows 8 : Pour les ordinateurs Dell livrés avec Microsoft Windows 11, Windows 10 ou Windows 11, Windows 8.1 ou Windows 8, la clé de produit de Microsoft Windows est intégrée sur la carte système (carte mère) de l’ordinateur. Le processus d’activation récupère automatiquement la clé de produit à partir de la carte système. Pour les ordinateurs Dell expédiés avec Windows 10, les informations d'activation sont liées au compte Microsoft que vous avez utilisé pour configurer votre ordinateur.
- Windows 7 : Pour les ordinateurs Dell livrés avec Microsoft Windows 7, la clé de produit pour Microsoft Windows se trouve sur une étiquette apposée sur le dessus d’un ordinateur de bureau Dell et sur le panneau inférieur d’un ordinateur portable Dell.
Pour en savoir plus sur l’activation de Windows, voir l’article suivant de la base de connaissances Dell : Où trouver la clé de produit Windows pour Windows 11 et Windows 10 ?
L’image de récupération contient-elle le logiciel d’origine préinstallé sur mon ordinateur Dell ?
L’image de récupération du système d’exploitation n’inclut pas les logiciels préinstallés sur votre ordinateur Dell.
Pour en savoir plus sur le téléchargement et l’installation de logiciels Dell installés en usine, consultez le guide de téléchargement et d’installation des pilotes et applications Dell.
Que dois-je faire si l'outil de récupération du système d'exploitation Dell ne se lance pas ou que l'installation ne démarre pas ?
L’outil de récupération du système d’exploitation Dell ne démarre pas après l’installation, ou l’exécution du programme d’installation ne permet pas de lancer le processus d’installation. Vous pouvez désactiver temporairement l’antivirus ou le logiciel anti-programme malveillant qui peut être installé sur l’ordinateur, puis exécuter à nouveau l’application ou le programme d’installation.
Que se passe-t-il si je reçois l’erreur « Aucune image n’a été identifiée » lorsque je saisis le numéro de série de mon ordinateur Dell ?
Contactez le support technique Dell pour obtenir de l’aide si l’outil de récupération du système d’exploitation Dell affiche cette erreur ou ne reconnaît pas votre étiquette de service.
 Votre ordinateur n’est plus sous garantie ? Pour bénéficier d’un support hors garantie, accédez au site Web Dell.com/support, puis saisissez votre étiquette de service Dell pour consulter nos offres.