Dell Storage SC and PS Series: How to Install Storage Manager with Data Collector
Summary: Dell Storage Manager centralizes monitoring, management and analysis of Storage Center (SC Series) SANs, FluidFS clusters, and Fluid Cache clusters. The Storage Manager Data Collector stores data and alerts that it gathers from managed storage devices in an embedded or external database. ...
This article applies to
This article does not apply to
This article is not tied to any specific product.
Not all product versions are identified in this article.
Instructions
Note: For more details about installation and upgrade, see the Dell Storage Manager 2020 R1 Installation Guide.
Dell Storage Manager is compatible with Storage Center OS (SCOS) versions 6.5 and later, and PS Series group firmware 7.0-9.1.
Table of Contents:
- Download the Dell EMC Storage Manager
- Install Dell EMC Data Collector
- Install the Storage Manager Client on Windows
- Use the Client to Connect to the Data Collector
- Add Storage Centers to Storage Manager
1. Dell EMC Storage Manager download for Windows
Download Dell Storage Manager - version Release (Full Release) for Windows from the Dell Drivers & Downloads site.
2. Install Dell EMC Data Collector
Extract the file DellEMCStorageManager-version.zip.
Launch "Storage Manager Data Collector Setup.exe" to start the installation.
Any of the following 64-bit operating systems with the latest service packs are compatible:
- Windows Server 2022
- Windows Server 2019
- Windows Server 2016
Note: 32-bit operating systems are not supported, and Windows Server Core is not supported.
Select a language from the drop-down menu and click OK and then click Install.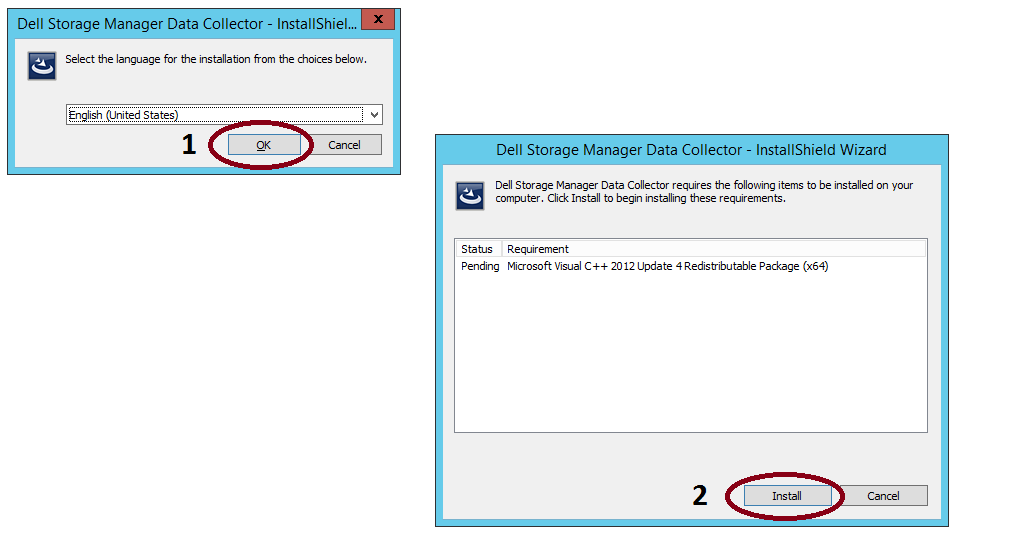
Note: The wizard may require a system reboot in this step.
Click Next. The License Agreement page appears. Read the license agreement and then click Yes to accept it.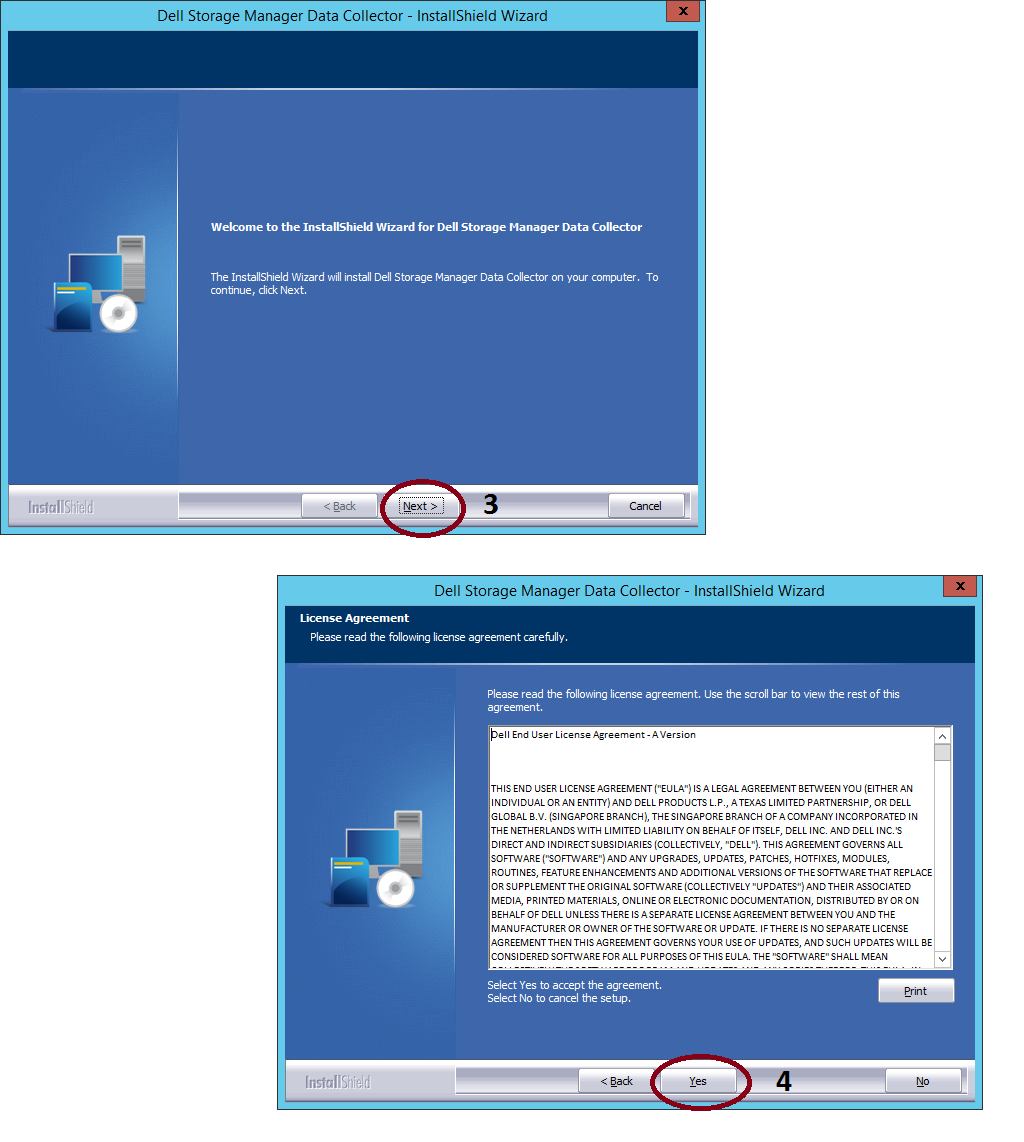
Click Finish
The Storage Manager Data Collector Setup wizard appears.
Note: The Storage Manager Data Collector Setup wizard can take a long time to appear.
Under Data Collector Type, select Configure as Primary Data Collector.
In the Data Source Type drop-down menu, select a database type.
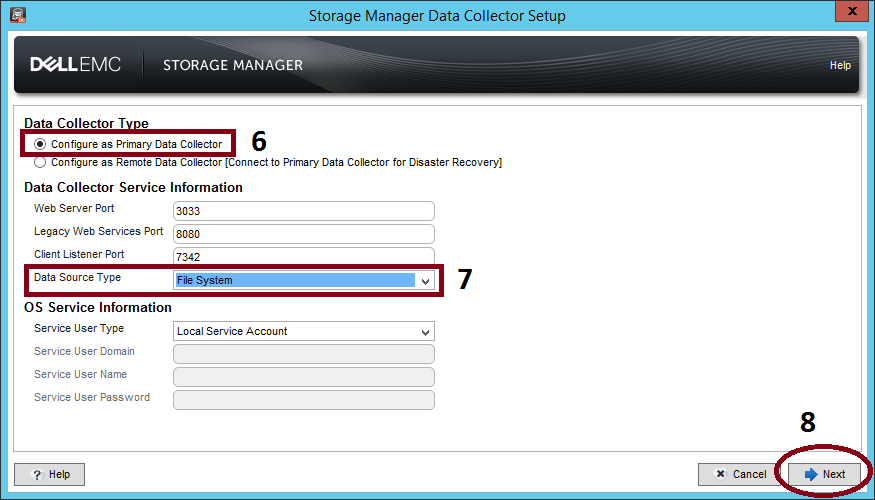
Embedded database (File System): The embedded database can retain only 30 days worth of data, and the database size cannot exceed 64 GB. The embedded database is not recommended for a production environment.
Note: To use an external database (Microsoft SQL Server or MySQL), prepare the database by performing the task that corresponds to your database type.
If the File System database option is selected, the next screen will be displayed:
Select Next in the step "SMI-S Server Properties":
Select the network adapter and specify the memory limit for the Data Collector. To select a network adapter automatically, select the Automatically Select Network Adapter check box. In the Max Memory Settings area, select an option to specify the maximum amount of memory that the Data Collector can use. If the Data Collector manages many Storage Centers, increasing this limit can improve performance.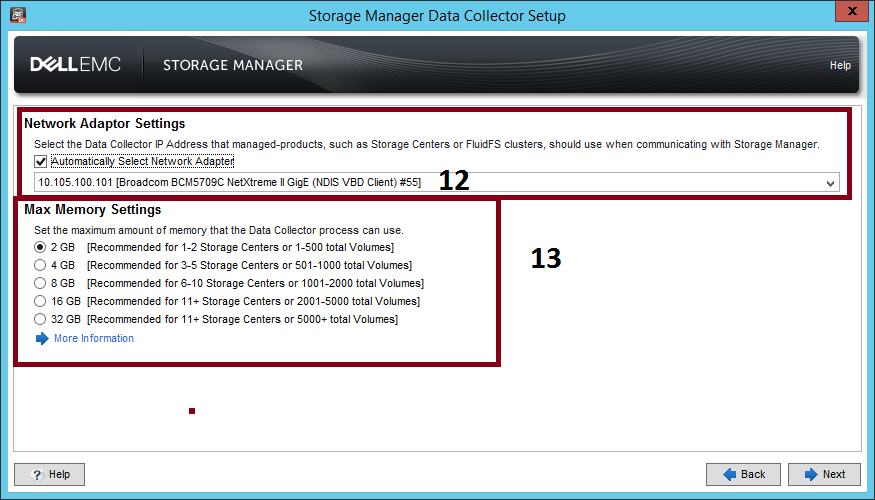
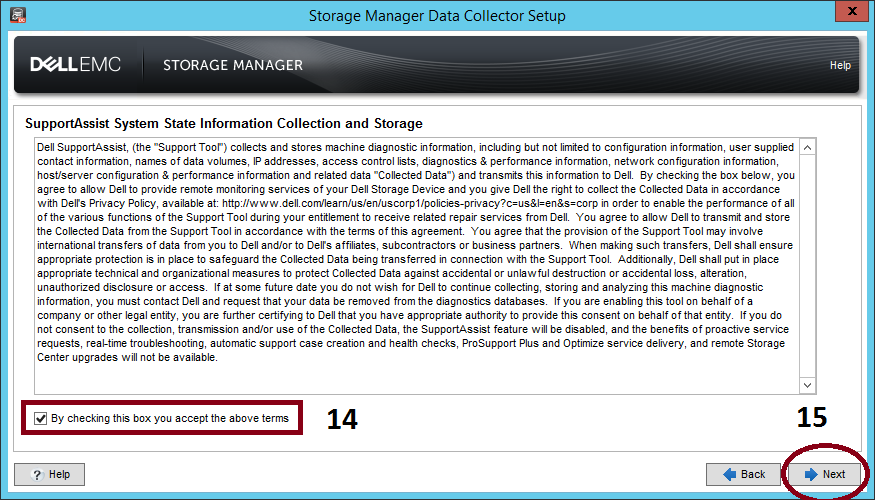
To accept the SupportAssist System State Information Collection and Storage agreement, select the check box below the agreement.
Note: SupportAssist collects diagnostic data from Storage Manager then sends it to technical support. If the agreement is not accepted, proactive technical support services that rely on SupportAssist will be unavailable.
Create an administrator user.
Note: Record the username and password. This information is needed to login to Storage Manager after installation is complete. It is recommended to use the same user (Admin) and password from storage SC.
Type a username, password, and password confirmation.
Wait the Data Collector Service start. After the Data Collector starts, the Setup is Complete pages appears. Click Finish.
2.1 Updating the Storage Manager Data Collector
Storage Manager manages Dell storage products and also provides management integration for Microsoft (SCVMM) and VMware products (SRM). When upgrading Dell EMC Storage Manager, check the release notes and Management Compatibility before upgrading.
Note: It is recommended to backup the server and database before upgrading the Data Collector.
Run the "Storage Manager Data Collector Setup.exe".
Select Yes to perform an upgrade.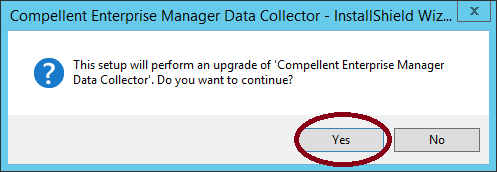
Follow the steps described in step 2. Option d until e.
Note: Allow at least 60 minutes for the Data Collector service to start. If the service takes longer than 60 minutes, contact technical support.
3. Install the Storage Manager Client on Windows
The Storage Manager Client is an app that connects to a Data Collector or a Storage Center. The client can be installed on the Data Collector server or on a computer that has network connectivity to the Data Collector server.
Launch "Storage Manager Client Setup.exe"
Use the wizard to install the Storage Manager Client.
4. Use the Client to Connect to the Data Collector
After the Storage Manager Client is installed, use it to connect to the Data Collector.
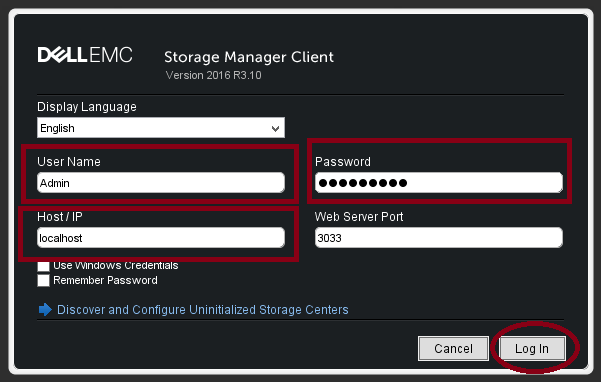
Start the Storage Manager Client application.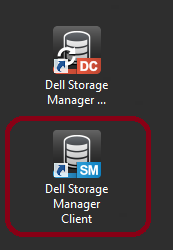
If the Welcome screen appears, select a language then click Log in to a Storage Center or Data Collector.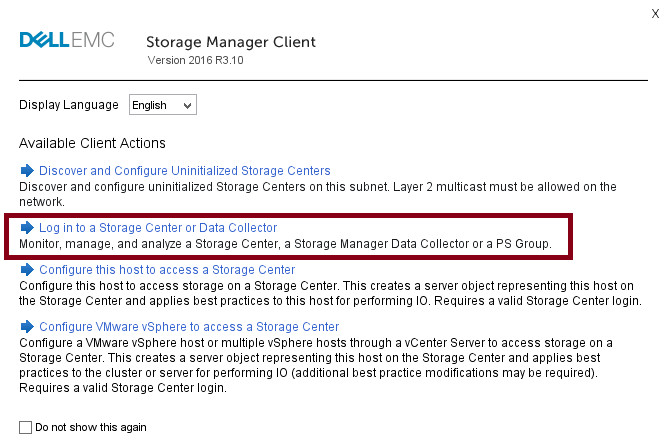
Complete the following fields:
User Name: Type the name of the Storage Manager user that was created during Data Collector installation.
Password: Type the password for the user. You can also use the password of a Storage Manager user that was previously created.
Host/IP: Type the hostname or IP address of the server that hosts the Data Collector. If the Data Collector and Client are installed on the same system, localhost can be typed instead.
Web Server Port: If the Web Server Port was changed during installation, type the number of the updated port. The default port is 3033.
Click Log In.
Note: Do not select the Use Windows Credentials check box (if present) now. The Data Collector must be configured for Active Directory and Kerberos to use this feature.
5. Add Storage Centers to Storage Manager
Use the Client to add the Storage Centers that you want to centrally manage.
The Storage Manager Data Collector must have connectivity to the Storage Center management interface.
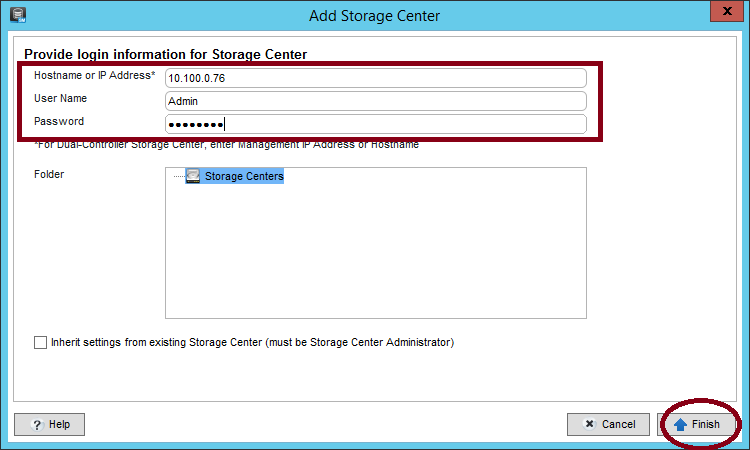
In the Storage Manager Client, click Add Storage Center, Add PS Group or Add FluidFS Cluster. The Add Storage Center dialog box appears.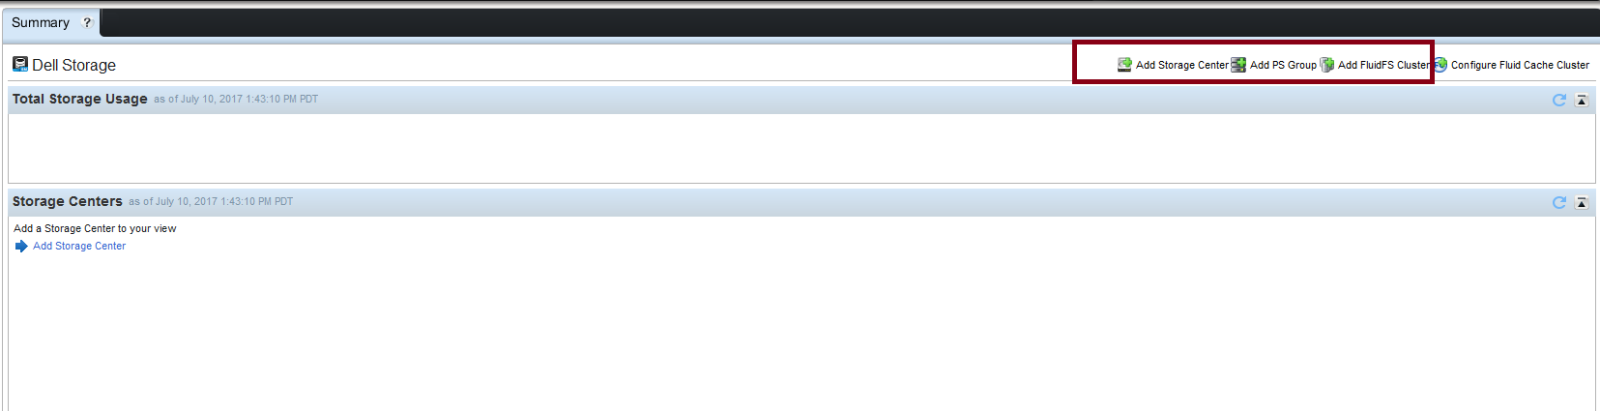
Type Storage Center login information.
Host Name: Type the hostname or IP address of a Storage Center controller. For a dual-controller Storage Center, type the IP address or hostname of the management controller. For Series PS, type the Group Manager IP Address
User Name and Password: Type the username and password.
(Optional) Configure the Storage Center to use settings applied to another Storage Center by selecting the "Inherit settings from existing Storage Center" check box.
Next Steps
After installation is complete, perform basic tasks to configure Storage Manager for your environment.
See the Storage Manager Administrator's Guide for detailed configuration instructions.
Affected Products
SC Series, SCv Series, OEM Dell Storage ManagerProducts
Dell Storage ManagerArticle Properties
Article Number: 000120062
Article Type: How To
Last Modified: 17 Oct 2025
Version: 10
Find answers to your questions from other Dell users
Support Services
Check if your device is covered by Support Services.