No Boot on Dell Computer or XPS With USB Type-C Adapter Installed or No USB Type-C Functionality
Resumen: Learn about if a Dell computer or XPS cannot boot when a USB Type-C device is connected, such as a dock or adapter. The computer may also boot without USB Type-C functionality.
Síntomas
The computer is unable to boot or complete POST with any USB Type-C power source on the Thunderbolt (TBT) port. USB-C Type-C power sources include both the AC adapter and docks.
- BIOS versions 1.6.0 through 1.9.1 cannot turn on or even charge with a TBT or non-TBT port.
- BIOS version 1.10.0 can turn on when charging with a non-TBT port.
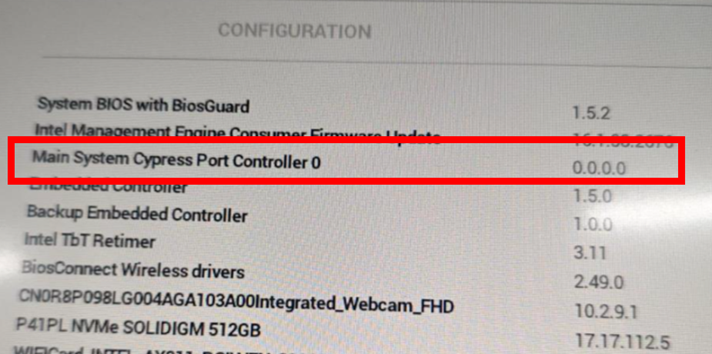
The computer’s USB Type-C functions, such as charging, USB, dongle, display, and so on are lost. The Main System Cypress Port Controller (power delivery firmware) under diagnostics shows 0.0.0.0.
Affected Platforms:
- Dell 14 Plus 2-in-1 DB04250
- Dell 14 Plus DB14250
- Dell 16 Plus 2-in-1 DB06250
- Dell 16 Plus DB16250
- Dell Pro Max 14 Premium MA14250
- Dell Pro Max 16 Premium MA16250
- XPS 14 (Dell 14 Premium) DA14250
- XPS 16 (Dell 16 Premium) DA16250
Causa
Computer lock-ups or other unexpected behaviors resulted in BIOS updates being interrupted.
Resolución
Resolve this issue by first Recovering the BIOS and then either Update the BIOS in Windows or perform a Remote BIOS Flash Update. Click the appropriate process for more information.
Recovering the BIOS
- Remove any external USB Type-C power sources, such as an adapter or dock.
- Let the computer rest for 5 minutes before performing any steps.
- Turn on the computer without any external power sources connected. Check if the computer is bootable and a BIOS Auto-Recovery starts successfully. If BIOS Auto-Recovery starts, continue to Step 5. If BIOS Auto-Recovery does not begin, go to Step 4.
- If Step 3 does not start BIOS Auto-Recovery, insert the USB Type-C adapter to a non-Thunderbolt port and turn on the computer.
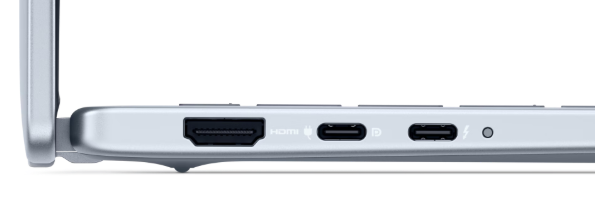 Note: Thunderbolt ports have a lightning bolt icon beside them, whereas non-Thunderbolt ports do not have a lightning bolt icon.
 - BIOS Auto-Recovery continues automatically once the computer’s battery capacity meets requirements.
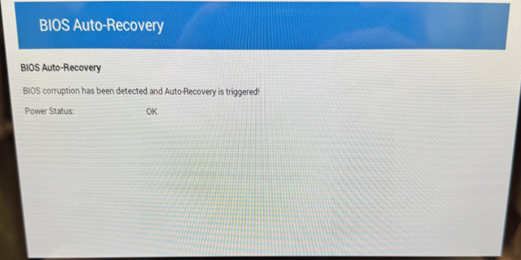
- Ensure that BIOS Auto-Recovery was successful and check if USB Type-C functions such as power input, display, and so on are recovered.
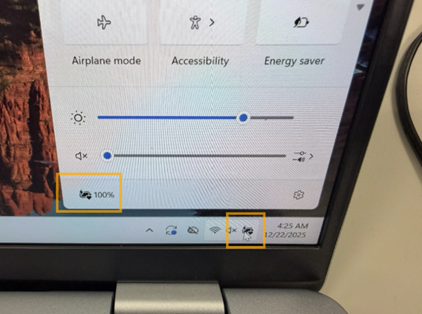
- The following action depends on if a Dell Plus computer is in use or if a Dell Pro Max computer is in use. Follow the steps for the appropriate computer platform.
- Dell Plus: If BIOS Auto-Recovery was successful, continue to Update the BIOS in Windows. If BIOS Auto-Recovery was not successful, continue to Remote BIOS Flash Update.
- Dell Pro Max or XPS: Continue to Remote BIOS Flash Update.
Update the BIOS in Windows
- Back up all personal data. For more information, refer to Back Up and Recovery.
- Connect the AC adapter.
Update the BIOS to version 1.10.0 or later on the computer resolves the issue. To download and install the BIOS, refer to the BIOS Update Guide.
Remote BIOS Flash Update
- Press F12 on the keyboard upon powering on the computer to enter the One-Time Boot Menu.
- Select BIOS Flash Update - Remote and then press Enter.
- Connect to any available wireless network and select Update BIOS. The computer runs a BIOS update after the download is complete. The BIOS is then updated to the latest version.