ME4: Collecting Diagnostic Logs using FTP
Summary: This article covers the steps to gather the support bundle through File Transfer Protocol (FTP) for PowerVault ME Series storage products.
This article applies to
This article does not apply to
This article is not tied to any specific product.
Not all product versions are identified in this article.
Instructions
This article covers the steps to gather the support bundle through FTP.
Secure FTP utilities like PSFTP cannot collect the support bundle. FTP must be enabled on the storage.
The logs can be gathered from either controller using the FTP protocol.
Prerequisites
-
Ensure the FTP protocol is enabled on the storage controller by running the
show protocolscommand from CLI or enabling FTP using the PowerVault Manager (PVM) from the Home topic, select: Action → System settings → Services and select the checkbox for File Transfer Protocol.
- User credentials with monitor permissions
- Use the
show userscommand to see who has been enabled with FTP access.
- Use the
Procedure outline
- Open an FTP session:
ftp <controller IP address>
- Login as a user with FTP and monitor access:
manageorftp
- Enter the password for the
manageorftpuser:******
- Save the file from the ME4 array to the local system:
get logs <filename.zip>
<filename.zip> password for the manage or ftp user is the name of the bundle file after it is transferred from the ME4 array.
- Exit the FTP session:
bye
- Send the file to your Dell Support representative.
Enable FTP on the array (FTP is not enabled by default).
Using the PVM UI
- From the Home topic, select: Action → System settings → Services and select the checkbox for File Transfer Protocol.
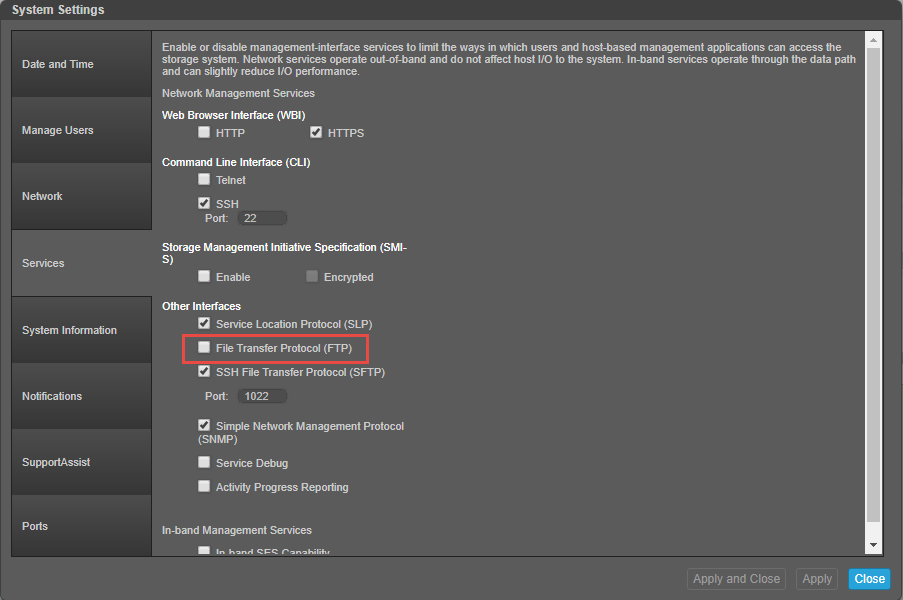
- After selecting the checkbox for FTP, click Apply
- A display appears to confirm the changes, select OK
Using ME4 CLI
User accounts using FTP may not have access to the PVM UI, use CLI in that instance.
Maximize the terminal emulator window for the best output format on screen.
- To view if the FTP protocol is enabled on the ME4 array, run the command
show protocols
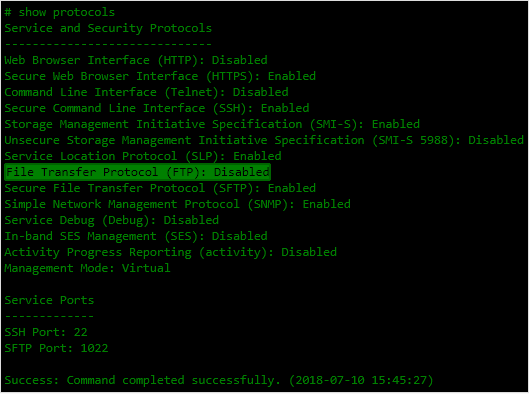
- To enable the FTP protocol support on the ME4, run the command
set protocols ftp enabled. To disable it when finished gathering the logs run the commandset protocols ftp disabled.

- (Optional) Create a user to collect the storage logs, then run the command
create user <UserName> interfaces ftp. The username and password are case-sensitive.

Note: FTP uses port numbers 20 and 21 for command control and data transfer. If these ports are not open, a session may open, but unable to transfer any files.
- For windows users, in the window firewall create a New Inbound Rule, leave TCP selected, and enter port numbers 20 and 21 ("20, 21").
- Select the option. Allow the connection to accept incoming traffic on these ports.
- Open an FTP session from your host client to the management interface on either of the ME4 controllers
ftp <management interface IP address> - Login as a user with FTP and monitor access:
manageorftp - Enter the password for the
manageorftpuser:****** - Save the file from the ME4 array to the local system:
get logs <filename.zip>
<filename.zip> password for the manage or ftp user is the name of the bundle file after it is transferred from the ME4 array.
- Exit the FTP session:
bye - Send the file to your Dell Support representative. (The file is in your present working directory)
FTP session sample output from Windows host client:
C:\dell\logs>ftp 172.28.120.XX
Connected to 172.28.120.XX.
220-Welcome to Pure-FTPd.
220-You are user number 1 of 5 allowed.
220-Local time is now 15:58. Server port: 21.
220-This is a private system - No anonymous login
220-IPv6 connections are also welcome on this server.
220 You will be disconnected after 15 minutes of inactivity.
User (172.28.120.30:(none)): ftp                                  <------- Login as a user with FTP permissions
331 User ftp OK. Password required
Password:
230-OK. Current restricted directory is /
230-Instructions for getting the cumulative I/O density data:
230-    1. Log in with user name and password
230-    2. Type 'get logs:heatmap <filename.csv> is a file to capture the cumulative
230-        I/O density data
230-    3. Example: 'get logs:heatmap IO_density.csv'
230-
230-Instructions for updating firmware in controller modules:
230-    1. Type 'put <filename> flash' where <filename> is the new firmware image to load.
230-    2. For a single controller load, it will take approximately 10 minutes for
230-        the new firmware to load and for the automatic restart to complete. For
230-        a system load (dual controller, PFU enabled), allow an additional 15
230-        minutes for the partner controller to be updated.
230-        If using FTP, progress messages will be displayed in the FTP client
230-        interface during that time.
230-        If using SFTP, progress messages will *not* be displayed in the SFTP
230-        client.   Instead, progress may be monitored via the Management Port
230-        (e.g., :8081) or by issuing a "get progress" command with a separate
230-        FTP/SFTP connection.
230-        Wait for the progress messages to indicate that the code load has
230-        completed.
230-    3. If PFU is not enabled and a system load was not performed, log into the
230-        other controller and repeat steps 1-2.
230-    4. WARNING! Do not power cycle or restart during the firmware update
230-        as this can result in loss of capabilities for this unit.
230-    5. If you attempt to load an incompatible firmware version (such as code
230-        that is intended only for an iSCSI system on an FC system) the message
230-        "*** Code Load Fail. Bad format image. ***" will be displayed and the FTP
230-        prompt will come back in just a few seconds. The code will not be loaded.
230-
230-Instructions for updating firmware in expansion modules:
230-    1. Obtain the address of each enclosure management processor (EMP) in the form
230-        <EMP-channel-ID>:<EMP-target-ID> (for example, 0:63 and 1:63)
230-        and obtain the firmware revision of each EMP.
230-        Determine which EMPs need to be updated based on the revision.
230-        Note: In the WBI, the EMP addresses are displayed by clicking on each
230-        enclosure in the Configuration View. The needed data is displayed
230-        in the fields labeled 'EMP A Bus ID', 'EMP B Bus ID', 'EMP A Target ID',
230-        'EMP B Target ID', 'EMP A Revision', and 'EMP B Revision'. (The terms
230-        'bus' and 'channel' are equivalent.)
230-        Note: In the CLI, enter 'show enclosures'. The needed data is displayed
230-        in the columns labeled 'EMP A CH:ID Rev' and 'EMP B CH:ID Rev'.
230-    2. Log in via FTP/SFTP with user name and password.
230-    3. Type 'put <filename> encl:<EMP-channel-ID>:<EMP-target-ID>'
230-        where <filename> is the new firmware image to load.
230-    4. It typically takes several minutes for the new firmware to load.
230-        If using FTP, progress messages will be displayed in the FTP client
230-        interface during that time.
230-        If using SFTP, progress messages will *not* be displayed in the SFTP
230-        client.   Instead, progress may be monitored via the Management Port
230-        (e.g., :8081) or by issuing a "get progress" command with a separate
230-        FTP/SFTP connection.
230-        Wait for the progress messages to indicate that the code load has
230-        completed.
230-        WARNING! Do not power cycle or restart during the firmware update
230-        as this can result in loss of capabilities for this unit.
230-    5. Repeat steps 3-4 for each EMP to update in each enclosure.
230-
230-Instructions for updating disk firmware:
230-    1. Obtain the address of each disk to be loaded in the form
230-        <enclosure-ID>.<slot-number> (for example, 0.1 and 1.9)
230-        and obtain the firmware revision of each of these disks.
230-        Determine which disks need to be updated based on the revision.
230-        Note: In the WBI, the disk addresses are displayed by clicking on each
230-        enclosure in the Configuration View and then selecting the desired
230-        disk. The needed data is displayed in the fields labeled 'Enclosure ID',
230-        'Slot', and 'Revision'.
230-        Note: In the CLI, enter 'show disks'. The needed data is displayed
230-        in the columns labeled 'Location' and 'Revision'.
230-    2. Log in via FTP/SFTP with user name and password.
230-    3. Type 'put <filename> disk:<disk-list>'
230-        where <filename> is the new firmware image to load,
230-        and <disk-list> is a list of the form currently supported in the CLI.
230-        You can specify:
230-        - A disk (Example: 0.4)
230-        - A hyphenated range of disks (Example: 0.4-7)
230-        - A comma-separated list of individual disks, ranges, or both with no spaces.
230-          (Example: 0.4,0.6-9)
230-        If "disk" with no disk-list is entered, all disks compatible with the
230-        specified firmware will be updated.
230-    4. It typically takes several minutes for the new firmware to load.
230-        If using FTP, progress messages will be displayed in the FTP client
230-        interface during that time.
230-        If using SFTP, progress messages will *not* be displayed in the SFTP
230-        client.   Instead, progress may be monitored via the Management Port
230-        (e.g., :8081) or by issuing a "get progress" command with a separate
230-        FTP/SFTP connection.
230-        Wait for the progress messages to indicate that the code load has
230-        completed.
230-        WARNING! Do not power cycle or restart during the firmware update
230-        as this can result in loss of capabilities for this unit.
230-    5. Repeat steps 3-4 for each disk to update in each enclosure.
230-
230-Instructions for getting debug logs:      <---- This is what you are going to do
230-    1. Log in with a user name and password.
230-    2. Type 'get logs <filename.zip>'
230-        where <filename.zip> is the file to capture the system debug logs.
230-        Note the debug logs are in a compressed archive format and will need to be
230-        uncompressed before viewing.
230-
230-Instructions for getting disk debug dump (Seagate Drives Only):
230-    1. Log in with a user name and password.
230-    2. Type 'get logs:disk:<enclosure-ID>.<slot-number>[:trigger] <filename.zip>'
230-        where <filename.zip> is the file to capture the disk debug logs.
230-        Note the drive dump are in a compressed archive format and will need to
230-        be uncompressed before processing.
230-        - The disk to collect the debug dump from is specified by
230-          <enclosure-ID>.<slot-number> (for example, 0.1).
230-        - A disk debug dump can be manually triggered with the ":trigger" keyword.
230-          This could overwrite old debug data with the newly triggered data, so
230-          it should only be done when instructed.
230-    Prerequisites: Drive must be a spinning/ready Native-SAS Seagate drive that
230-                   is NOT part of an active VDisk (acceptable states are:
230-                   Available/Spare/Leftover/Failed).
230-
230-Instructions for getting historical disk-performance statistics:
230-    1. Log in as a user that has permission to use the FTP/SFTP interface.
230-    2. Type 'get perf[:<date/time-range>] <filename>.csv'
230-        where <filename>.csv is the file to capture the historical
230-        disk-performance statistics and <date/time-range> is optional
230-        and specifies the time range of data to transfer, in the format:
230-        start.<yyyy>-<mm>-<dd>.<hh>:<mm>.[AM|PM].end.<yyyy>-<mm>-<dd>.<hh>:<mm>.[AM|PM]
230-        The <date/time-range> string must contain no spaces.
230-    3. Example: 'get perf:start.2015-01-03.04:00.AM.end.2015-01-05.10:00.PM. statistics
230-
230-Instructions for loading a license file:
230-    1. Log in via FTP/SFTP with user name and password.
230-    2. Type 'put <certificate.txt> license'
230-        where <certificate.txt> is the name of the license file generated
230-        for your specific system.
230-
230-Instructions for loading security certificate files:
230-    1. The security certificate files will consist of a pair of files.
230-       You will have a certificate file and a key file.
230-    2. Log in with a user name and password.
230-    3. Type 'put <certificate-file-name> cert-file'
230-        where <certificate-file-name> is the name of the certificate file
230-        for your specific system.
230-    4. Type 'put <key-file-name> cert-key-file'
230-       where <key-file-name> is the name of the security key file for
230-        your specific system.
230-    5.  Restart both Management Controllers to have the new security
230-        certificate take effect.
230-
230
ftp> get logs me4012_08072018.zip                             <--- get logs <yourfilename.zip>
200 PORT command successful
150-Starting operation:
STATUS: Getting Storage Controller logs ...
Please wait...
Please wait...
Please wait...
Please wait...
Please wait...
Please wait...
Please wait...
Please wait...
Please wait...
Please wait...
Please wait...
Please wait...
Please wait...
Please wait...
Please wait...
Please wait...
STATUS: Finished getting Storage Controller logs
STATUS: Getting logs from Partner Management Controller B
Please wait...
STATUS: Finished getting the Partner Management Controller B logs
STATUS: Getting local Management Controller logs from A
Please wait...
STATUS: Finished getting logs from local Management Controller.
STATUS: get logs operation is complete
Size: 11278053 bytes

Operation Complete
150-Connecting to port 55639
150 (11278053 bytes) to download
226-File successfully transferred
226 2.737 seconds (measured here), 3.93 Mbytes per second
ftp: 11278053 bytes received in 2.72Seconds 4147.87Kbytes/sec.
ftp> bye                                                               <--- exit the FTP session
221-Goodbye. You uploaded 0 and downloaded 11014 kbytes.
221 Logout
Affected Products
OEMR ME40XX and ME4XX, Dell EMC PowerVault ME4012, Dell EMC PowerVault ME4024, Dell EMC PowerVault ME4084, Dell EMC PowerVault ME412 Expansion, Dell EMC PowerVault ME424 Expansion, Dell EMC PowerVault ME484Article Properties
Article Number: 000117696
Article Type: How To
Last Modified: 03 سبتمبر 2025
Version: 4
Find answers to your questions from other Dell users
Support Services
Check if your device is covered by Support Services.