PowerEdge: System does not boot past the Driver Health Manager screen - UEFI0116
Summary: This article provides information about how to boot past the Driver Health Manager Screen.
This article applies to
This article does not apply to
This article is not tied to any specific product.
Not all product versions are identified in this article.
Instructions
The UEFI Driver Health Manager is the UEFI equivalent to the BIOS boot mode messages that are typically seen during POST.
- When the server is in UEFI boot mode, if a device (typically the PERC) reports an error, there are new menus that have to be navigated through in order to correct the issue.
- Rebooting the server, draining flea power, even replacing parts may not resolve the issue and can continue to be prompted for the UEFI Driver Health Manager.
- You must follow the directions correctly to enter the option ROM of the device and determine what actions to take.
Note: In the March Block BIOS release for 15G and 16G PowerEdge platforms, new message IDs (UEFI0457, UEFI0458, UEFI0459, UEFI0460, UEFI0461) have been introduced to replace UEFI0116.
- UEFI0457: "Configuration required"
- UEFI0458: "Repair required"
- UEFI0459: "Failure detected"
- UEFI0460: "Reconnect required"
- UEFI0461: "Reboot required"
Entering the driver health manager:
- The first screen that you see gives you a generic message about the device that is reporting the error.
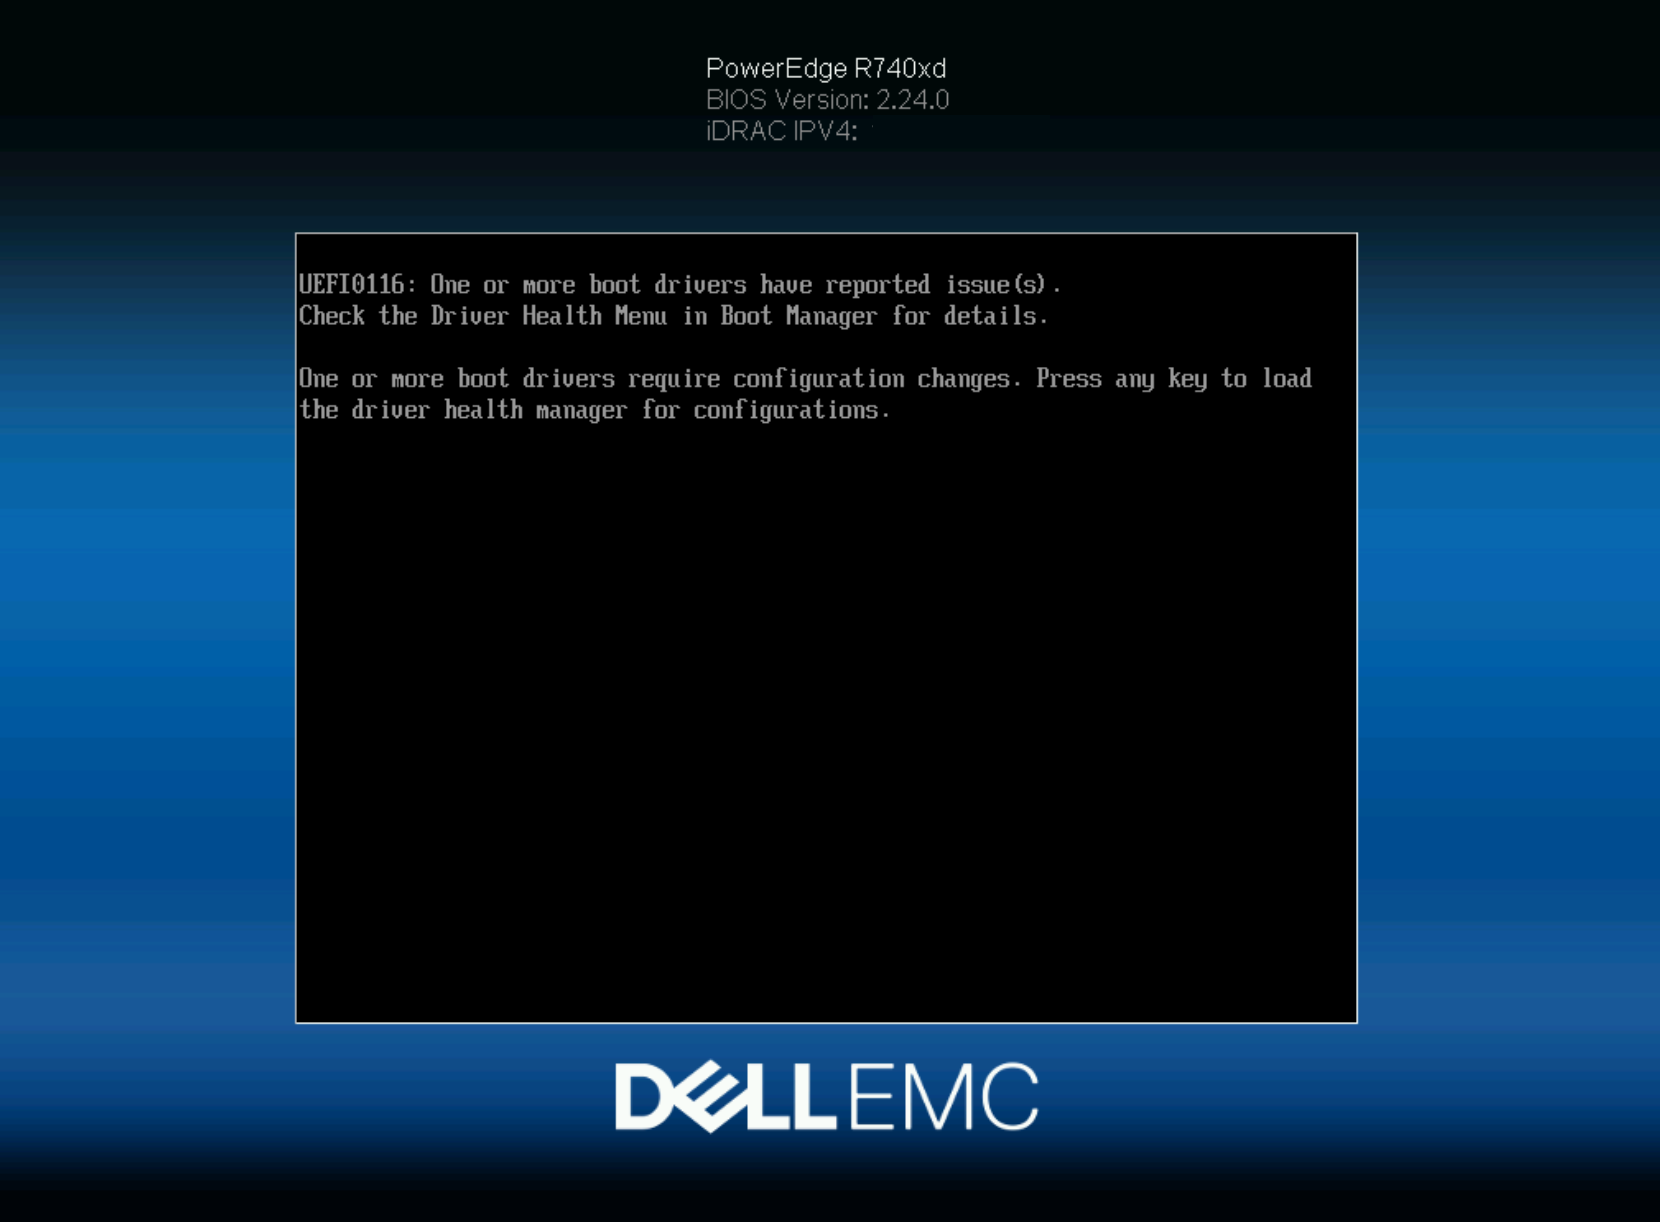
- Following the on-screen instructions above to Press any key, and you arrive at the Driver Health Manager.
- Here you see a list of any devices reporting an issue.
- Select the appropriate device.

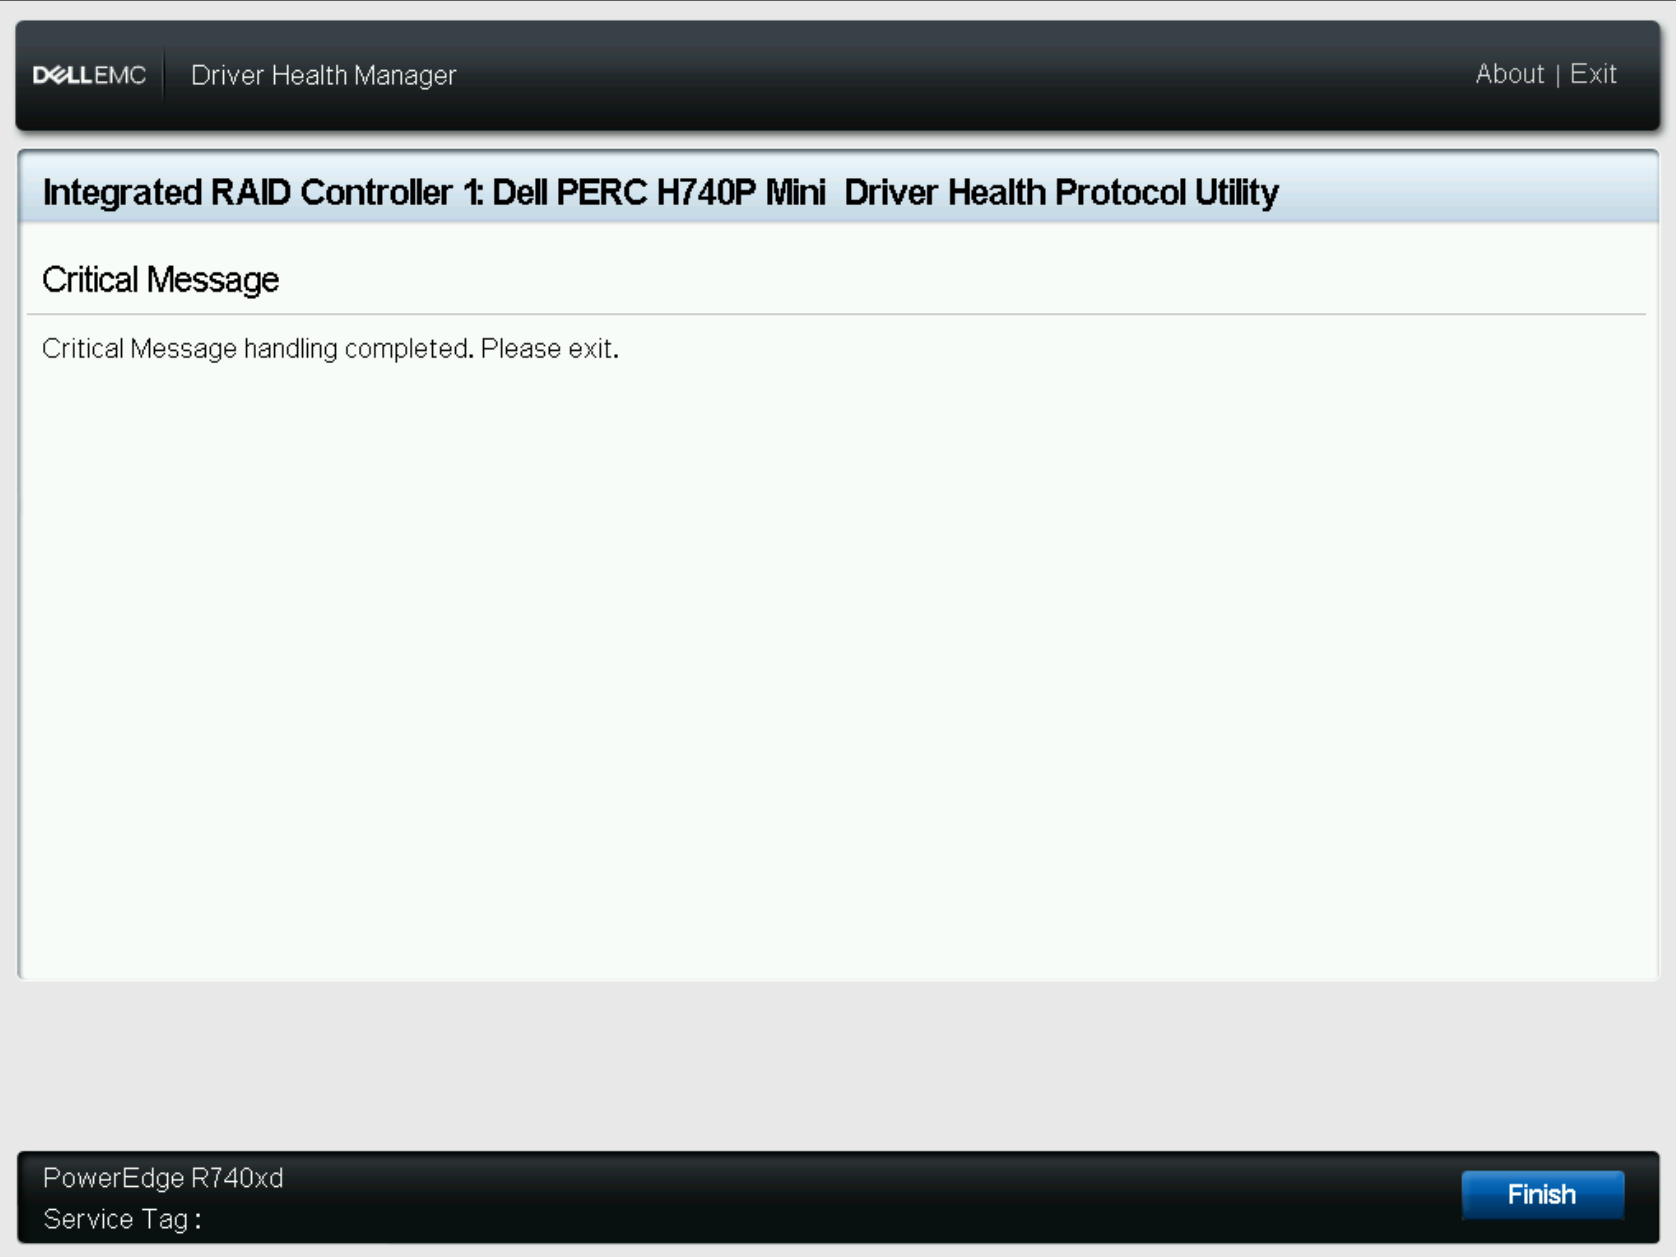
- Here you are prompted with the message of the issue, and what you must do. This message appears on every boot until acknowledged.
- In this example, the PERC is reporting "
There are offline or missing virtual drives with preserved cache. Press any key to enter the configuration utility." - Notice below the message, there is a text input box "Enter Your Input Here:"
- Tab to or click in to activate the text input box.
- In this example, it specifies that any key can be entered, in our example the input provided was "ok."
Note: There are times that it specifies a character to be input such as X, or C.
- Tab to or click Finish in the lower right corner to submit the input.
- Next a message is shown confirming acknowledgment of the error message. Select Finish again to continue to the device configuration menu
- It then returns to the device list allowing you to proceed through the devices configuration utility.
- Select the device.
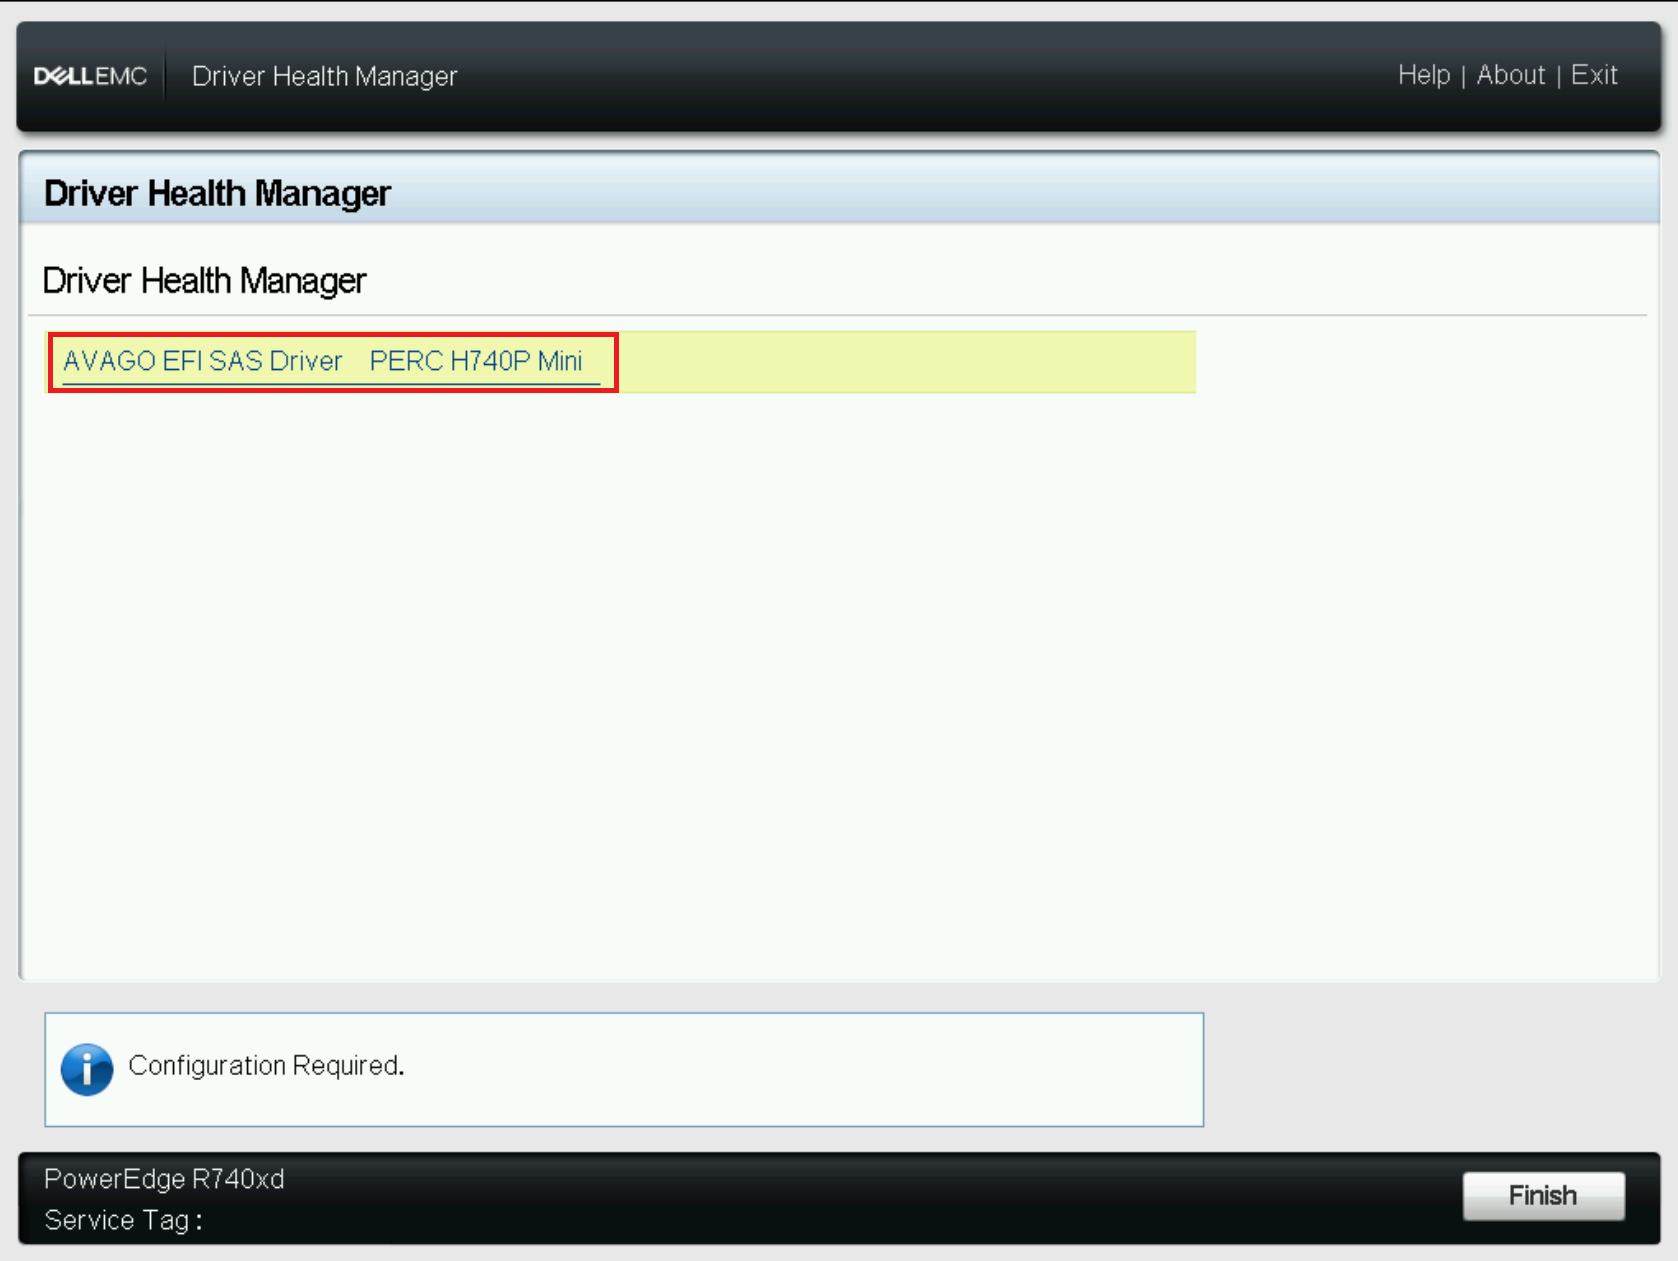
- In this example, the PERC is reporting "
- You are now in the device configuration utility (the same as if you went to System Setup and selected Device Configuration)
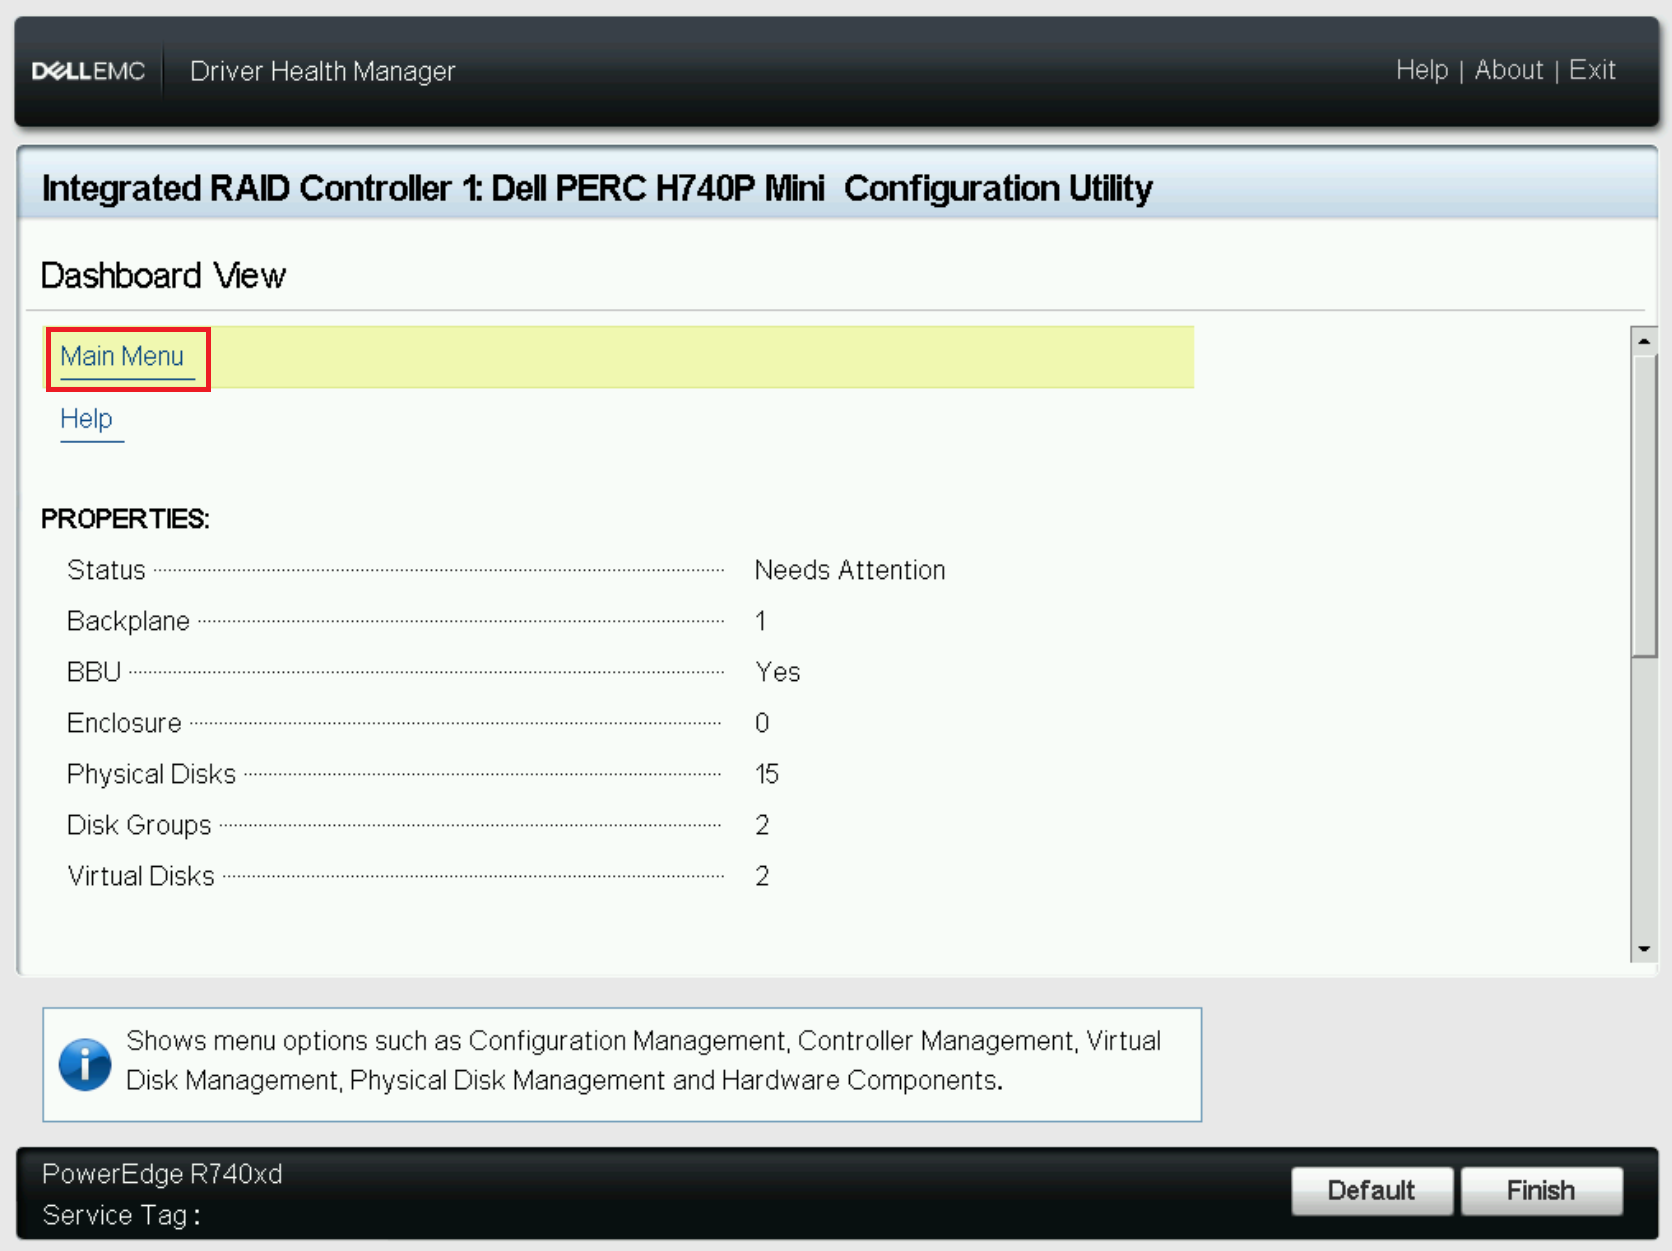
-
- In this example, a Virtual Disk failed, causing the cached data from intended for that VD to be preserved.
- If the VD can be brought back online the cache is automatically be written to the VD.
Note: If foreign disks must be imported, the preserved cache must be discarded first in order to import.
- Discard the Preserved Cache
- Note: Until the failed virtual disk was remediated or the preserved cache cleared, the server continues to boot to the Driver Health Manager.
- Click Main Menu -> Controller Management -> Advanced Controller Properties -> Cache and Memory.

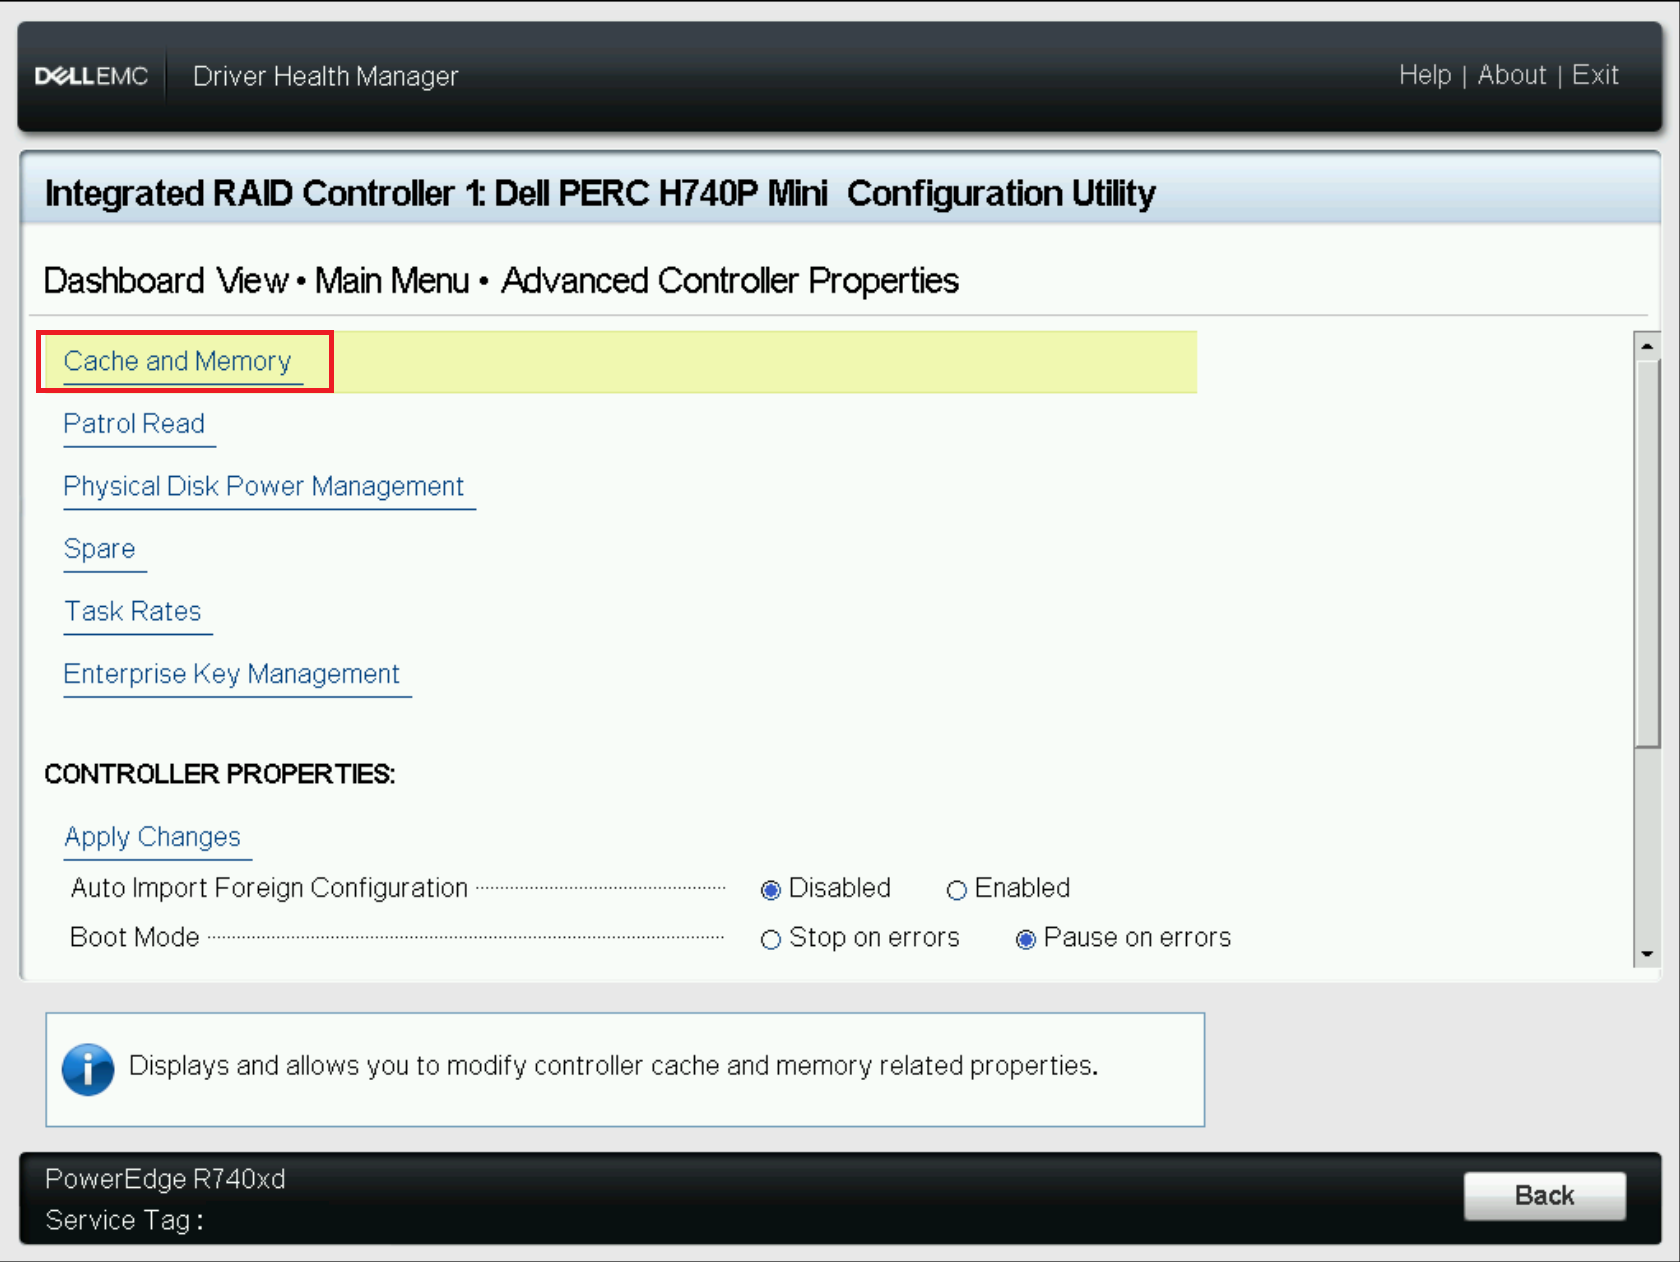
- Here you see the confirmation that there is preserved cache, select Discard Preserved Cache.
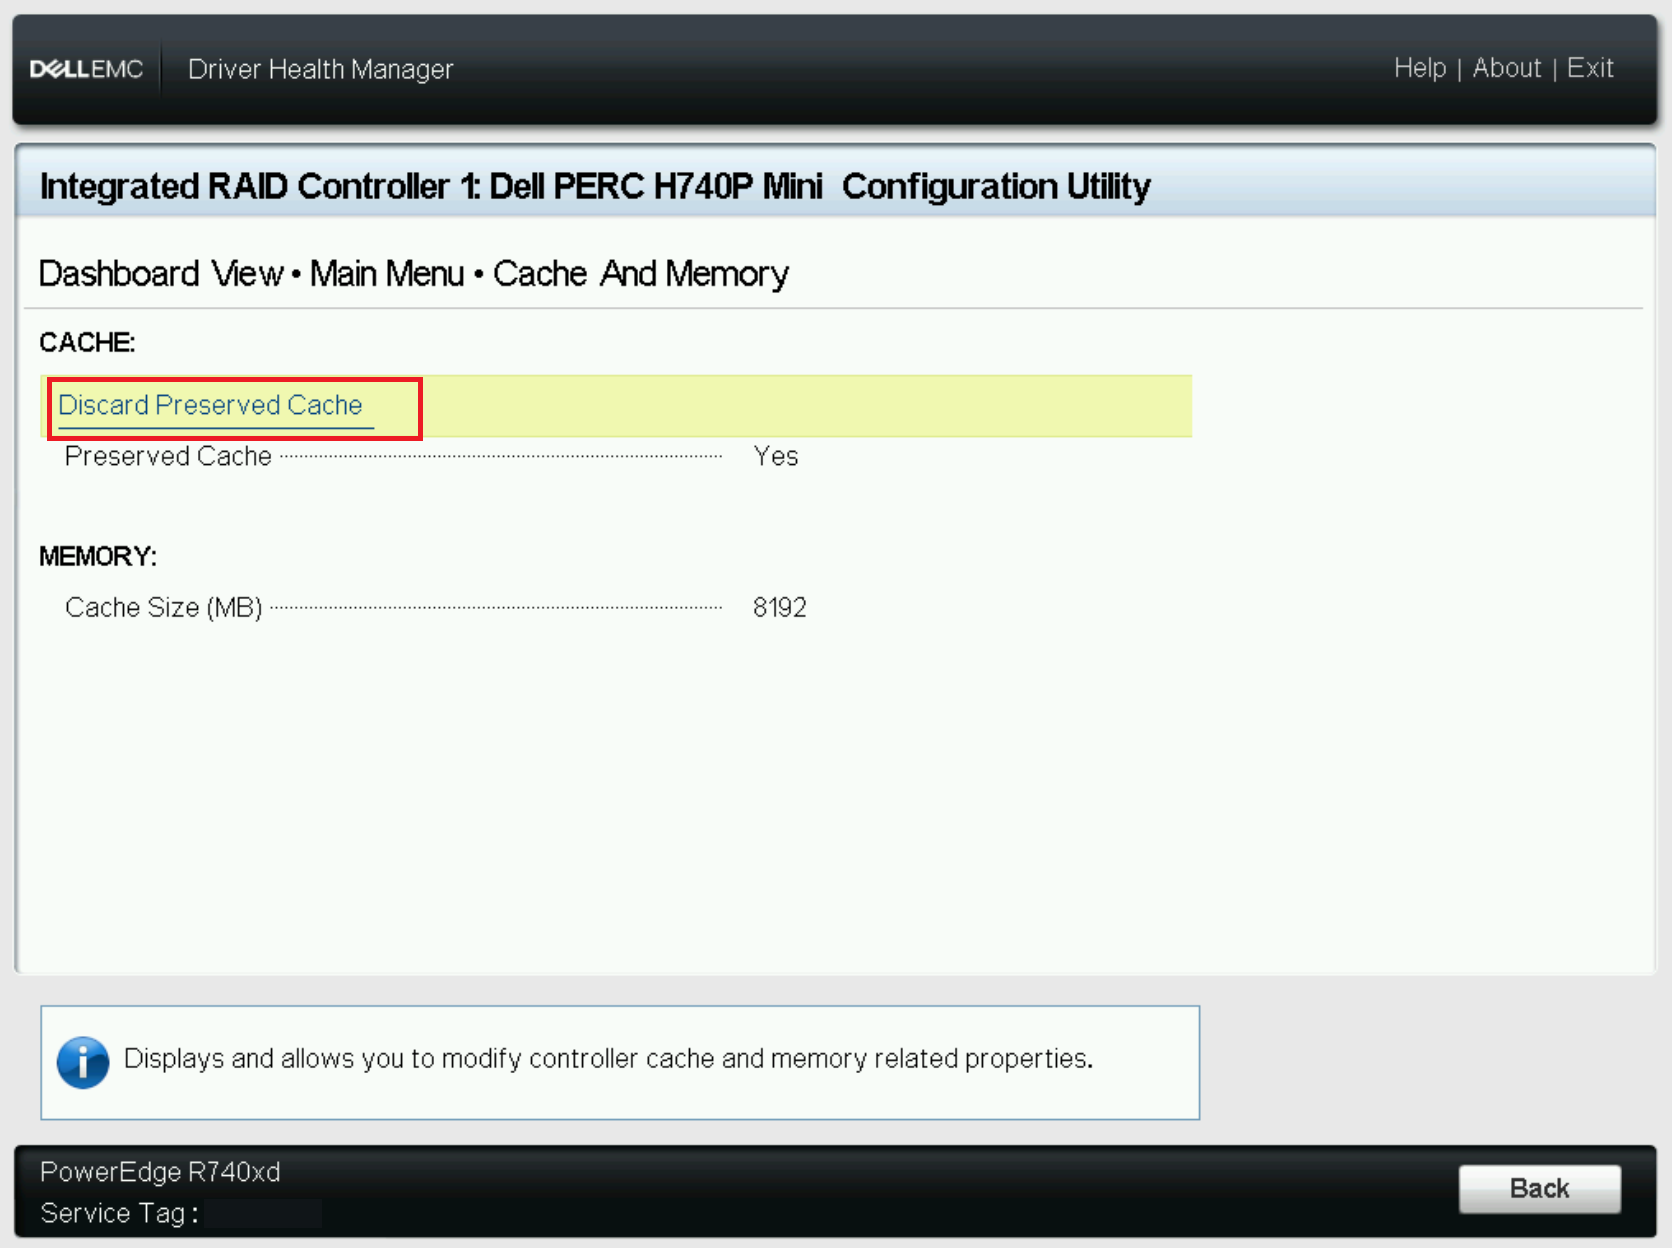
- Next the VD with the preserved cache is shown and you must confirm the request to discard the cache by selecting Yes.
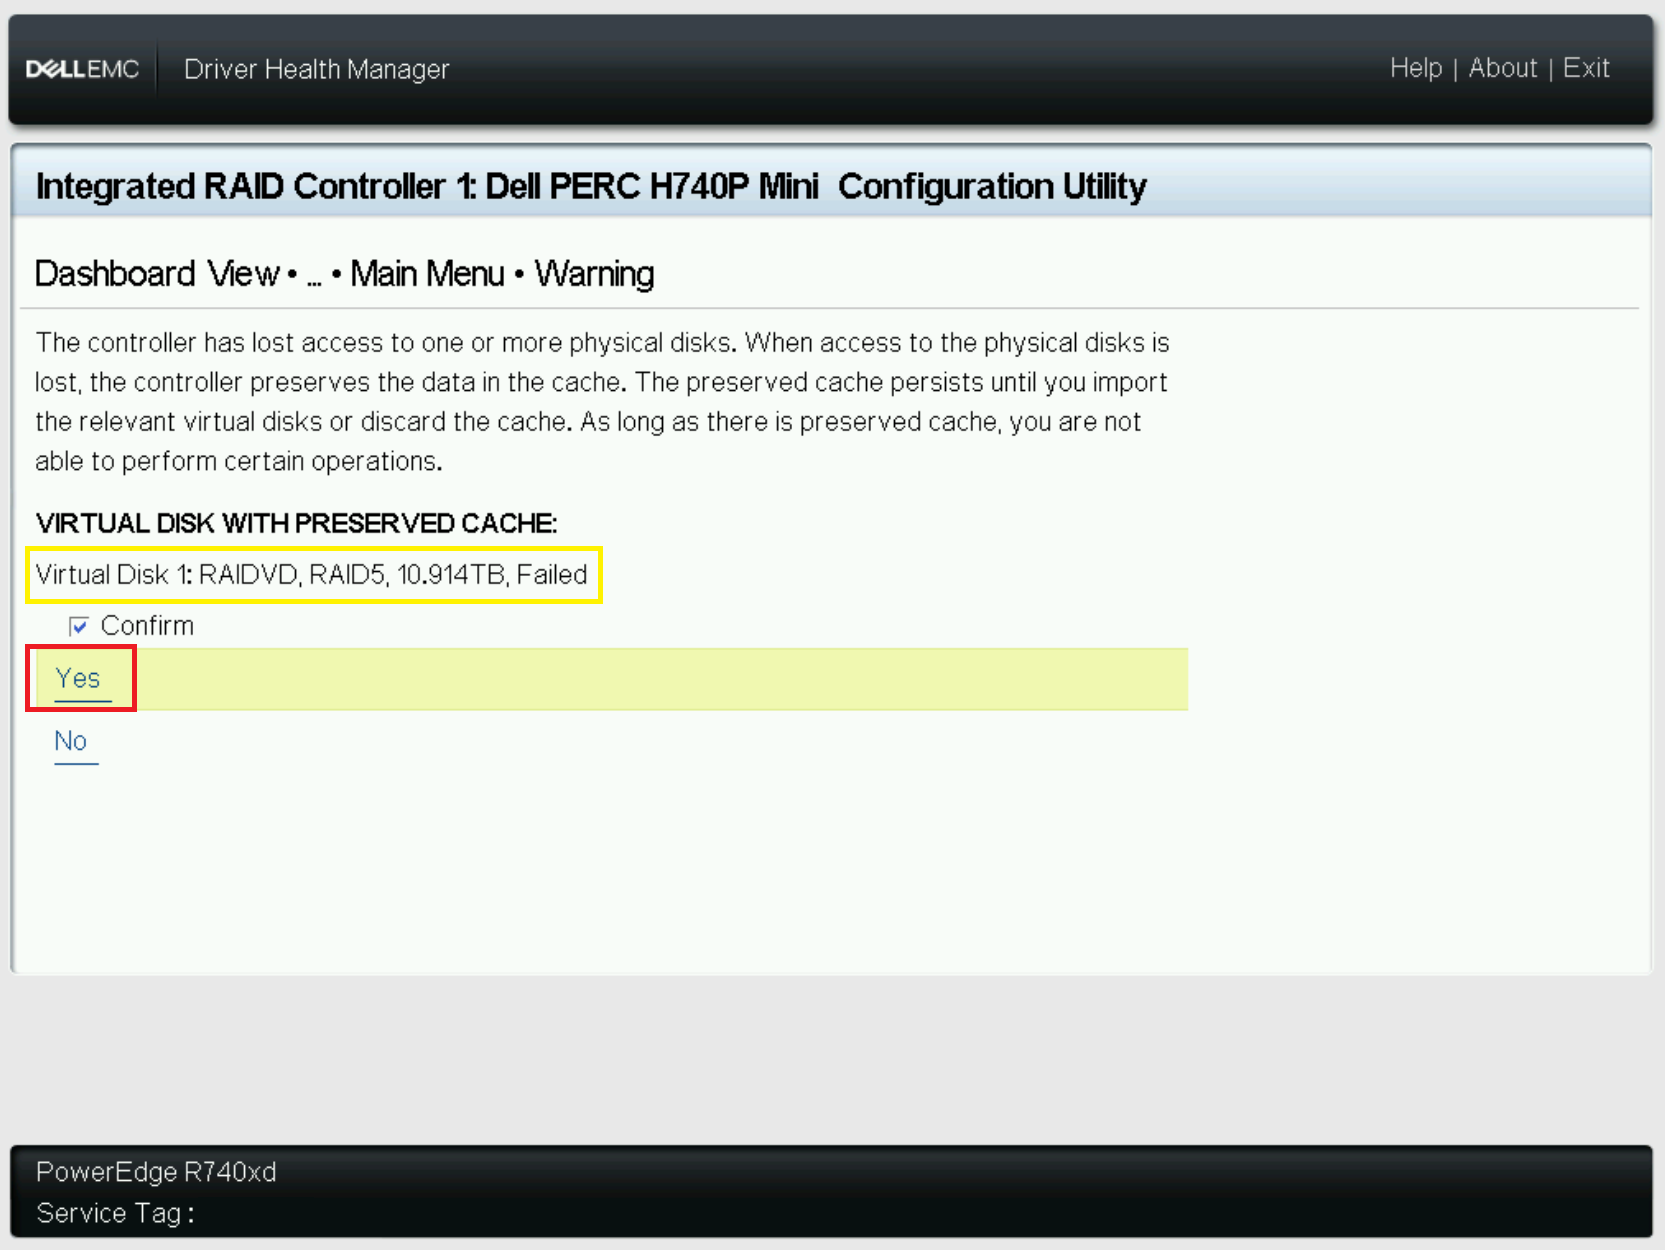
- The cache is now cleared and you can exit the utility and reboot the server to complete the POST process.
Additional Information
Changing POST behavior:
- Navigate to the PERC Configuration Utility
- Select Controller Management
- Select Advanced Controller Properties
- Boot Mode options:
- Stop on errors - Shows you the errors and waits for your inputs. The firmware does not proceed with boot until you act.
- Pause on errors - Noncritical errors show up for a brief time. You can act on the errors else the firmware proceeds with the boot. If the controller has critical errors, it waits for your input. The firmware does not proceed with boot until you act.
- Ignore errors - Errors are ignored and the firmware proceeds with boot.
Affected Products
C Series, HS Series, Modular Infrastructure, Rack Servers, Tower Servers, XE Servers, XR Servers, OEM Server Solutions, PowerEdge RAID Controller H345, PowerEdge RAID Controller H350 Adapter SAS, PowerEdge RAID Controller H355 Front SAS
, PowerEdge RAID Controller H355 Adapter SAS, PowerEdge RAID Controller H365i Adapter, PowerEdge RAID Controller H365i Front DC-MHS, PowerEdge RAID Controller H730P MX, PowerEdge RAID Controller H745, PowerEdge RAID Controller H745P MX, PowerEdge RAID Controller H750 Adapter SAS, PowerEdge RAID Controller H755 Adapter, PowerEdge RAID Controller H755 MX Adapter, PowerEdge RAID Controller H755N Front NVMe, PowerEdge RAID Controller H755 Front SAS, PowerEdge RAID Controller H965i Adapter, PowerEdge RAID Controller H965i Front, PowerEdge RAID Controller H965i MX, PowerEdge RAID Controller H330, PowerEdge RAID Controller H730, PowerEdge RAID Controller H730P, PowerEdge RAID Controller H740P, PowerEdge RAID Controller H965e Adapter
...
Article Properties
Article Number: 000148089
Article Type: How To
Last Modified: 23 ديسمبر 2025
Version: 7
Find answers to your questions from other Dell users
Support Services
Check if your device is covered by Support Services.