NMC: Installation Fails with Error "Unable to Verify Authentication Server's Hostname or Port"
Summary: NetWorker Management Console (NMC) installation fails on a Windows host with error: "Unable to verify Authentication Server's hostname or port."
This article applies to
This article does not apply to
This article is not tied to any specific product.
Not all product versions are identified in this article.
Symptoms
- The NetWorker Management Console (NMC) installation fails on a Windows host with an Authentication failure message.
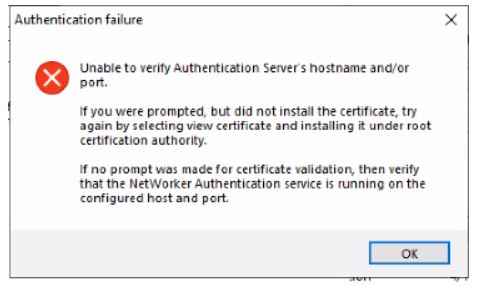
Figure 1: Authentication failure message appears during NMC installation on Windows.
- The NMC server is installed on a Windows host separate from the NetWorker server.
- The NetWorker authentication service is up and running.
- Port 9090 is open.
nsrports -t NetWorker_ServerName -p 9090
Cause
The NMC installation negotiates with the NetWorker authentication service over TLS earlier than version 1.2.
NOTE: See Additional Information section for instructions on validating TLS handshake between NetWorker server and NMC server.
Resolution
Perform the following on the NetWorker server:
- Make a backup copy of:
C:\Program Files\EMC NetWorker\nsr\authc-server\tomcat\conf\server.xml.
- Edit the
server.xmlfile and look for the string.
NetWorker 19.12 (and Earlier) Example:
sslEnabledProtocols="TLSv1.2"
Networker 19.13 (and later) Example:
SSLHostConfig protocols="TLSv1.2"Change the value oof the protocols string to:
"TLSv1.2, TLSv1.1, TLSv1"
NOTE: These changes are temporary and are only being done to complete the NMC installation. They can be reverted once the NMC installation has been completed.
- Save the changes to the file.
- Restart the NetWorker service.
net stop nsrd
net start nsrd
- Install NetWorker and NMC on the NMC server. This time the prompt to install the certificate should appear.
NOTE: If you still do not see the option to install the certificate, the issue may be due to a mismatch between the Ciphers advertised by the Authc server OS and the ones used by your NetWorker version's Authc Ciphers. See: NetWorker: NMC server install fails on Windows Host "Unable to verify Authentication Server's Hostame and or Port". - Add the certificate to the Root Trusted certificate list.
- Click View Certificate.
- From the Certificate, click Install Certificate.
- Select Local Machine and click Next.
- Select Place all certificates in the following store, then click Browse.
- Select Trusted Root Certification Authorities, then click OK.
- On the Certificate Install Wizard, click Next.
- Click Finish.
- You should receive a pop-up stating "The import was successful," click OK.
- From the Certificate window, click OK.
- From the Security Alert window, click Yes.
- Continue until the installation completes.
After the installation finishes, revert to the original copy of server.xml. A NetWorker service restart is required for the changes to take effect.
Additional Information
Related Article: NMC install fails on Windows Host "Unable to verify Authentication Server's Hostname and/or Port"
TLS validation:
The following can be run in a PowerShell prompt on the NMC server, replace the AUTHC_SERVERNAME with your AUTHC server address.
$server = "AUTHC_SERVERNAME"
$port   = 9090

$tcp = [System.Net.Sockets.TcpClient]::new()
$tcp.Connect($server, $port)
$ssl = [System.Net.Security.SslStream]::new(
    $tcp.GetStream(),
    $false,
    { param($sender,$cert,$chain,$errors) $true }
)

try {
    $ssl.AuthenticateAsClient($server)
    "=== Protocol ==="
    $ssl.SslProtocol
    "=== Cipher ==="
    "$($ssl.CipherAlgorithm) ($($ssl.CipherStrength)-bit)"
    "=== Certificate Chain (PEM) ==="
    # Build the chain from the remote leaf certificate
    $remoteCert = [System.Security.Cryptography.X509Certificates.X509Certificate2]::new($ssl.RemoteCertificate)
    $xchain = [System.Security.Cryptography.X509Certificates.X509Chain]::new()
    $null = $xchain.Build($remoteCert)
    $i = 0
    foreach ($elem in $xchain.ChainElements) {
        $i++
        $c = $elem.Certificate
        "----- Certificate $i -----"
        "Subject  : $($c.Subject)"
        "Issuer   : $($c.Issuer)"
        "NotBefore: $($c.NotBefore)"
        "NotAfter : $($c.NotAfter)"
        ""
    }
}
finally {
    $ssl.Dispose()
    $tcp.Dispose()
}
Example:
PS C:\Users\Administrator.NETWORKER> $server = "win-srvr02.networker.lan"
PS C:\Users\Administrator.NETWORKER> $port   = 9090
PS C:\Users\Administrator.NETWORKER>
PS C:\Users\Administrator.NETWORKER> $tcp = [System.Net.Sockets.TcpClient]::new()
PS C:\Users\Administrator.NETWORKER> $tcp.Connect($server, $port)
PS C:\Users\Administrator.NETWORKER> $ssl = [System.Net.Security.SslStream]::new(
>>     $tcp.GetStream(),
>>     $false,
>>     { param($sender,$cert,$chain,$errors) $true }
>> )
PS C:\Users\Administrator.NETWORKER>
PS C:\Users\Administrator.NETWORKER> try {
>>     $ssl.AuthenticateAsClient($server)
>>     "=== Protocol ==="
>>     $ssl.SslProtocol
>>     "=== Cipher ==="
>>     "$($ssl.CipherAlgorithm) ($($ssl.CipherStrength)-bit)"
>>     "=== Certificate Chain (PEM) ==="
>>     # Build the chain from the remote leaf certificate
>>     $remoteCert = [System.Security.Cryptography.X509Certificates.X509Certificate2]::new($ssl.RemoteCertificate)
>>     $xchain = [System.Security.Cryptography.X509Certificates.X509Chain]::new()
>>     $null = $xchain.Build($remoteCert)
>>     $i = 0
>>     foreach ($elem in $xchain.ChainElements) {
>>         $i++
>>         $c = $elem.Certificate
>>         "----- Certificate $i -----"
>>         "Subject  : $($c.Subject)"
>>         "Issuer   : $($c.Issuer)"
>>         "NotBefore: $($c.NotBefore)"
>>         "NotAfter : $($c.NotAfter)"
>>         ""
>>     }
>> }
>> finally {
>>     $ssl.Dispose()
>>     $tcp.Dispose()
>> }
=== Protocol ===
Tls12
=== Cipher ===
Aes256 (256-bit)
=== Certificate Chain (PEM) ===
----- Certificate 1 -----
Subject  : CN=WIN-SRVR02.networker.lan, OU=NetWorker, O=DELL, L=Round Rock, S=TX, C=US
Issuer   : CN=WIN-SRVR02.networker.lan, OU=NetWorker, O=DELL, L=Round Rock, S=TX, C=US
NotBefore: 12/12/2025 15:16:03
NotAfter : 12/06/2050 15:16:03
This output shows that the TLS protocol negotiated is TLSv1.2, and that the AUTHC server is using a valid self-signed certificate.
Affected Products
NetWorker, NetWorker Management ConsoleProducts
NetWorker FamilyArticle Properties
Article Number: 000219009
Article Type: Solution
Last Modified: 16 يوليو 2026
Version: 6
Find answers to your questions from other Dell users
Support Services
Check if your device is covered by Support Services.