NetWorker: How To Perform Azure VM FLR using nsrazure_flr_recover Command
Summary: This article provides an overview of how to perform an Azure Virtual Machine (VM) File Level Restore (FLR) using the nsrazure_flr_recover command.
This article applies to
This article does not apply to
This article is not tied to any specific product.
Not all product versions are identified in this article.
Instructions
Limitations:
- FLR is not supported for non-Data Domain volumes. Similarly, Azure VM backup can only be written to Data Domain volumes. If you have cloned (copied) the backup data to a non-Data Domain volume, the data must be cloned back to Data Domain before attempting the FLR. The following vProxy article details the necessary steps: NVP vProxy: How to manually clone a VM save set from a non-Data Domain device to a Data Domain clone device.
- FLR is not supported from the NetWorker Management Console (NMC) or NetWorker Web User Interface (NWUI). Currently, the only supported method is from command-line, using
nsrazure_flr_recover. - FLR is not supported on Linux Operating Systems. FLR is supported only on Windows clients. It supports NTFS and ReFS file system.
- FLR is only possible when the VM backup workflow completed both the VM disk backups, and the
psuedo_saveset 'Azure' backup. If there is no 'Azure' save set, for the VM disk, then the only option is command-line Image or Disk restore: NetWorker: How to Perform Azure VM Snapshot Restore from Command-Line - The Save Set must be recoverable. For more information, see: NetWorker: Understanding Save Set Flags
Overview:
Syntax:
nsrazure_flr_recover [ -c client ] [ -m mount_point ][ -n saveset ] [ -s nw_server ] [ -S SSID[/cloneid ] ] [ -t time ] [ -p ]
| Option | Description |
-c |
Specifies the client name. You can use this option when you provide the -n option to specify the save set. |
-m |
Specify a mount location. For example, |
-n |
Specifies the save set name to specify the disk to mount; For example: -n MY_RESOURCE-GROUP:MY_VM:DATA_DISK1 |
-s |
Specifies the NetWorker server. Use this option when starting the nsrazure_flr_recover command on the NetWorker client; otherwise, the client attempts to use itself as the NetWorker server. |
-S |
Specifies the Save Set ID (SSID); for example: -S SSID. If there is more than one copy of the save set, you can include the cloneid; for example: -S SSID/CloneID. Not to be used with -n. Use either -S to specify the SSID or -n to specify the disk name. |
-t |
Use this option with -n to specify the instance of a backup corresponding to a specific point in time. |
-p |
Performs queries and determines if the provided request is valid but does not proceed with mount. |
Process:
The process in this article demonstrates performing nsrazure_flr_recover process from a Windows NetWorker client. In this example, the Windows client is also the Azure VM that was backed up; however, the VM does not have to be the same system as the client.
- Open an elevated prompt on the NetWorker server, use the
mminfocommand to identify the VM disk save set details:
mminfo -avot
Other mminfo commands can be used to filter data as per your discretion:
- Filter save set data by client:
mminfo -avot -q client=cient_name
- Filter save set data by backup volume:
mminfo -avot -q volume=volume_name
- Filter save set data by backup date:
mminfo -avot -q "savetime=MM/DD/YYYY"
Or:
mminfo -avot -q "savetime>=MM/DD/YYYY,savetime<=MM/DD/YYYY"Example:
[root@azure-nsr ~]# mminfo -avot
 volume        type   client           date     time         size ssid      fl   lvl name
...
azure_nsr.dddefault.001 Data Domain azure-win2k22 03/12/2026 03:01:55 PM 133 GB 11720036 cb full DD-PERF:azure-win2k22:azure-win2k22_OsDisk_1_423227d3ef284695803c23cd47e8b839
azure_nsr.dddefault.001 Data Domain azure-win2k22 03/12/2026 03:01:56 PM 10 GB 4289910116 cb full DD-PERF:azure-win2k22:Data_Disk-1
azure_nsr.dddefault.001 Data Domain azure-win2k22 03/12/2026 03:57:07 PM 10 KB 4273136211 cb full Azure
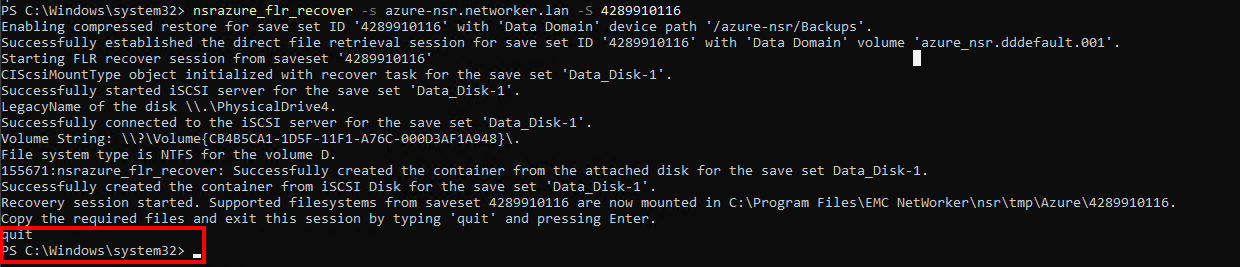
- Open an elevated command-prompt or PowerShell on the NetWorker client. Run the
nsrazure_flr_recovercommand to mount the VM disk save set:

- From Windows File Explorer, go to the mount point shown in the FLR output. The default path is
C:\Program Files\EMC NetWorker\nsr\tmp\Azure\SSID.
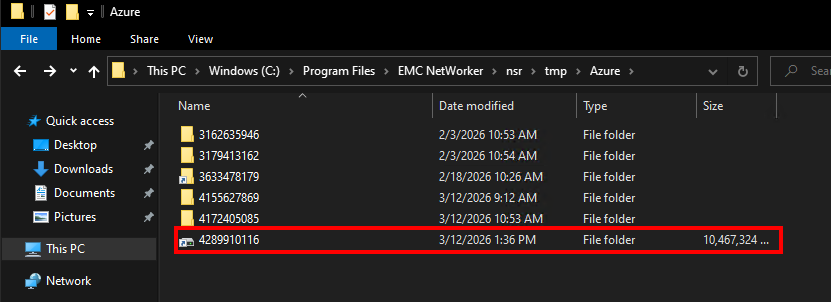
- Using Windows File Explorer (or commands). Copy the required data from the FLR mount point to the VM's file system.
- Once you are done copying data, enter
quitin the prompt from whichnsrazure_flr_recoverwas run. This closes the FLR session:
Additional Information
Affected Products
NetWorkerProducts
NetWorker FamilyArticle Properties
Article Number: 000438764
Article Type: How To
Last Modified: 06 أغسطس 2026
Version: 3
Find answers to your questions from other Dell users
Support Services
Check if your device is covered by Support Services.