PowerFlex 4.X:由于缺少虚拟 IP 导致操作系统转换失败
Summary: 当 MDM 群集的虚拟 IP 少于 MDM 数据 IP 时,资源组 (RG) 的操作系统转换会完成并导致 DU。
Symptoms
- 在仅存储 (SO) RG 中的一个或多个节点上运行操作系统转换操作,并且该过程失败。
- 目标节点已成功转换为 SLES 操作系统。
- 转换操作后,MDM 群集具有不同的配置模式,并且 State 显示为 Degraded。
--query_cluster输出可能会将最初作为管理器 MDM 的节点显示为仲裁,反之亦然。 角色可能不匹配actor_roleMDM 配置文件中的设置 —/opt/emc/scaleio/mdm/cfg/conf.txt.
示例:
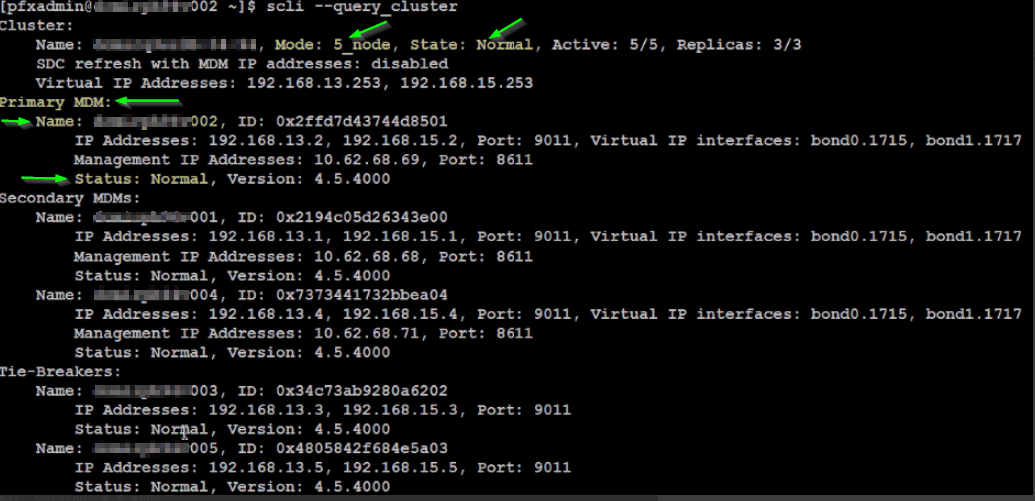
预操作系统转换
MDM 群集具有5_node配置模式和正常(正常运行)状态,节点 xxx002 处于正常状态并且处于管理器 MDM(主):
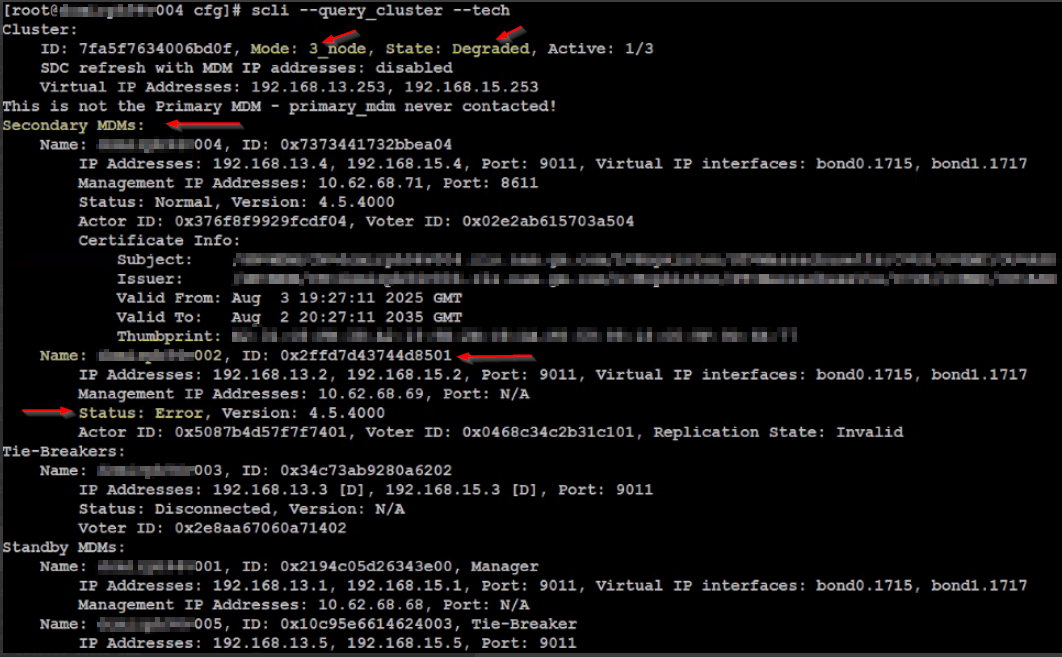
操作系统后转换
MDM 群集具有3_node配置模式和降级(不正常)状态,节点 xxx002 处于错误状态和管理器 MDM(辅助):
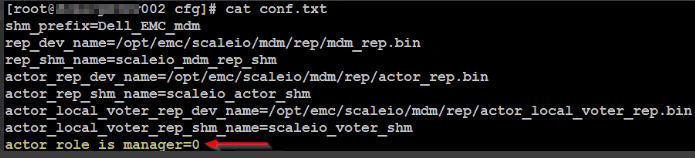
节点 xxx002 的配置文件设置为 actor_role_is_manager=0,即仲裁:
影响
MDM 群集处于故障和意外状态 — 可能是 DU。
Cause
在操作系统转换期间,PFMP 会在可用节点之间重新平衡 MDM 角色。PFMP 使用 MDM 群集的虚拟 IP 地址作为锚点来安装和添加 MDM 群集节点和备用管理器/仲裁。
将节点的操作系统成功转换为 SLES 后,将触发 MDM 群集节点的重新平衡过程,由于虚拟 IP 地址指示有 2 个 IP 要查找,并且节点有 4 个 IP,因此会导致搜索失败,并且安装将继续,方法是将安装默认为备用仲裁。
Cluster:
    Name: sio-1, ID: 0a1707234b50f20f, Mode: 5_node, State: Normal, Active: 5/5, Replicas: 3/3
	...
    Virtual IP Addresses: 10.122.160.100, 10.123.160.100	<<<<<
Primary MDM:
    Name: sio-101, ID: 0x6bd7be1d61b4c900
        IP Addresses: 10.122.160.101, 10.123.160.101, 10.122.224.101, 10.123.224.101, Port: 9011, Virtual IP interfaces: bond0.393, bond1.398	<<<<<
        ...
Secondary MDMs:
    Name: sio-102, ID: 0x0b5a343e4caba901
        IP Addresses: 10.122.160.102, 10.123.160.102, 10.122.224.102, 10.123.224.102, Port: 9011, Virtual IP interfaces: bond0.393, bond1.398	<<<<<
        ....
    Name: sio-104, ID: 0x749bb9791864d903
        IP Addresses: 10.122.160.104, 10.123.160.104, 10.122.224.104, 10.123.224.104, Port: 9011, Virtual IP interfaces: bond0.393, bond1.398	<<<<<
        ....
Tie-Breakers:
    Name: sio-105, ID: 0x612f04b03a127004
        IP Addresses: 10.122.160.105, 10.123.160.105, 10.122.224.105, 10.123.224.105, Port: 9011	<<<<<
        ...
    Name: sio-103, ID: 0x154f223f2046a305
        IP Addresses: 10.122.160.103, 10.123.160.103, 10.122.224.103, 10.123.224.103, Port: 9011	<<<<<
        ...
Standby MDMs:
    Name: sio-106, ID: 0x6bd7be1d61b4c900, Manager
        IP Addresses: 10.122.160.106, 10.123.160.106, 10.122.224.106, 10.123.224.106, Port: 9011, Virtual IP interfaces: bond0.393, bond1.398	<<<<<
        ...
	Name: sio-107, ID: 0x612f04b03a127004, Tie-Breaker
        IP Addresses: 10.122.160.107, 10.123.160.107, 10.122.224.107, 10.123.224.107, Port: 9011	<<<<<
    Name: sio-108, ID: 0x0b5a343e4caba901, Manager
        IP Addresses: 10.122.160.108, 10.123.160.108, 10.122.224.108, 10.123.224.108, Port: 9011, Virtual IP interfaces: bond0.393, bond1.398	<<<<<
        ...
    Name: sio-112, ID: 0x612f04b03a127004, Tie-Breaker
        IP Addresses: 10.122.160.112, 10.123.160.112, 10.122.224.112, 10.123.224.112, Port: 9011	<<<<<
因此,安装过程将恢复为默认 MDM 角色 Tie-Breaker,并且所有 MDM 都将安装为仲裁,从而中断 MDM 群集:
DEBUG [2025-11-23T06:51:03.699277] 316828: provider/elementmanager/scaleio.rb:5702:in `add_mdm': scaleio-block-legacy-gateway: Failed to add MDM sio-102 to VxOS cluster with error {"message"=>"Illegal number of IP addresses. The Primary MDM, the Secondary MDM, and the Tie-Breaker must each have the same number of IP addresses.", "httpStatusCode"=>500, "errorCode"=>298}. Retying 1 Resolution
为避免操作系统转换失败或出现 DU,请在尝试操作系统转换之前执行以下操作。
通过增加虚拟 IP 接口并添加虚拟 IP 地址或减少 MDM 的数据 IP,MDM 群集成员和备用 MDM 的 IP 地址 (DATA IP) 数量必须与群集的虚拟 IP 地址相同。
请按照以下选项之一修复问题:增加 MDM 群集的虚拟 IP 以与主/辅助/仲裁/备用 MDM 的数据 IP 计数保持一致,或减少数据 IP 以与 MDM 群集的虚拟 IP 计数保持一致。
增加 MDM 群集的虚拟 IP。
- 确保按照与相应 SDS IP 角色相同的顺序添加virtual_ip_interface。
- 请确保按照与其对应cluster_virtual_ip相同的顺序添加virtual_ip_interface。
- 确保将新cluster_virtual_ip添加到 SDC。
1) 将其他虚拟 IP 添加到群集,并将虚拟 IP 接口添加到主 MDM 和辅助 MDM。
a.清除现有虚拟 IP:
scli --modify_cluster_virtual_ips --clear_all
B。添加旧的和新的虚拟 IP(逗号分隔的列表,每个逗号后省略空格):
scli --modify_cluster_virtual_ips --cluster_virtual_ip <Virtual IP 1,Virtual IP 2,Virtual IP 3,Virtual IP 4>
c. 清除现有虚拟 IP 接口:
scli --modify_virtual_ip_interfaces --clear_all
d. 在主 MDM 和辅助 MDM 上添加新旧虚拟 IP 接口(逗号分隔列表,省略每个逗号后的空格):
scli --modify_virtual_ip_interfaces --target_mdm_ip <Primary MDM management IP> --new_mdm_virtual_ip_interface <Virtual Interface 1,Virtual Interface 2,Virtual Interface 3,Virtual Interface 4>

scli --modify_virtual_ip_interfaces --target_mdm_ip <Secondary MDM management IP> --new_mdm_virtual_ip_interface <Virtual Interface 1,Virtual Interface 2,Virtual Interface 3,Virtual Interface 4>
2) 使用新 IP 更新 SDC/s 和使用群集虚拟 IP 的任何其他客户端:
- Linux:
/opt/emc/scaleio/sdc/bin/drv_cfg提醒:新的 IP 地址列表是逗号分隔的列表,并且必须在每个逗号后省略空格。如果要保留现有地址,请将其包含在此列表中。drv_cfg --mod_mdm_ip --ip <One of the existing MDM IP addresses> <All MDM IP addresses>
- Windows:
C:\Program Files\emc\scaleio\sdc\bin\drv_cfg
- ESXi:
- 获取正在运行的配置。该命令将返回一个字符串,表示当前设置的所有 ESXi 配置参数、SDC GUID 和 MDM IP:
cat /etc/vmware/esx.conf | grep scini | grep options-
- 使用输出中的详细信息运行命令以添加新的虚拟 IP(逗号分隔列表,每个逗号后省略空格):
提醒:
<XXX> — 是用户生成的 GUID 字符串。可以在主 MDM 上使用 SCLI 命令“--query_all_sdc”验证 GUID。
<> LIST_VIP_MDM_IPS是所有 MDM IP 地址或 MDM 的虚拟 IP 地址的逗号分隔列表。请勿在此处包含仲裁 IP 地址。
- 使用输出中的详细信息运行命令以添加新的虚拟 IP(逗号分隔列表,每个逗号后省略空格):
- 使 ESXi 进入维护模式并重新启动。
3) 使用 PFMP UI 删除 RG,然后使用所有 MDM 群集虚拟 IP 地址(旧和新)重新添加。
4) 在操作系统对话成功完成且系统处于正常运行状态后,要还原更改,请运行 步骤 1-3。
减少 MDM 数据 IP。
1) 根据当前群集模式,将 MDM 群集缩减为3_node或1_node模式。
2) 根据群集的 VIP 数量,重新添加具有较少 MDM 数据 IP 的所有 MDM(备用、TB 和辅助)。
受影响的版本
PFMP 4.x
已修复问题的版本
PFMP 5.1