NFSリモートI/Oエラー:FSが有効なバケットのバケット所有者を変更すると、アプリケーションやユーザーがNFSファイルにアクセスできなくなる可能性がある(英語)」
Summary: 以前のバケット所有者が許可されていないか、制限されています ObjectControllerException: メソッド updateObjectInternal は以前のバケット所有者に対して許可されていません
This article applies to
This article does not apply to
This article is not tied to any specific product.
Not all product versions are identified in this article.
Symptoms
ユーザー インターフェイスのバケット所有者ページに対してユーザーが行った変更:
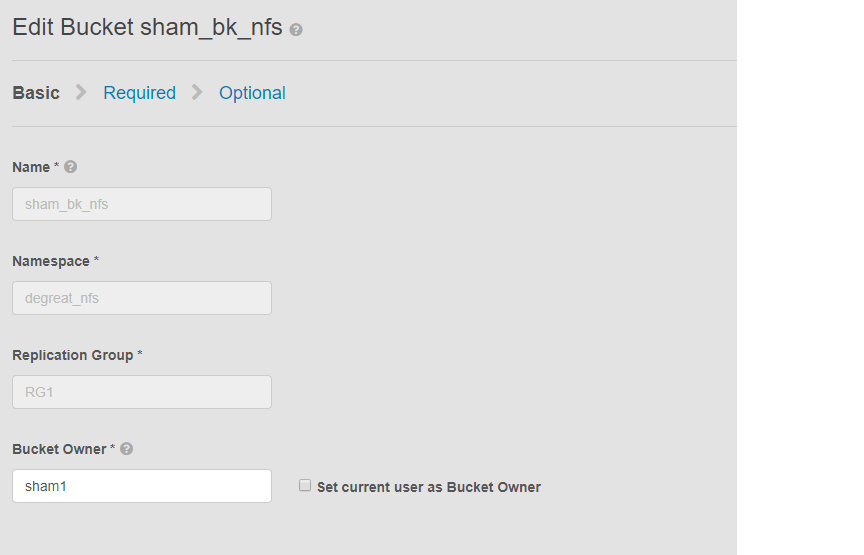
この問題は、NFSが有効なバケットと、ユーザー インターフェイスによるバケット所有者の変更に該当します。これにより、接続されているアプリケーションまたはユーザーがLinuxファイル システム上のバケットにアクセスできなくなる可能性があります。変更を元の所有者に戻しても、DUにつながるアクセスはできなくなります
この例では、
ユーザー インターフェイスを使用してバケット所有者が「sham2」に変更されています。ECSの制限により、バケット所有者名を「sham1」に戻した後でも同様です。ECSでは、ユーザー インターフェイスを使用してバケット所有者を「sham1」には戻しません。現時点では、所有者フラグをtrueにリセットするペイロードを含むAPIを使用してCLIでのみ実行できます
問題を特定するには、Linuxマシンでユーザーにファイルのタッチを依頼します。例:
この問題は、NFSが有効なバケットと、ユーザー インターフェイスによるバケット所有者の変更に該当します。これにより、接続されているアプリケーションまたはユーザーがLinuxファイル システム上のバケットにアクセスできなくなる可能性があります。変更を元の所有者に戻しても、DUにつながるアクセスはできなくなります
この例では、
ユーザー インターフェイスを使用してバケット所有者が「sham2」に変更されています。ECSの制限により、バケット所有者名を「sham1」に戻した後でも同様です。ECSでは、ユーザー インターフェイスを使用してバケット所有者を「sham1」には戻しません。現時点では、所有者フラグをtrueにリセットするペイロードを含むAPIを使用してCLIでのみ実行できます
問題を特定するには、Linuxマシンでユーザーにファイルのタッチを依頼します。例:
admin@node1~>touch file
touch: setting times of `file': Remote I/O error

se svc_log with the string  "method updateObjectInternal "

Command:
# svc_log -a -sr dataheadsvc | grep "method updateObjectInternal"
Example:
admin@node1~>svc_log -a -sr dataheadsvc | grep "method updateObjectInternal"
svc_log v1.0.22 (svc_tools v1.5.3)                 Started 2019-06-06 10:45:04

Running on nodes:              <All nodes>
Time range:                    2019-06-05 10:45:04 - 2019-06-06 10:45:04
Filter string(s):              <All messages>
Show nodename(s):              True
Search reclaim logs (if any):  False

com.emc.storageos.data.object.exception.ObjectControllerException: method updateObjectInternal not allowed for previous bucket owner sham1
Caused by: com.emc.storageos.data.object.exception.ObjectControllerException: method updateObjectInternal not allowed for previous bucket owner sham1
Cause
特定のユーザーを所有者としてバケットを作成し、その後にバケットの所有権を変更する。最後に、ACLページを使用して元の所有者にフル コントロールを付与すると、ECSログ例外により失敗します。
ObjectControllerException: method updateObjectInternal not allowed for previous bucket owner <ownerid>
This is a known issue currently being evaluated by Dell EMC at this time.
Resolution
回避策は、ペイロードでCLIを介してAPIを使用してバケット所有者を変更し、ownerフラグをtrueにリセットすることです
1.現在のバケット所有者を確認します。
2.viエディターを使用して、単純なxmlファイルを作成します。以下の例では、/tmp/bucket-owner.xml と呼ばれています。これは、複数ステップのプロセスです。一時的にsham2の新しい所有者に設定する必要があります。次の例のように、元の所有者 sham1 に戻す前に、出力を確認します。
。7.構成の変更が完了すると、同じエラーは表示されなくなります
1.現在のバケット所有者を確認します。
トークンを生成するには、ユーザー インターフェイスのrootパスワードが必要です。例:
admin@ecsnode1:~> tok=$(curl -iks https://XX.XX.XX.XX:4443/login -u 'root:ChangeMe' | grep X-SDS-AUTH-TOKEN)
現在のバケット所有者を確認します(状況に応じてバケットとネームスペースを代用します)。
admin@node1:~> curl -s -k -X GET -H "$tok" https://XX.XX.XX.XX:4443/object/bucket/sham_bk_nfs/info?namespace=degreat_nfs | xmllint --format - | grep '<owner>'
  <owner>sham2</owner>
これにより、パラメーター reset_previous_ownersをtrueに設定する必要があることが確認されます。元に戻されたバケット所有者はユーザー インターフェイス上にありますが、CLI経由のAPIでは、ECSがまだバケット所有者を「sham2」として認識していることが確認されます。
2.viエディターを使用して、単純なxmlファイルを作成します。以下の例では、/tmp/bucket-owner.xml と呼ばれています。これは、複数ステップのプロセスです。一時的にsham2の新しい所有者に設定する必要があります。次の例のように、元の所有者 sham1 に戻す前に、出力を確認します。
admin@node1:~ # vi /tmp/bucket-owner.xml

admin@ecsnode1:~ # cat /tmp/bucket-owner.xml
<object_bucket_update_owner>
   <namespace>degreat_nfs</namespace>
   <new_owner>sham2</new_owner>
   <reset_previous_owners>true</reset_previous_owners>
</object_bucket_update_owner>

3. Change the bucket owner to the temporary owner.
xmlファイルを使用してバケット所有者を「sham2」に変更するために必要なAPI構文は次のとおりです。
admin@ecsnode1:~> curl -v -k -X "POST" "https://xx.xx.xx.xx:4443/object/bucket/sham_bk_nfs/owner" -H "$tok" -H "Content-Type: application/xml" -H "ACCEPT:application/xml" -d @/tmp/bucket-owner.xml -v
* Hostname was NOT found in DNS cache
*   Trying xx.xx.xx.xx...
* Connected to xx.xx.xx.xx (xx.xx.xx.xx) port 4443 (#0)
* successfully set certificate verify locations:
*   CAfile: none
  CApath: /etc/ssl/certs/
* SSLv3, TLS unknown, Certificate Status (22):
* SSLv3, TLS handshake, Client hello (1):
* SSLv3, TLS handshake, Server hello (2):
* SSLv3, TLS handshake, Certificate (11):
* SSLv3, TLS handshake, Server key exchange (12):
* SSLv3, TLS handshake, Server finished (14):
* SSLv3, TLS handshake, Client key exchange (16):
* SSLv3, TLS change cipher, Client hello (1):
* SSLv3, TLS handshake, Finished (20):
* SSLv3, TLS change cipher, Client hello (1):
* SSLv3, TLS handshake, Finished (20):
* SSL connection using TLSv1.2 / ECDHE-RSA-AES256-GCM-SHA384
* Server certificate:
*        subject: CN=localhost
*        start date: 2019-03-25 09:53:41 GMT
*        expire date: 2029-03-22 09:53:41 GMT
*        issuer: CN=localhost
*        SSL certificate verify result: self signed certificate (18), continuing anyway.
> POST /object/bucket/sham_bk_nfs/owner HTTP/1.1
> User-Agent: curl/7.37.0
> Host: xx.xx.xx.xx:4443
> X-SDS-AUTH-TOKEN: BAAcUy9KYlhxTlVYb2M0bnF3bTNscEsvSEdDeWhJPQMAjAQASHVybjpzdG9yYWdlb3M6VmlydHVhbERhdGFDZW50ZXJEYXRhOmJhOGQ3ZTkzLTMyMGYtNDNmNy05Y2FkLWM4YWQzMWFiMzY1MAIADTE1NTk3Mzk3OTA2MDgDAC51cm46VG9rZW46YjQ4NGNiZjEtNTkwNy00YWI3LTgzYTctM2Y3OGRhM2RiY2NiAgAC0A8=
> Content-Type: application/xml
> ACCEPT:application/xml
> Content-Length: 179
>
* upload completely sent off: 179 out of 179 bytes
< HTTP/1.1 200 OK
< Date: Thu, 06 Jun 2019 10:56:08 GMT
< Content-Length: 0
< Connection: keep-alive
<
* Connection #0 to host xx.xx.xx.xx left intact
4. Edit the simple.xml file previously created in step 2 and this time insert original owner of sham1
admin@node1:~ # vi /tmp/bucket-owner.xml

admin@ecsnode1:~ # cat /tmp/bucket-owner.xml
<object_bucket_update_owner>
   <namespace>degreat_nfs</namespace>
   <new_owner>sham1</new_owner>
   <reset_previous_owners>true</reset_previous_owners>
</object_bucket_update_owner>

5. Change the bucket owner back to the original owner
The API syntax required to change the bucket owner back to "sham1" through the xml file is as follows:
admin@ecsnode1:~> curl -v -k -X "POST" "https://xx.xx.xx.xx:4443/object/bucket/sham_bk_nfs/owner" -H "$tok" -H "Content-Type: application/xml" -H "ACCEPT:application/xml" -d @/tmp/bucket-owner.xml -v
* Hostname was NOT found in DNS cache
*   Trying xx.xx.xx.xx...
* Connected to xx.xx.xx.xx (xx.xx.xx.xx) port 4443 (#0)
* successfully set certificate verify locations:
*   CAfile: none
  CApath: /etc/ssl/certs/
* SSLv3, TLS unknown, Certificate Status (22):
* SSLv3, TLS handshake, Client hello (1):
* SSLv3, TLS handshake, Server hello (2):
* SSLv3, TLS handshake, Certificate (11):
* SSLv3, TLS handshake, Server key exchange (12):
* SSLv3, TLS handshake, Server finished (14):
* SSLv3, TLS handshake, Client key exchange (16):
* SSLv3, TLS change cipher, Client hello (1):
* SSLv3, TLS handshake, Finished (20):
* SSLv3, TLS change cipher, Client hello (1):
* SSLv3, TLS handshake, Finished (20):
* SSL connection using TLSv1.2 / ECDHE-RSA-AES256-GCM-SHA384
* Server certificate:
*        subject: CN=localhost
*        start date: 2019-03-25 09:53:41 GMT
*        expire date: 2029-03-22 09:53:41 GMT
*        issuer: CN=localhost
*        SSL certificate verify result: self signed certificate (18), continuing anyway.
> POST /object/bucket/sham_bk_nfs/owner HTTP/1.1
> User-Agent: curl/7.37.0
> Host: xx.xx.xx.xx:4443
> X-SDS-AUTH-TOKEN: BAAcUy9KYlhxTlVYb2M0bnF3bTNscEsvSEdDeWhJPQMAjAQASHVybjpzdG9yYWdlb3M6VmlydHVhbERhdGFDZW50ZXJEYXRhOmJhOGQ3ZTkzLTMyMGYtNDNmNy05Y2FkLWM4YWQzMWFiMzY1MAIADTE1NTk3Mzk3OTA2MDgDAC51cm46VG9rZW46YjQ4NGNiZjEtNTkwNy00YWI3LTgzYTctM2Y3OGRhM2RiY2NiAgAC0A8=
> Content-Type: application/xml
> ACCEPT:application/xml
> Content-Length: 179
>
* upload completely sent off: 179 out of 179 bytes
< HTTP/1.1 200 OK
< Date: Thu, 06 Jun 2019 10:56:08 GMT
< Content-Length: 0
< Connection: keep-alive
<
* Connection #0 to host xx.xx.xx.xx left intact


6.  Confirm the bucket owner change is reflected.
バケット所有者の変更が「sham1」になったことを確認します。
admin@ecsnode1:~> curl -s -k -X GET -H "$tok" https://XX.XX.XX.XX:4443/object/bucket/sham_bk_nfs/info?namespace=degreat_nfs | xmllint --format - | grep '<owner>'
<owner>sham1</owner>
APIでバケット所有者が復元されたら、ホストがLinuxファイル システム上のバケットにアクセスできるようになったことを確認します。
。7.構成の変更が完了すると、同じエラーは表示されなくなります
svc_log -f "method updateObjectInternal not allowed" -start "20 hour ago" -sr all -sh -st hour
svc_log v1.0.22 (svc_tools v1.6.8)                 Started 2020-01-23 09:28:17

Running on nodes:              <All nodes>
Time range:                    2020-01-22 13:28:17 - 2020-01-23 09:28:17
Filter string(s):              'method updateObjectInternal not allowed'
Show nodename(s):              True
Search reclaim logs (if any):  False

Count of message occurrences per hour:

2020-01-22 13:xx - 5066
2020-01-22 14:xx - 9580
2020-01-22 15:xx - 9574
2020-01-22 16:xx - 9580
2020-01-22 17:xx - 9570
2020-01-22 18:xx - 9576
2020-01-22 19:xx - 9564
2020-01-22 20:xx - 9576
2020-01-22 21:xx - 9576
2020-01-22 22:xx - 9572
2020-01-22 23:xx - 9564
2020-01-23 00:xx - 9586
2020-01-23 01:xx - 9574
2020-01-23 02:xx - 9572
2020-01-23 03:xx - 4564
2020-01-23 04:xx - 0
2020-01-23 05:xx - 0
2020-01-23 06:xx - 0
2020-01-23 07:xx - 0
2020-01-23 08:xx - 0
2020-01-23 09:xx - 0


Dell EMC is aware of this issue and are working on a fix in a future release.
Additional Information
関連するNFS KB:
- 基本的なNFSエクスポートを作成し、クライアントにマウントする方法
- ECS:dataheadsvcログ ストリーミング エラー:NFSv3手順LINKがリクエストReadLinkRequestでサポートされていません
- NFSマウントが「No such file or directory」またはERROR_OBJECT_NOT_FOUNDで失敗する, ECS, NFS mount failing with No such file or directory or ERROR_OBJECT_NOT_FOUND
- NFSリモートI/Oエラー:FSが有効なバケットのバケット所有者を変更すると、アプリケーション/ユーザーがNFSファイルにアクセスできなくなる可能性がある(英語)」
- NFS書き込みで、一定量のデータの後にI/Oエラーがスローされる(英語)」
- VMware NFSデータストアでのECSからのNFSファイル共有の使用(英語)」
- ECS NFSエクスポートをマウントするためのベスト プラクティス(英語)」
- WindowsクライアントでNFS共有をマウントする方法, ECS, How to mount NFS share on Windows client
- UIでファイル エクスポート設定を変更した後、NFSのマウントに失敗する(英語)」
- Oracle WebCenter Content (WCC)はECSと互換性がありますか(英語)」
製品アップデートをサブスクライブします。
以下のナレッジベース記事の手順に従って、アップデートをサブスクライブできます。
DELL EMC:製品ページをサブスクライブする方法 - Dellサポート?
Affected Products
Elastic Cloud StorageProducts
ECS Appliance, ECS Appliance Software with Encryption, ECS Appliance Software without Encryption, Elastic Cloud StorageArticle Properties
Article Number: 000055535
Article Type: Solution
Last Modified: 15 صفر 1448
Version: 5
Find answers to your questions from other Dell users
Support Services
Check if your device is covered by Support Services.