ME4: Erfassen von Diagnoseprotokollen mithilfe von FTP
Zusammenfassung: In diesem Artikel werden die Schritte zum Erfassen des Support-Bundles über das File Transfer Protocol (FTP) für Storage-Produkte der PowerVault ME-Serie beschrieben.
Dieser Artikel gilt für
Dieser Artikel gilt nicht für
Dieser Artikel ist nicht an ein bestimmtes Produkt gebunden.
In diesem Artikel werden nicht alle Produktversionen aufgeführt.
Weisungen
In diesem Artikel werden die Schritte zum Erfassen des Supportbündels über FTP beschrieben.
Sichere FTP-Dienstprogramme wie PSFTP können das Support-Bundle nicht erfassen. FTP muss auf dem Storage aktiviert sein.
Die Protokolle können von beiden Controllern mithilfe des FTP-Protokolls erfasst werden.
Voraussetzungen
-
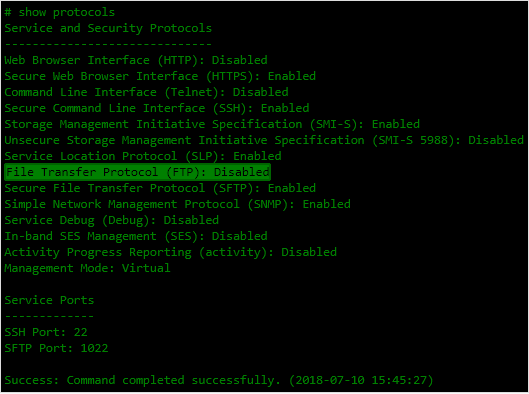
Stellen Sie sicher, dass das FTP-Protokoll auf dem Speicher-Controller aktiviert ist, indem Sie den Befehl
show protocolsBefehl über die CLI oder durch Aktivieren von FTP mithilfe von PowerVault Manager (PVM) im Thema Start , wählen Sie Folgendes aus: Aktion → Systemeinstellungen → Services und aktivieren Sie das Kontrollkästchen für File Transfer Protocol.
- Nutzeranmeldedaten mit Berechtigungen zur Überwachung
- Verwenden Sie den Befehl
show users, um zu sehen, wer mit FTP-Zugriff aktiviert wurde.
- Verwenden Sie den Befehl
Verfahrensübersicht
- Öffnen Sie eine FTP-Sitzung:
ftp <controller IP address>
- Melden Sie sich als Nutzer mit FTP- und Monitorzugriff an:
manageoderftp
- Geben Sie das Kennwort für die
manageoderftpBenutzer:******
- Speichern Sie die Datei vom ME4-Array auf dem lokalen System:
get logs <filename.zip>
<filename.zip> Kennwort für die manage oder ftp user ist der Name der Bundle-Datei, nachdem diese vom ME4-Array übertragen wurde.
- Beenden Sie die FTP-Sitzung:
bye
- Senden Sie die Datei an Ihren Dell Supportmitarbeiter.
Aktivieren Sie FTP auf dem Array (FTP ist standardmäßig nicht aktiviert).
Verwenden der PVM-Benutzeroberfläche
- Wählen Sie unter " Start " Folgendes aus: Aktion → Systemeinstellungen → Services und aktivieren Sie das Kontrollkästchen für File Transfer Protocol.
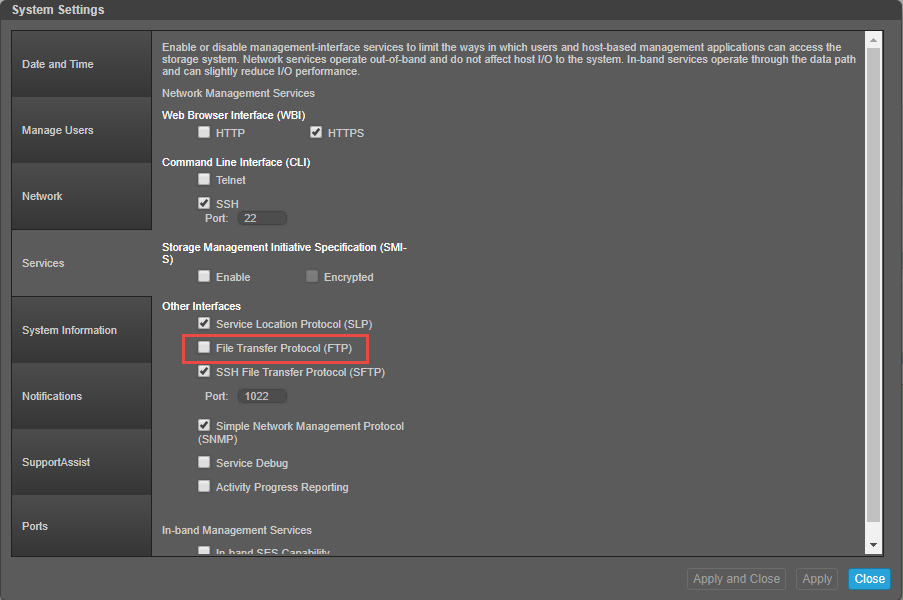
- Nachdem Sie das Kontrollkästchen für FTP aktiviert haben, klicken Sie auf Apply
- Ein Bildschirm wird angezeigt, um die Änderungen zu bestätigen. Wählen Sie OK aus.
Verwenden der ME4-CLI
Nutzerkonten, die FTP verwenden, haben möglicherweise keinen Zugriff auf die PVM-Benutzeroberfläche. Verwenden Sie in dieser Instanz die CLI.
Maximieren Sie das Fenster des Terminalemulators, um das beste Ausgabeformat auf dem Bildschirm zu erhalten.
- Um zu sehen, ob das FTP-Protokoll auf dem ME4-Array aktiviert ist, führen Sie den folgenden Befehl aus:
show protocols
- Um die FTP-Protokollunterstützung auf dem ME4 zu aktivieren, führen Sie den folgenden Befehl aus:
set protocols ftp enabled. Um sie nach Abschluss der Protokollerfassung zu deaktivieren, führen Sie den folgenden Befehl aus:set protocols ftp disabled.

- (Optional) Erstellen Sie einen Nutzer, um die Storage-Protokolle zu erfassen, und führen Sie dann den folgenden Befehl aus:
create user <UserName> interfaces ftp. Beim Nutzernamen und Kennwort wird zwischen Groß- und Kleinschreibung unterschieden.

Hinweis: FTP verwendet die Portnummern 20 und 21 für die Befehlssteuerung und Datenübertragung. Wenn diese Ports nicht geöffnet sind, kann möglicherweise eine Sitzung geöffnet werden, aber es können keine Dateien übertragen werden.
- Für Windows-Benutzer erstellen Sie im Fenster Firewall eine neue eingehende Regel, lassen Sie TCP ausgewählt und geben Sie die Portnummern 20 und 21 ("20, 21") ein.
- Wählen Sie die Option aus. Erlauben Sie der Verbindung, eingehenden Datenverkehr über diese Ports zu akzeptieren.
- Öffnen Sie eine FTP-Sitzung von Ihrem Host-Client zur Managementschnittstelle auf einem der ME4-Controller
ftp <management interface IP address> - Melden Sie sich als Nutzer mit FTP- und Monitorzugriff an:
manageoderftp - Geben Sie das Kennwort für die
manageoderftpBenutzer:****** - Speichern Sie die Datei vom ME4-Array auf dem lokalen System:
get logs <filename.zip>
<filename.zip> Kennwort für die manage oder ftp user ist der Name der Bundle-Datei, nachdem sie vom ME4-Array übertragen wurde.
- Beenden Sie die FTP-Sitzung:
bye - Senden Sie die Datei an Ihren Dell Supportmitarbeiter. (Die Datei befindet sich in Ihrem aktuellen Arbeitsverzeichnis)
Beispielausgabe einer FTP-Sitzung vom Windows-Hostclient:
C:\dell\logs>ftp 172.28.120.XX
Connected to 172.28.120.XX.
220-Welcome to Pure-FTPd.
220-You are user number 1 of 5 allowed.
220-Local time is now 15:58. Server port: 21.
220-This is a private system - No anonymous login
220-IPv6 connections are also welcome on this server.
220 You will be disconnected after 15 minutes of inactivity.
User (172.28.120.30:(none)): ftp                                  <------- Login as a user with FTP permissions
331 User ftp OK. Password required
Password:
230-OK. Current restricted directory is /
230-Instructions for getting the cumulative I/O density data:
230-    1. Log in with user name and password
230-    2. Type 'get logs:heatmap <filename.csv> is a file to capture the cumulative
230-        I/O density data
230-    3. Example: 'get logs:heatmap IO_density.csv'
230-
230-Instructions for updating firmware in controller modules:
230-    1. Type 'put <filename> flash' where <filename> is the new firmware image to load.
230-    2. For a single controller load, it will take approximately 10 minutes for
230-        the new firmware to load and for the automatic restart to complete. For
230-        a system load (dual controller, PFU enabled), allow an additional 15
230-        minutes for the partner controller to be updated.
230-        If using FTP, progress messages will be displayed in the FTP client
230-        interface during that time.
230-        If using SFTP, progress messages will *not* be displayed in the SFTP
230-        client.   Instead, progress may be monitored via the Management Port
230-        (e.g., :8081) or by issuing a "get progress" command with a separate
230-        FTP/SFTP connection.
230-        Wait for the progress messages to indicate that the code load has
230-        completed.
230-    3. If PFU is not enabled and a system load was not performed, log into the
230-        other controller and repeat steps 1-2.
230-    4. WARNING! Do not power cycle or restart during the firmware update
230-        as this can result in loss of capabilities for this unit.
230-    5. If you attempt to load an incompatible firmware version (such as code
230-        that is intended only for an iSCSI system on an FC system) the message
230-        "*** Code Load Fail. Bad format image. ***" will be displayed and the FTP
230-        prompt will come back in just a few seconds. The code will not be loaded.
230-
230-Instructions for updating firmware in expansion modules:
230-    1. Obtain the address of each enclosure management processor (EMP) in the form
230-        <EMP-channel-ID>:<EMP-target-ID> (for example, 0:63 and 1:63)
230-        and obtain the firmware revision of each EMP.
230-        Determine which EMPs need to be updated based on the revision.
230-        Note: In the WBI, the EMP addresses are displayed by clicking on each
230-        enclosure in the Configuration View. The needed data is displayed
230-        in the fields labeled 'EMP A Bus ID', 'EMP B Bus ID', 'EMP A Target ID',
230-        'EMP B Target ID', 'EMP A Revision', and 'EMP B Revision'. (The terms
230-        'bus' and 'channel' are equivalent.)
230-        Note: In the CLI, enter 'show enclosures'. The needed data is displayed
230-        in the columns labeled 'EMP A CH:ID Rev' and 'EMP B CH:ID Rev'.
230-    2. Log in via FTP/SFTP with user name and password.
230-    3. Type 'put <filename> encl:<EMP-channel-ID>:<EMP-target-ID>'
230-        where <filename> is the new firmware image to load.
230-    4. It typically takes several minutes for the new firmware to load.
230-        If using FTP, progress messages will be displayed in the FTP client
230-        interface during that time.
230-        If using SFTP, progress messages will *not* be displayed in the SFTP
230-        client.   Instead, progress may be monitored via the Management Port
230-        (e.g., :8081) or by issuing a "get progress" command with a separate
230-        FTP/SFTP connection.
230-        Wait for the progress messages to indicate that the code load has
230-        completed.
230-        WARNING! Do not power cycle or restart during the firmware update
230-        as this can result in loss of capabilities for this unit.
230-    5. Repeat steps 3-4 for each EMP to update in each enclosure.
230-
230-Instructions for updating disk firmware:
230-    1. Obtain the address of each disk to be loaded in the form
230-        <enclosure-ID>.<slot-number> (for example, 0.1 and 1.9)
230-        and obtain the firmware revision of each of these disks.
230-        Determine which disks need to be updated based on the revision.
230-        Note: In the WBI, the disk addresses are displayed by clicking on each
230-        enclosure in the Configuration View and then selecting the desired
230-        disk. The needed data is displayed in the fields labeled 'Enclosure ID',
230-        'Slot', and 'Revision'.
230-        Note: In the CLI, enter 'show disks'. The needed data is displayed
230-        in the columns labeled 'Location' and 'Revision'.
230-    2. Log in via FTP/SFTP with user name and password.
230-    3. Type 'put <filename> disk:<disk-list>'
230-        where <filename> is the new firmware image to load,
230-        and <disk-list> is a list of the form currently supported in the CLI.
230-        You can specify:
230-        - A disk (Example: 0.4)
230-        - A hyphenated range of disks (Example: 0.4-7)
230-        - A comma-separated list of individual disks, ranges, or both with no spaces.
230-          (Example: 0.4,0.6-9)
230-        If "disk" with no disk-list is entered, all disks compatible with the
230-        specified firmware will be updated.
230-    4. It typically takes several minutes for the new firmware to load.
230-        If using FTP, progress messages will be displayed in the FTP client
230-        interface during that time.
230-        If using SFTP, progress messages will *not* be displayed in the SFTP
230-        client.   Instead, progress may be monitored via the Management Port
230-        (e.g., :8081) or by issuing a "get progress" command with a separate
230-        FTP/SFTP connection.
230-        Wait for the progress messages to indicate that the code load has
230-        completed.
230-        WARNING! Do not power cycle or restart during the firmware update
230-        as this can result in loss of capabilities for this unit.
230-    5. Repeat steps 3-4 for each disk to update in each enclosure.
230-
230-Instructions for getting debug logs:      <---- This is what you are going to do
230-    1. Log in with a user name and password.
230-    2. Type 'get logs <filename.zip>'
230-        where <filename.zip> is the file to capture the system debug logs.
230-        Note the debug logs are in a compressed archive format and will need to be
230-        uncompressed before viewing.
230-
230-Instructions for getting disk debug dump (Seagate Drives Only):
230-    1. Log in with a user name and password.
230-    2. Type 'get logs:disk:<enclosure-ID>.<slot-number>[:trigger] <filename.zip>'
230-        where <filename.zip> is the file to capture the disk debug logs.
230-        Note the drive dump are in a compressed archive format and will need to
230-        be uncompressed before processing.
230-        - The disk to collect the debug dump from is specified by
230-          <enclosure-ID>.<slot-number> (for example, 0.1).
230-        - A disk debug dump can be manually triggered with the ":trigger" keyword.
230-          This could overwrite old debug data with the newly triggered data, so
230-          it should only be done when instructed.
230-    Prerequisites: Drive must be a spinning/ready Native-SAS Seagate drive that
230-                   is NOT part of an active VDisk (acceptable states are:
230-                   Available/Spare/Leftover/Failed).
230-
230-Instructions for getting historical disk-performance statistics:
230-    1. Log in as a user that has permission to use the FTP/SFTP interface.
230-    2. Type 'get perf[:<date/time-range>] <filename>.csv'
230-        where <filename>.csv is the file to capture the historical
230-        disk-performance statistics and <date/time-range> is optional
230-        and specifies the time range of data to transfer, in the format:
230-        start.<yyyy>-<mm>-<dd>.<hh>:<mm>.[AM|PM].end.<yyyy>-<mm>-<dd>.<hh>:<mm>.[AM|PM]
230-        The <date/time-range> string must contain no spaces.
230-    3. Example: 'get perf:start.2015-01-03.04:00.AM.end.2015-01-05.10:00.PM. statistics
230-
230-Instructions for loading a license file:
230-    1. Log in via FTP/SFTP with user name and password.
230-    2. Type 'put <certificate.txt> license'
230-        where <certificate.txt> is the name of the license file generated
230-        for your specific system.
230-
230-Instructions for loading security certificate files:
230-    1. The security certificate files will consist of a pair of files.
230-       You will have a certificate file and a key file.
230-    2. Log in with a user name and password.
230-    3. Type 'put <certificate-file-name> cert-file'
230-        where <certificate-file-name> is the name of the certificate file
230-        for your specific system.
230-    4. Type 'put <key-file-name> cert-key-file'
230-       where <key-file-name> is the name of the security key file for
230-        your specific system.
230-    5.  Restart both Management Controllers to have the new security
230-        certificate take effect.
230-
230
ftp> get logs me4012_08072018.zip                             <--- get logs <yourfilename.zip>
200 PORT command successful
150-Starting operation:
STATUS: Getting Storage Controller logs ...
Please wait...
Please wait...
Please wait...
Please wait...
Please wait...
Please wait...
Please wait...
Please wait...
Please wait...
Please wait...
Please wait...
Please wait...
Please wait...
Please wait...
Please wait...
Please wait...
STATUS: Finished getting Storage Controller logs
STATUS: Getting logs from Partner Management Controller B
Please wait...
STATUS: Finished getting the Partner Management Controller B logs
STATUS: Getting local Management Controller logs from A
Please wait...
STATUS: Finished getting logs from local Management Controller.
STATUS: get logs operation is complete
Size: 11278053 bytes

Operation Complete
150-Connecting to port 55639
150 (11278053 bytes) to download
226-File successfully transferred
226 2.737 seconds (measured here), 3.93 Mbytes per second
ftp: 11278053 bytes received in 2.72Seconds 4147.87Kbytes/sec.
ftp> bye                                                               <--- exit the FTP session
221-Goodbye. You uploaded 0 and downloaded 11014 kbytes.
221 Logout
Betroffene Produkte
OEMR ME40XX and ME4XX, Dell EMC PowerVault ME4012, Dell EMC PowerVault ME4024, Dell EMC PowerVault ME4084, Dell EMC PowerVault ME412 Expansion, Dell EMC PowerVault ME424 Expansion, Dell EMC PowerVault ME484Artikeleigenschaften
Artikelnummer: 000117696
Artikeltyp: How To
Zuletzt geändert: 03 Sept. 2025
Version: 4
Antworten auf Ihre Fragen erhalten Sie von anderen Dell NutzerInnen
Support Services
Prüfen Sie, ob Ihr Gerät durch Support Services abgedeckt ist.