Article Number: 000150882
USB-CおよびThunderbolt EthernetアダプターからPXE起動を実装する方法
Summary: USB-CまたはThunderbolt Ethernetアダプターを使用する場合のPXE(Pre-Boot Execution)起動プロセスの進行に関する情報。
Article Content
Instructions
PXE起動
PXEを起動する際には、BIOSでいくつかのオプションを有効にする必要がある場合があります(図1)。
注:次のスクリーンショット(図1および2)は、必要なオプションの例です。お使いのPCのBIOSオプションは異なる場合があります。
- Fastboot オプションを Thorough に設定して、UEFI PXE起動を有効にします。
- Windows 10および11: レガシー オプションROM はオフにする必要があります。必要に応じて、セキュア ブート が有効になっている場合があります。

図1: Dell BIOSの詳細ブート オプション
- USB-Cアダプターを使用している場合は、BIOSで Thunderbolt起動 サポートを有効にします。(すべてのチェックボックスをオンにします)(図2)

図2:Thunderbolt起動サポートの有効化
- サーバーは UEFI PXEブート をサポートしている必要があります(通常、Windows Server 2012が必要です)。
- BIOSを終了し、[ UEFI PXE Boot IPv4 ]を選択します。
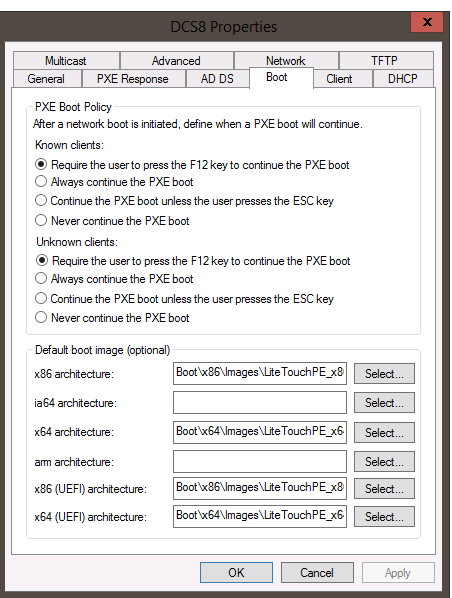
UEFI の WDS 設定には、x86 および x64 起動イメージが含まれている必要があります(図 3)。
図3: Windows展開サービスPXE起動ポリシー
注:Macパススルーを正常に動作させるには、Windows 10 PEイメージでRealtek USB FEファミリー コントローラー ドライバー(バージョン10.9.504.2016が動作することが確認されており、新しいバージョンを使用できますが、検証されていません)が必要です。
Additional Information
推奨記事
ここでは、このトピックに関連した役立つ可能性のある推奨記事をいくつか紹介します。
Article Properties
Affected Product
Desktops & All-in-Ones, Laptops, Workstations
Last Published Date
11 Jan 2024
Version
7
Article Type
How To