NRE 8.x: How to clear Java Cache, enable Java Console and Debugging.
Summary: This KB provides an overview of how to clear Java cache, enable java console, and configure Java debug on Microsoft Windows systems using NetWorker Runtime Environment (NRE) to access the NetWorker Management Console (NMC). ...
This article applies to
This article does not apply to
This article is not tied to any specific product.
Not all product versions are identified in this article.
Instructions
NetWorker Runtime Environment (NRE) provides the Java Runtime Environment (JRE) used by the NetWorker authentication service and NetWorker Management Console (NMC).
NOTE: This article is only applicable for NRE 8.x, which is used by NetWorker 19.12.x and prior. For NetWorker 19.13 (and later), see: NRE 17.x: How to clear Java Cache, enable Java Console and Debugging.
If Oracle JRE is used instead of NRE JRE, see NetWorker: How To Clear Java Cache, enable Java Console and Debugging (Oracle Java).
Clearing Java Cache:
- On the NMC client, open a Windows File Explorer.
- Go to the NRE install location; default:
C:\Program Files\NRE\java - Depending on the NRE version installed, a different JRE folder may be seen. To open the Java control panel, go to
..\jre#.#.#_###\bin\and openjavacpl.exe - From the General tab, click Settings.
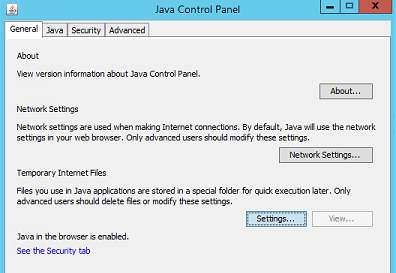
- From the Temporary Files and Settings window, click Delete Files.
- Ensure Trace and Log Files and Cache Applications and Applets is checked, click Ok.
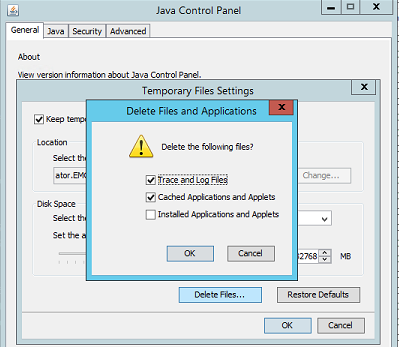
- Click Ok to close out the remaining windows.
Logging (Option One): Enable Java Console:
- On the NMC client, open a Windows File Explorer.
- Go to the NRE install location; default:
C:\Program Files\NRE\java - Depending on the NRE version installed, a different JRE folder may be seen. To open the Java control panel, go to
..\jre#.#.#_###\bin\and openjavacpl.exe - Click the Advanced tab.
- Ensure that Enable Tracing and Enable Logging are checked.
- Click the Show Console radio button.
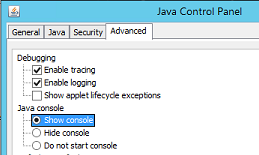
- Click Apply.
- Click Ok to close the Java control panel.
- To Disable the console, repeat the process but select Hide Console.
Logging (Option Two): Java Output to a File:
- On the NetWorker Management Console (NMC) server, open the
gconsole.jnlpfile in a text editor.
- Linux:
/opt/lgtonmc/web/gconsole.jnlp - Windows (Default):
C:\Program Files\EMC NetWorker\Management\GST\web\gconsole.jnlp
- In the
application-descsection, add the following options:
<argument>-f</argument>
<argument>C:\\Program Files\\NRE\\logs\\java1.log</argument>
Example:
<application-desc main-class="COM.legato.gwt.framework.LMainWindow">
		<argument>-g</argument>
		<argument>IPADDR_REPLACE_AT_RUNTIME(fe80::d3e7:121a:e342:3332)</argument>
		<argument>-p</argument>
		<argument>gconsole</argument>
		<argument>-i</argument>
		<argument>false</argument>
		<argument>-s</argument>
		<argument>X_NO_SERVER_X</argument>
		<argument>-P</argument>
		<argument>X_NO_SERVER_PORT_X</argument>
		<argument>-t</argument>
		<argument>X_NO_TASK_X</argument>
		<argument>-h</argument>
		<argument>9000</argument>
		<argument>-n</argument>
		<argument>9001</argument>
		<argument>-b</argument>
		<argument>5432</argument>
		<argument>-A</argument>
		<argument>9090</argument>
		<argument>-d</argument>
		<argument>0</argument>
		<argument>-a</argument>
		<argument>X_NO_AUTH_X</argument>
		<argument>-m</argument>
		<argument>X_NO_ISSUER_X</argument>
		<argument>-f</argument>
		<argument>C:\\Program Files\\NRE\\logs\\java1.log</argument>
</application-desc>
NOTE: The log file is generated on the host accessing the NMC, not the NMC server. A different log path may be specified; however, if NRE is used to launch the NMC, this path should exist on all hosts accessing the NMC.
- From the hosts used to access the NMC, delete the
gconsole.jnlpfrom the NRE temp folder. The default path isC:\Program Files\NRE\temp\gconsole.jnlp. Deleting this copy of the file forces NRE to download the new updated version from the NMC server. - The
java1.logfile is created after launching the NMC:

Enable Java Debug:
- Enable the Java Console as per the above steps.
- Open the NRE NMC Launcher.
- Log in to the NetWorker Management Console.
- From the Enterprise window, CTRL+SHIFT+Right-Click.
- Click Save Debug Messages… and specify an output location.
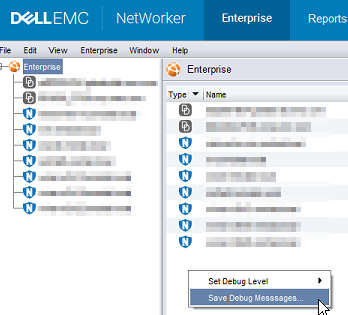
- In the Enterprise window, CTRL+SHIFT+Right-Click again.
- From Set Debug Level, select the wanted debug level. Usually, 7.
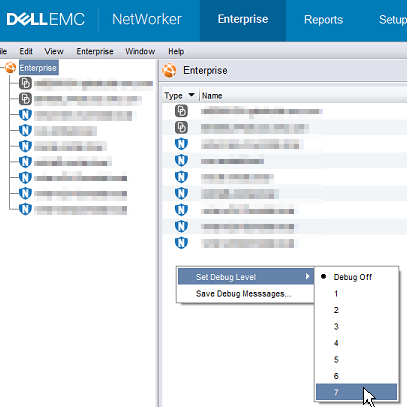
- Perform actions within NMC which require debug. Copy the output from the Java Console session and collect the Java output file that is created in step 5.
- To disable debug, repeat the process but set Debug Off.
Enabling NRE Debug:
NRE debug can be configured inside the NRE
The supported Log Levels from lowest to highest are:
OFF
SEVERE
WARNING
INFO
CONFIG
FINE
FINER
FINEST
ALL
..Program Files\NRE\logs\logConfig.properties file. The default log debug level is WARNING.
The supported Log Levels from lowest to highest are:
OFF
SEVERE
WARNING
INFO
CONFIG
FINE
FINER
FINEST
ALL
Enable NMC (gstd) Debug:
Debugging can be enabled on the NMC's gst service from the NetWorker Management Console.
- From the NMC's Enterprise screen, click the Setup tab.
- Click the Setup menu and select System Options.

- From System Options, set the Debug Level as required, typically 9.
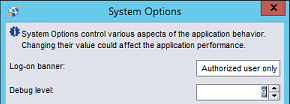
- No service restart is required, perform actions from NMC requiring debug.
- Render the gstd.raw from the NMC server.
Linux:
Windows (Default):
/opt/lgtonmc/logs/gstd.raw
Windows (Default):
C:\Program Files\EMC NetWorker\Management\GST\logs\gstd.raw
To render .raw files, see NetWorker: How to use nsr_render_log.
- Collect the rendered gstd.raw file from the NMC server.
Additional Information
Additional Debug procedures:
Affected Products
NetWorkerProducts
NetWorker Family, NetWorker SeriesArticle Properties
Article Number: 000203881
Article Type: How To
Last Modified: 15 May 2026
Version: 15
Find answers to your questions from other Dell users
Support Services
Check if your device is covered by Support Services.