Article Number: 000191918
NetWorker: How to take a backup of Map drives (CIF) on Windows
Summary: This KB details the basic steps and requirements for backing up a CIF share that is mapped to a NetWorker client.
Article Content
Instructions
In the examples outlined in this KB, there is a CIF share on a Linux system (CentOS8.emclab.local). The CIF share is mapped to another Windows system (winsrvr2k12.emclab.local). The share is mapped to the Windows system as \\CentOS8.emclab.local\share.
Requirements:

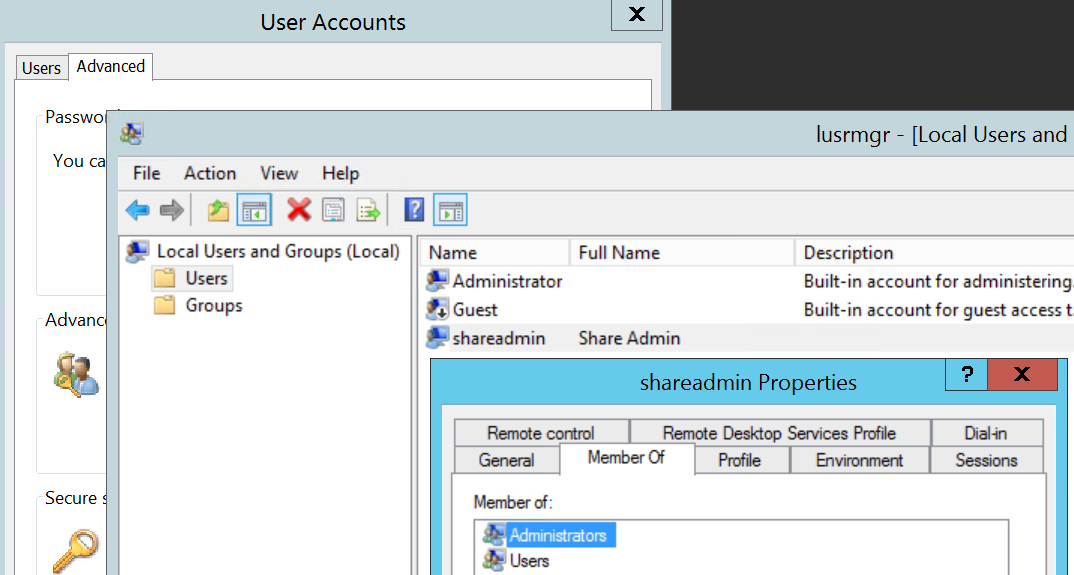
Open the properties of the newly created user account and select the Member Of tab, add the user to the Administrators group:

Requirements:
- Create a dedicated client resource for the backups of mapped drives. A common user account must have access to each mapped drive.
- Create a separate Client resource for backups of local drives.
- From the system where the CIF share is hosted, make note of the user account (and password) for the account that owns or has read and write access to this share. If the user or owner is nobody/nogroup, then any local user with read and write access to the share can be used.
- Log in to the NetWorker server system and create a local account with the same username and password of the user who is identified in step1.
Note: For assistance with the following, engage your Windows operating system administrator.
Control Panel > User Accounts > Advanced (tab) > Advance (box) > Local Users and Groups (Local) > Users:
Open the properties of the newly created user account and select the Member Of tab, add the user to the Administrators group:
- From the NMC, ensure that you have checked "Diagnostic Mode" under "View."
- Create a client instance to take backup of CIF share. Do not use an existing client that is used to back up local files or folders on the system.
In the General tab of the new client, set the hostname of the target system, and the saveset as \\CIFS-server-hostname\share-name using the CIFS server IP address or hostname and share folders and files wanted for backup.

In the "Apps and Modules" tab, set the "Remote user" and password to the user account created in step 2. Set the save command as "save -xL" and the save operations as "vss:*=off."
- Add the client to an existing or new group and initiate a backup. The backups should appear in the media database: mminfo -avot -q client=client_name
C:\Users\Administrator.EMCLAB>mminfo -avot -t today -q client=winsrvr2k12.emclab.local -r client,ssid,name,nsavetime
 client    ssid       name                             save time
winsrvr2k12.emclab.local 2942688457 \\CENTOS8.EMCLAB.LOCAL\SHARE 1634065604

C:\Users\Administrator.EMCLAB>nsrinfo -t 1634065604 winsrvr2k12.emclab.local
scanning client `winsrvr2k12.emclab.local' for savetime 1634065604(10/12/2021 3:06:44 PM) from the backup namespace
\\CENTOS8.EMCLAB.LOCAL\SHARE\somefile1
\\CENTOS8.EMCLAB.LOCAL\SHARE\somefile2
\\CENTOS8.EMCLAB.LOCAL\SHARE\
/
4 objects found
Article Properties
Affected Product
NetWorker
Last Published Date
14 Oct 2021
Version
1
Article Type
How To