Article Number: 000173347
NetWorker NVP-vProxy: SQL Server Backup fails with "The login 'NT AUTHORITYSYSTEM' for SQL instance [VM_NAME] does not have the sysadmin role assigned"
Summary: SQL VM backups performed with the NetWorker VMware Protection (NVP) vProxy appliance fail indicating "NT AUTHORITY\SYSTEM does not have the sysadmin role assigned."
Article Content
Symptoms
The NetWorker VMware Protection integration is configured with the vProxy Appliance. The Microsoft Virtual Machine Application Agent (MSVMAPPAGENT) for SQL Server application-consistent protection is being used to perform a backup of a Virtual Machine (VM) with Microsoft SQL Server. The VM backup fails, indicating that the "NT AUTHORITY\SYSTEM" does not have the sysadmin role assigned.
The backup session log shows:
The backup session log shows:
YYYY-MM-DD HH:MM:SS ERROR: [127] MSSQL: MSSQL:validate_application: NetWorker VM agent for Microsoft Applications: Unable to execute discovery command, error: 'The login 'NT AUTHORITY\SYSTEM' for SQL instance [VM_NAME] does not have the sysadmin role assigned.'
Cause
The MSVMAPPAGENT runs under the "NT AUTHORITY\SYSTEM" account, and it does not have sufficient rights to perform data protection operations.
Resolution
The MSVMAPPAGENT "Software and security requirements" section of the Dell NetWorker VMware Integration Guide indicates that the sysadmin role must be granted to the "NT AUTHORITY\SYSTEM" account. Here is an overview of the steps to grant the permissions to the "NT AUTHORITY\SYSTEM" account.
1. On the SQL VM, Open Microsoft SQL Server Management Studio.
2. Connect to the SQL Server instance.
4. Open the Properties for the "NT AUTHORITY\SYSTEM" account.
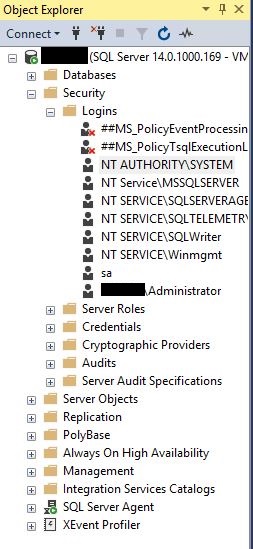
Figure 1: SQL Server Management Studio (SSMS) Security Logins.
5. In the Login Properties windows, select "Server Roles" in the left hand pane.
6. In the right hand pane, select "sysadmin."
7. Select OK to close the Login Properties Window.

Figure 1: SSMS NT AUTHORITY\SYSTEM login properties.
1. On the SQL VM, Open Microsoft SQL Server Management Studio.
2. Connect to the SQL Server instance.
NOTE: The steps must be performed against all SQL Server instances on the VM.
3. In the Object Explorer tree view, expand "Security > Logins".
4. Open the Properties for the "NT AUTHORITY\SYSTEM" account.
Figure 1: SQL Server Management Studio (SSMS) Security Logins.
5. In the Login Properties windows, select "Server Roles" in the left hand pane.
6. In the right hand pane, select "sysadmin."
7. Select OK to close the Login Properties Window.
Figure 1: SSMS NT AUTHORITY\SYSTEM login properties.
Article Properties
Product
NetWorker
Last Published Date
15 Nov 2023
Version
3
Article Type
Solution