How to Install CrowdStrike Falcon Sensor
Summary: Learn how to install CrowdStrike Falcon Sensor using these step-by-step instructions for Windows, Mac, and Linux.
This article applies to
This article does not apply to
This article is not tied to any specific product.
Not all product versions are identified in this article.
Instructions
This article covers the installation process for the CrowdStrike Falcon Sensor.
Affected Products:
- CrowdStrike Falcon Sensor
Affected Operating Systems:
- Windows
- Mac
- Linux
Note: Before installation, ensure that all requirements are met by referencing CrowdStrike Falcon Sensor System Requirements.
Click Windows, macOS, or Linux for the installation process.
Windows
CrowdStrike Falcon Sensor can be installed on Windows through the:
Click the appropriate method for more information.
UI
- Double-click WindowsSensor.exe.
 Note: For information about obtaining the installer, reference How to Download the CrowdStrike Falcon Sensor.
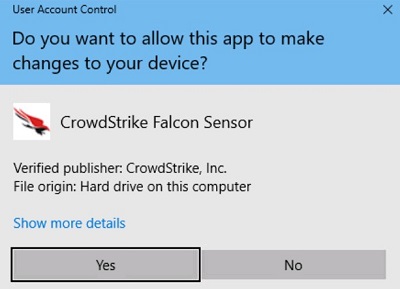
 - If User Account Control (UAC) is enabled, click Yes. Otherwise go to Step 3.
- In the install UI:
- Accept the license agreement.
- Populate the Customer ID.
- Click Install.
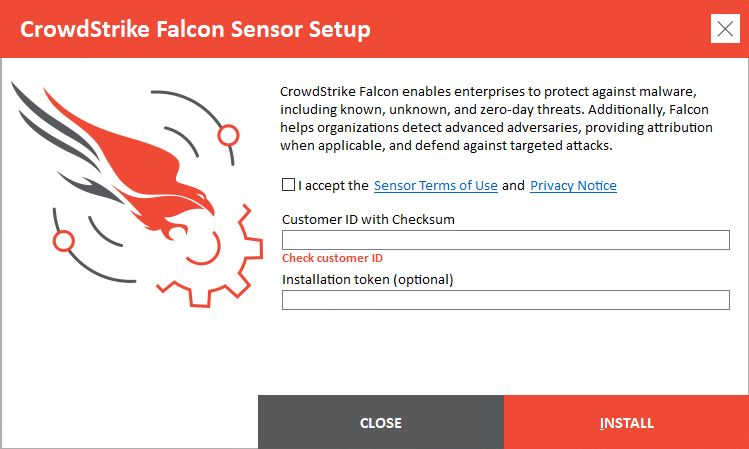 Note:
Note:- To locate the Customer ID (CID), reference How to Obtain the CrowdStrike Customer Identification (CID).
- The CID is used to associate the endpoint to the CrowdStrike Falcon Console.
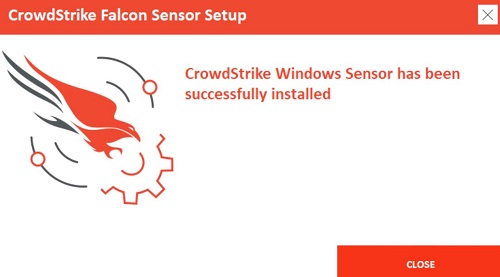
- On successful installation, click Close.
CLI
Note: Switches are not case-sensitive.
| Switch | Required | Purpose |
|---|---|---|
/install |
Yes | Installs the CrowdStrike Falcon Sensor. |
/passive |
No | The installer shows a minimal UI with no prompts. |
/quiet |
No | Suppresses UI and prompts. |
/norestart |
No | Prevents the host from restarting after installation. |
/log |
No | Changes the default installation log directory from %Temp% to a new location. The new location must be contained in quotation marks (""). |
Note: Parameters are case-sensitive.
| Parameter | Value | Required | Purpose |
|---|---|---|---|
CID= |
See Examples1 | Yes | Uses customer identification (CID) to associate sensor to CrowdStrike Falcon Console. |
NO_START= |
0 (Default) | No | Starts the sensor immediately after installation. |
NO_START= |
1 | No | Prevents the sensor from starting after installation. The next time the host boots, the sensor is assigned an agent ID (AID). |
VDI= |
1 | No | Configures sensor for a virtual desktop infrastructure (VDI) environment. Updates AID after system initialization. |
APP_PROXYNAME= |
See Examples | No | Configures sensor to use a proxy connection. Cannot be used with PACURL. |
APP_PROXYPORT= |
See Examples | No | Specifies APP_PROXYNAME port. |
PACURL= |
See Examples | No | Configures a proxy connection using a PAC file. Cannot be used with either APP_PROXYNAME or APP_PROXYPORT. |
PROXYDISABLE= |
0 (Default) | No | Attempts to connect to CrowdStrike Falcon Console using any available proxy connections. |
PROXYDISABLE= |
1 | No | The parameter ignores any automatic proxy connection. |
ProvNoWait= |
0 (Default) | No | The parameter uninstalls the sensor if unable to connect to CrowdStrike Falcon Console within 10 minutes. |
ProvNoWait= |
1 | No | The parameter prevents uninstall if unable to connect to CrowdStrike Falcon Console. |
1Reference How to Obtain the CrowdStrike Customer Identification (CID) for more information.
Note: For information about obtaining the installer, reference How to Download the CrowdStrike Falcon Sensor.
CLI Installation Examples:
Example #1:
WindowsSensor.exe /install NO_START=1 CID=ABCDEF123GHI-J6
Example #1 contains:
- Installer = WindowsSensor.exe
- CID =
ABCDEF123GHI-J6 - Silent install = No
- Default value since not defined
- End-user installation prompts = Yes
- Default value since not defined
- Start sensor post installation = Yes
- Default value since not defined.
- VDI deployment = No
- Default since not defined.
- Configured Proxy/Port = No
- Default value since not defined.
- Connect using automatic proxy connection = Yes
- Default value since not defined.
- Uninstall if unable to connect to CrowdStrike Falcon Console = Yes
- Default value since not defined.
- Installation Directory =
%TEMP%- Default value since not defined.
Example #2:
WindowsSensor.exe /install NO_START=1 /quiet /norestart ProvNoWait=1 CID=ABCDEF123GHI-J6 /log "C:\Logs"
Example #2 contains:
- Installer = WindowsSensor.exe
- CID =
ABCDEF123GHI-J6 - Silent install = Yes
- End-user installation prompts = No
- Start sensor post installation = No
- Default value since not defined.
- VDI deployment = No
- Default since not defined.
- Configured Proxy/Port = No
- Default value since not defined.
- Connect using automatic proxy connection = Yes
- Default value since not defined.
- Uninstall if unable to connect to CrowdStrike Falcon Console = No
- Installation Directory =
C:\Logs
Example #3:
WindowsSensor.exe /install VDI=1 NO_START=1 APP_PROXYNAME=proxy.domain.com APP_PROXYPORT=1234 ProvNoWait=1 PROXYDISABLE=1 /quiet CID=ABCDEF123GHI-J6
Example #3 contains:
- Installer = WindowsSensor.exe
- CID =
ABCDEF123GHI-J6 - Silent install = Yes
- End-user installation prompts = No
- Start sensor post installation = No
- VDI deployment = Yes
- Configured Proxy/Port =
proxy.domain.com/1234 - Connect using automatic proxy connection = No
- Uninstall if unable to connect to CrowdStrike Falcon Console = No
- Installation Directory =
%TEMP%- Default value since not defined.
macOS
v5.10.9003 and Later
- In the Apple menu, click Go and then select Utilities.
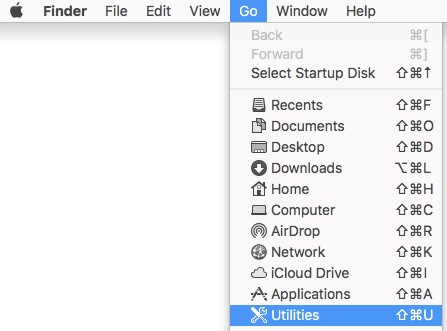
- In the Utilities folder, double-click Terminal.

- In Terminal, type
sudo installer -verboseR -package [INSTALLPATH]/FalconSensorMacOS.pkg -target /and then press Enter.Note:[INSTALLPATH]= The directory where the installer is located- For information about obtaining the installer, reference How to Download the CrowdStrike Falcon Sensor.
- Populate the password for
sudoand then press Enter.

- Type
sudo /Library/CS/falconctl license 'CID'and then press Enter.
 Note:
Note:'CID'= The Customer Identification that has been collected from the CrowdStrike Falcon Console- For more information, reference How to Obtain the CrowdStrike Customer Identification (CID).
- If running:
- macOS Mojave (10.14.5) and later:
- Kernel Extensions must be approved for product functionality. For more information, reference How to Allow Dell Data Security Kernel Extensions on macOS.
- Full Disk Access must be granted for full protection. For more information, reference How to Grant Full Disk Access for the CrowdStrike Falcon Sensor.
- macOS High Sierra (10.13) or later:
- Kernel Extensions must be approved for product functionality. For more information, reference How to Allow Dell Data Security Kernel Extensions on macOS.
- macOS Sierra (10.12) and earlier, no further action is required.
- macOS Mojave (10.14.5) and later:
Linux
Click Red Hat Enterprise Linux, CentOS, Amazon Linux, Ubuntu, or SLES for the steps to install CrowdStrike Falcon Sensor.
Red Hat Enterprise Linux, CentOS, Amazon Linux
CrowdStrike Falcon Sensor must be installed using Terminal on Linux.
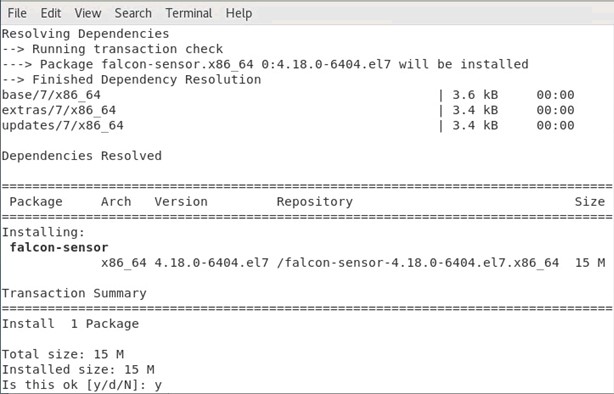
- Open the Linux Terminal.
- In Terminal, type
sudo yum install falcon-sensor-[VERSION].[EXT]and then press Enter.
 Note:
Note:[VERSION]= The version of the CrowdStrike Falcon Sensor installer file[EXT]= The extension of the CrowdStrike Falcon Sensor installer file- Installer extensions can differ between Linux distributions.
- For information about obtaining the installer, reference How to Download the CrowdStrike Falcon Sensor.
- Type
Yand then press Enter to confirm installation.
- Type
sudo /opt/CrowdStrike/falconctl -s –cid=[CID]and then press Enter.
 Note:
Note:[CID]= Customer Identification for CrowdStrike Falcon Console[CID]is only present on installers that are downloaded from Google Chrome.- For information about obtaining the installer, reference How to Download the CrowdStrike Falcon Sensor.
- Type:
- Hosts with
SysVinit:service falcon-sensor startand then press Enter. - Hosts with
Systemd:systemctl start falcon-sensorand then press Enter.

- Hosts with
Ubuntu
CrowdStrike Falcon Sensor must be installed using Terminal on Linux.
- Open the Linux Terminal.
- In Terminal, type
sudo dpkg -i falcon-sensor-[VERSION].[EXT]and then press Enter.Note:[VERSION]= The version of the CrowdStrike Falcon Sensor installer file[EXT]= The extension of the CrowdStrike Falcon Sensor installer file- Installer extensions can differ between Linux distributions.
- For information about obtaining the installer, reference How to Download the CrowdStrike Falcon Sensor.
- Type
Yand then press Enter to confirm installation. - Type
sudo /opt/CrowdStrike/falconctl -s –cid=[CID]and then press Enter.Note:[CID]= Customer Identification for CrowdStrike Falcon Console[CID]is only present on installers that are downloaded from Google Chrome.- For information about obtaining the installer, reference How to Download the CrowdStrike Falcon Sensor.
- Type:
- Hosts with
SysVinit:service falcon-sensor startand then press Enter. - Hosts with
Systemd:systemctl start falcon-sensorand then press Enter.
- Hosts with
SLES
CrowdStrike Falcon Sensor must be installed using Terminal on Linux.
- Open the Linux Terminal.
- In Terminal, type
sudo zypper install falcon-sensor-[VERSION].[EXT]and then press Enter.Note:[VERSION]= The version of the CrowdStrike Falcon Sensor installer file[EXT]= The extension of the CrowdStrike Falcon Sensor installer file- Installer extensions can differ between Linux distributions.
- For information about obtaining the installer, reference How to Download the CrowdStrike Falcon Sensor.
- Type
Yand then press Enter to confirm installation. - Type
sudo /opt/CrowdStrike/falconctl -s –cid=[CID]and then press Enter.Note:[CID]= Customer Identification for CrowdStrike Falcon Console[CID]is only present on installers that are downloaded from Google Chrome.- For information about obtaining the installer, reference How to Download the CrowdStrike Falcon Sensor.
- Type:
- Hosts with
SysVinit:service falcon-sensor startand then press Enter. - Hosts with
Systemd:systemctl start falcon-sensorand then press Enter.
- Hosts with
Affected Products
CrowdStrikeArticle Properties
Article Number: 000126124
Article Type: How To
Last Modified: 19 Apr 2026
Version: 20
Find answers to your questions from other Dell users
Support Services
Check if your device is covered by Support Services.