MD Series: MD3x60e Physical and Virtual Disk location identifiers
Summary: Locate hard drives and identify drawer hardware components on the MD3x60e series.
This article applies to
This article does not apply to
This article is not tied to any specific product.
Not all product versions are identified in this article.
Instructions
Drive Locations
Drives are labeled one of two ways:
- Enclosure X, Drawer Y, Slot Z: For example, 0:3:6 means Enclosure 0, Drawer 3, Slot 6
- Extended numbering: For example, Drive 43
- Drive numbering goes from 0-59
Check the table below to identify drives location.
Drawer 0:
| Slot 2 |
Slot 5 |
Slot 8 |
Slot 11 |
| Slot 1 |
Slot 4 |
Slot 7 |
Slot 10 |
| Slot 0 |
Slot 3 |
Slot 6 |
Slot 9 |
| Front Left: Drawer 0 | |||
Drawer 1:
| Slot 2 Drive 14 |
Slot 5 Drive 17 |
Slot 8 Drive 20 |
Slot 11 Drive 23 |
| Slot 1 Drive 13 |
Slot 4 Drive 16 |
Slot 7 Drive 19 |
Slot 10 Drive 22 |
| Slot 0 Drive 12 |
Slot 3 Drive 15 |
Slot 6 Drive 18 |
Slot 9 Drive 21 |
| Front Left: Drawer 1 | |||
Drawer 2:
| Slot 2 Drive 26 |
Slot 5 Drive 29 |
Slot 8 Drive 32 |
Slot 11 Drive 35 |
| Slot 1 Drive 25 |
Slot 4 Drive 28 |
Slot 7 Drive 31 |
Slot 10 Drive 34 |
| Slot 0 Drive 24 |
Slot 3 Drive 27 |
Slot 6 Drive 30 |
Slot 9 Drive 33 |
| Front Left: Drawer 2 | |||
Drawer 3:
| Slot 2 Drive 38 |
Slot 5 Drive 41 |
Slot 8 Drive 44 |
Slot 11 Drive 47 |
| Slot 1 Drive 37 |
Slot 4 Drive 40 |
Slot 7 Drive 43 |
Slot 10 Drive 46 |
| Slot 0 Drive 36 |
Slot 3 Drive 39 |
Slot 6 Drive 42 |
Slot 9 Drive 45 |
| Front Left: Drawer 3 | |||
Drawer 4:
| Slot 2 Drive 50 |
Slot 5 Drive 53 |
Slot 8 Drive 56 |
Slot 11 Drive 59 |
| Slot 1 Drive 49 |
Slot 4 Drive 52 |
Slot 7 Drive 55 |
Slot 10 Drive 58 |
| Slot 0 Drive 48 |
Slot 3 Drive 51 |
Slot 6 Drive 54 |
Slot 9 Drive 57 |
| Front Left: Drawer 4 | |||
Note: Replacing the incorrect drive can cause data loss.
Drawers
- Chassis must be powered off to replace drawers.
- Remove and install SAS chain cables ONLY when the drawer is closed.
- Chassis will remain online for approximately 10 minutes after either fan canister is removed.
Front View
The drawer number is displayed in red on the below picture:
SAS Chain Cable
- Remove and install SAS chain cables ONLY when the drawer is closed
- Chassis will remain online for approximately 10 minutes after either fan canister is removed.
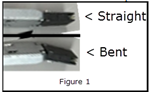
If there are issues after replacing or reseating the SAS chain cables, check the following:
- Check that the SAS chain cable ends are straight and not bent (See figure 1 below)
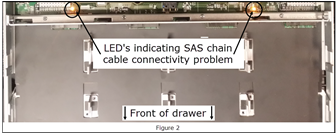
- Slide the drawer open as far as it can go, Do not remove, and check for trouble lights (See figure 2 below)
- Check that the correct SAS chain cable and drawer was replaced (see previous drawer image)
Affected Products
MD Series, PowerVault MD3060e, PowerVault MD3260i, PowerVault MD3460, PowerVault MD3660f, PowerVault MD3660i, PowerVault MD3860f, PowerVault MD3860iArticle Properties
Article Number: 000068118
Article Type: How To
Last Modified: 14 Mar 2025
Version: 5
Find answers to your questions from other Dell users
Support Services
Check if your device is covered by Support Services.