Unable to Connect to the Dell Security Management Server When Self-Encrypting Drive is Enabled
Summary: This article provides a resolution to the preboot authentication environment in Dell Data Protection | Self-Encrypting Drive being unable to connect to the Dell Security Management Server (formerly Dell Data Protection | Enterprise Edition) or Dell Security Management Server Virtual (formerly Dell Data Protection | Virtual Edition). ...
This article applies to
This article does not apply to
This article is not tied to any specific product.
Not all product versions are identified in this article.
Symptoms
Affected Products:
- Dell Data Protection | Enterprise Edition Shield
- Dell Security Management Server
- Dell Data Protection | Enterprise Edition
- Dell Security Management Server Virtual
- Dell Data Protection | Virtual Edition
- Dell Data Protection | Self-Encrypting Drive
Affected Versions:
- v8.5 and Earlier
This issue is indicated when the managed Self-Encrypting Drive shows the error message Cannot connect to Server: Check connections.
Cause
The preboot authentication environment Dell Data Protection | Self-Encrypting Drive Manager v8.5 and earlier does not support TLS encryption protocols. In later server versions, these protocols are disabled by default. This causes errors when trying to authenticate to the server in the preboot authentication environment.
Resolution
- Open the Options menu at the bottom-left corner of the screen by clicking the gear icon then click Error Diagnostics.

Figure 1: (English Only) Click Error Diagnostics
- The error diagnostics screen displays the server with which the endpoint is attempting to communicate.
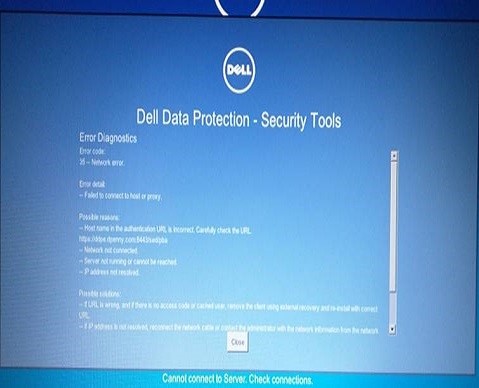
Figure 2: (English Only) Error diagnostic screen
- Check the server version. If the server is an updated Dell Security Management Server, v8.5.1 or later, or an upgraded Dell Security Management Server Virtual, v9.0 or later, then a modification to the spring-jetty.xml file for the Security Server service is required. Depending on the type of server, the spring-jetty.xml configuration file default location is one of the two following locations.
- Dell Security Management Server -
C:\Program Files\Dell\Enterprise Edition\Security Server\conf - Dell Security Management Server Virtual -
/opt/dell/server/security-server/conf
- Dell Security Management Server -
Note: For more information about how to find the server version, reference How to Identify the Dell Data Security / Dell Data Protection Server Version.
- Open the appropriate spring-jetty.xml configuration.
- Go to the folder C:\Program Files\Dell\Enterprise Edition\Security Server\conf and open the spring-jetty.xml file.
- Find the
<property name="excludeProtocols" value="SSL, SSLv2, SSLv3" />line.
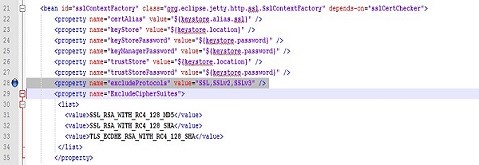
Figure 3: (English Only) Spring-jetty.xml
- Add
<!--to the beginning and-->to the end of the line. The new line should appear as the highlighted line in the following image.
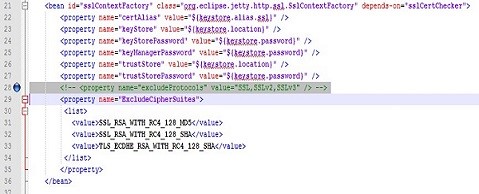
Figure 4: (English Only) Add <!-- and --> to end of the line
- Restart the Security Server service.
- From the main menu, select Launch Shell.
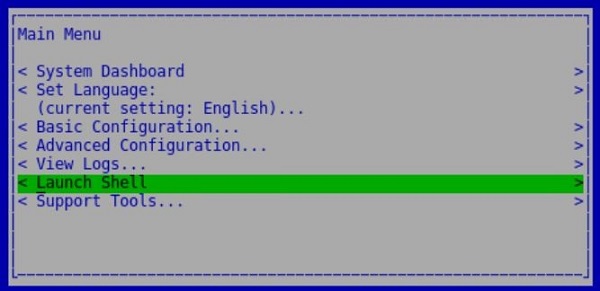
Figure 5: (English Only) Launch Shell
- Switch to the support user by entering the
su <support user>command then providing the password for the support user account when prompted. For Dell Data Protection | Virtual Edition Server v9.2 and earlier, the <support user> isddpsupport. For Dell Security Management Server Virtual v9.3 and later, the <support user> isdellsupport.

Figure 6: (English Only) Switch users
- Change directory to the location of the spring-jetty.xml configuration file with the
cd /opt/dell/server/security-server/conf/command.

Figure 7: (English Only) Change directory
- Open the spring-jetty.xml configuration file in the vi editor using the
sudo vi spring-jetty.xmlcommand.

Figure 8: (English Only) Open spring-jetty.xml in vi editor
- Find the
<property name="excludeProtocols" value="SSL, SSLv2, SSLv3" />line and, using the arrow keys, move the cursor beneath the first character, <, of the line. Press theikey to insert text and add<!--to the beginning of the line.

Figure 10: (English Only) Add --> to the end of the line
- Save the change and quit vi by typing
:wqthen pressing Enter.

Figure 11: (English Only) Save and quit vi
- Type
exitand press Enter to exit the <support user> context. Typeexitand press Enter to return to the main menu. - Stop and Start the application from the Basic Configuration… menu for the changes to take effect.
- Click Server-sync on the affected client. If the client can communicate to the server, an extra symbol appears at the upper right of the screen.
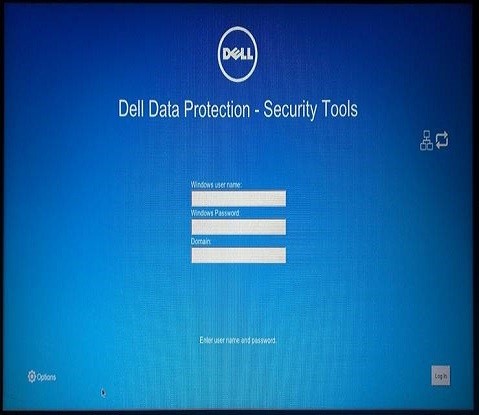
Figure 12: (English Only) Click Server-sync
To contact support, reference Dell Data Security International Support Phone Numbers.
Go to TechDirect to generate a technical support request online.
For additional insights and resources, join the Dell Security Community Forum.
Affected Products
Dell EncryptionArticle Properties
Article Number: 000129515
Article Type: Solution
Last Modified: 21 Mar 2024
Version: 12
Find answers to your questions from other Dell users
Support Services
Check if your device is covered by Support Services.