PowerEdge:如何變更 BIOS、iDRAC 和 Lifecycle Controller 中的語言
Summary: 下列文章提供 Dell PowerEdge 系統上的 BIOS、Lifecycle Controller 和 Integrated Dell Access Controller (iDRAC) 中可用的語言選項相關資訊,以及如何變更此選項。
This article applies to
This article does not apply to
This article is not tied to any specific product.
Not all product versions are identified in this article.
Instructions
目錄:
個人簡介
在 Dell PowerEdge 伺服器的系統設定 (也稱為 BIOS 設定) 中,唯一可用的語言是英文。功能表中沒有可變更系統設定語言的選項。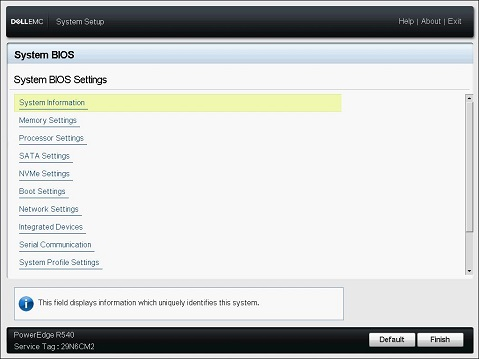
圖 1:Dell 系統 BIOS
返回頁首
Lifecycle Controller (LCC)
Lifecycle Controller 介面支援下列語言:
- 英文 (en-us) - 預設
- 法文 (fr)
- 德文 (de)
- 西班牙文 (西班牙文)
- 日文 (ja)
- 簡體中文 (zh-cn)
Lifecycle Controller 介面可讓您變更使用者介面語言。步驟包括:
- 開啟或重新啟動伺服器
- 在 Dell 啟動顯示畫面上按下 F10,以進入 LCC
- 按一下「Settings」「>Language and Keyboard」並變更為您想要的語言
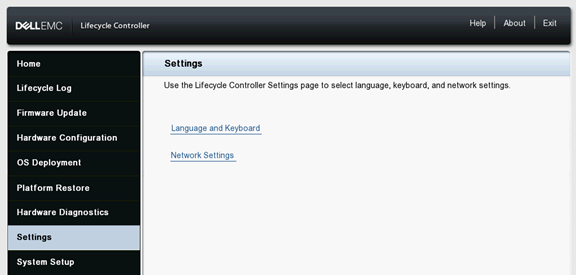
圖 2:Lifecycle Controller 設定
變更 Lifecycle Controller 語言
持續時間:00:00:38 (小時:分鐘:秒)
當可用時,您可以使用此影像播放器上的 CC 圖示來選擇隱藏式輔助字幕 (字幕) 語言設定。
iDRAC
iDRAC Web 介面支援下列語言:
- 英文 (en-us)
- 法文 (fr)
- 德文 (de)
- 西班牙文 (西班牙文)
- 日文 (ja)
- 簡體中文 (zh-cn)
iDRAC 語言取決於網頁瀏覽器中設定的語言。若要以您偏好的語言檢視 iDrac,請變更網頁瀏覽器的預設語言。以下步驟說明如何使用最常用的 Web 瀏覽器更改預設語言。
注意:步驟可能略有不同,具體取決於您的瀏覽器版本。如果您需要下列以外的進一步資訊,請參閱瀏覽器說明一節。
Chrome
- 按下 Chrome 右上角的圖示

- 從出現的下拉式功能表中,選取設定
- 在下一個視窗中,滾動到底部並按兩下高級
- 向下滾動到「語言」部分,然後按兩下「語言」框右側的向下箭頭
- 在出現的功能表中,按一下連結
- 在下一個螢幕中,按下一種或多種語言旁邊的複選框,然後按下「添加」按鈕
- 您新選擇的語言應顯示在「語言」功能表中
- 若要選擇,請按一下該語言右側的圖示,然後勾選以此語言顯示 Google Chrome 旁的方塊
- 重新啟動瀏覽器時,您會看到新語言
Mozilla Firefox
- 開啟 Mozilla Firefox 瀏覽器
- 按一下瀏覽器視窗左上角的

- 從顯示的下拉式功能表中選取
 選項
選項 - 在語言和外觀區段下,按一下選擇按鈕。
- 在顯示的視窗中,按一下方塊右側的箭頭,顯示選取語言。若要新增,請按一下按鈕
- 按兩下新選擇的語言,然後按下確定按鈕
- 重新啟動瀏覽器時,您會看到新語言
Microsoft Internet Explorer
- Microsoft Internet Explorer 開啟
- 在畫面右上角,按一下圖示

- 從出現的下拉式功能表中選取網際網路選項
- 在打開的視窗中,在「常規」選項卡下,按下按鈕
- 在「語言偏好設定」視窗中,點按設定語言偏好設定按鈕
- 在中間附近顯示的“語言”視窗中,按兩下“添加語言”
- 從新增語言視窗中選取新語言,然後點按按鈕
- 當您回到「語言」視窗時。按一下您的新語言。變為藍色時,按下右側的選項
- 選取「下載」,然後安裝語言套件
- 再次單擊“選項”,然後選擇“將此設為主要語言”
- 登出並重新登入 Windows 或重新開機電腦,以在 Internet Explorer 中顯示新語言
Microsoft Edge
注意:隨著 Microsoft Edge 整合至 Windows 10,變更其預設語言也會影響某些 Windows 程式。
- 按下 Windows 鍵,輸入地區和語言設定,然後按下 Enter 鍵。
- 在顯示的視窗中,按一下圖示
 。
。 - 您可以在清單中輸入要新增或選取的語言。
- 選擇語言后,系統將要求您選擇一個區域。
- 您應該會在「語言」區段底下看到新語言。
- 按一下新語言,然後選取選項按鈕。
- 在出現的畫面中,在語言選項下,按一下下載按鈕。
- 下載新語言後,請返回上一個畫面。
- 再次按下新語言,然後按下「設置為預設」 按鈕。
- 登出並重新登入 Windows 或重新開機電腦以顯示新語言。
Safari
注意:Safari 已整合至 macOS X 作業系統。因此,您必須進入Mac語言設置才能更改Safari中顯示的語言。
- 從桌面底部的擴充基座開啟系統偏好設定。
- 在個人區段中,按一下語言和文字圖示。
- 在出現的功能表中,將您的慣用語言拖到頂端。
- 按一下畫面左上角的 Apple 圖示,然後選取登出 (使用者名稱)
- 重新登入電腦時,即會顯示您偏好的語言。
注意:括弧中的 ISO 識別碼代表支援的語言變體。對於某些支持的語言,需要將瀏覽器視窗大小調整為 1024 像素寬才能查看所有功能。iDRAC Web 介面可搭配支援的語言變體的當地語系化鍵盤使用。iDRAC Web 介面的某些功能 (例如虛擬主控台) 可能需要額外步驟才能存取特定功能或字母。不支援其他鍵盤,而且可能會導致非預期的問題。
Affected Products
Chassis Management Controllers, iDRAC8, iDRAC9, Lifecycle ControllersProducts
OEMR R240, OEMR R250, OEMR XE R250, OEMR R260, OEMR XE R260, OEMR R340, OEMR R350, OEMR XE R350, OEMR R360, OEMR XE R360, OEMR R440, OEMR R450, OEMR R540, OEMR R550, OEMR R640, OEMR XL R640, OEMR R6415, OEMR R650, OEMR R650xs, OEMR R6515, OEMR R6525
, OEMR R660, OEMR XL R660, OEMR R660xs, OEMR R6615, OEMR R6625, OEMR R740, OEMR XL R740, OEMR R740xd, OEMR XL R740xd, OEMR R740xd2, OEMR R7415, OEMR R7425, OEMR R750, OEMR R750xa, OEMR R750xs, OEMR R7515, OEMR R7525, OEMR R760, OEMR R760xa, OEMR R760XD2, OEMR XL R760, OEMR R760xs, OEMR R7615, OEMR R7625, OEMR R840, OEMR R860, OEMR R940, OEMR R940xa, OEMR R960, OEMR T340, OEMR T350, OEMR T360, OEMR T440, OEMR T550, OEMR T560, OEMR T640, OEMR XL T640, OEMR XL R240, OEMR XL R340, OEMR XL R660xs, OEMR XL R6615, OEMR XL R6625, OEMR XL V2 R710, OEMR XL R760xs, OEMR XL R7615, OEMR XL R7625, OEMR XR11, OEMR XR12, OEMR XR4000r, OEMR XR4000w, OEMR XR4000z, OEMR XR4510c, OEMR XR4520c, Poweredge C4140, PowerEdge C6400, PowerEdge C6420, PowerEdge C6525, PowerEdge C6600, PowerEdge C6615, PowerEdge C6620, PowerEdge FC640, PowerEdge M640, PowerEdge M640 (for PE VRTX), PowerEdge MX5016s, PowerEdge MX7000, PowerEdge MX740C, PowerEdge MX750c, PowerEdge MX760c, PowerEdge MX840C, PowerEdge R230, PowerEdge R240, PowerEdge R250, PowerEdge R260, PowerEdge R330, PowerEdge R340, PowerEdge R350, PowerEdge R360, PowerEdge R430, PowerEdge R440, PowerEdge R450, PowerEdge R530, PowerEdge R530xd, PowerEdge R540, PowerEdge R550, PowerEdge R630, PowerEdge R640, PowerEdge R6415, PowerEdge R650, PowerEdge R650xs, PowerEdge R6515, PowerEdge R6525, PowerEdge R660, PowerEdge R660xs, PowerEdge R6615, PowerEdge R6625, PowerEdge R670, PowerEdge R730, PowerEdge R730xd, PowerEdge R740, PowerEdge R740XD, PowerEdge R740XD2, PowerEdge R7415, PowerEdge R7425, PowerEdge R750, PowerEdge R750XA, PowerEdge R750xs, PowerEdge R7515, PowerEdge R7525, PowerEdge R760, PowerEdge R760XA, PowerEdge R760xd2, PowerEdge R760xs, PowerEdge R7615, PowerEdge R7625, PowerEdge R770, PowerEdge R830, PowerEdge R840, PowerEdge R860, PowerEdge R930, PowerEdge R940, PowerEdge R940xa, PowerEdge R960, PowerEdge T330, PowerEdge T340, PowerEdge T350, PowerEdge T360, PowerEdge T40, PowerEdge T430, PowerEdge T440, PowerEdge T550, PowerEdge T560, PowerEdge T630, PowerEdge T640
...
Article Properties
Article Number: 000135184
Article Type: How To
Last Modified: 28 Nov 2024
Version: 8
Find answers to your questions from other Dell users
Support Services
Check if your device is covered by Support Services.