Article Number: 000152034
How to backup your Dell PC using the Ubuntu Linux backup utility
Summary: This article takes you through using the backup options on older Ubuntu Revisions.
Article Content
Symptoms
This article provides information about how to use the backup utility in your Ubuntu Linux operating system to backup your Dell PC.
Table of Contents:
- How to backup Ubuntu using its Backup utility
- Getting Started
- Setting Up the utility
- Carrying out a Backup
- Restore
How to backup Ubuntu using its backup utility
The Ubuntu backup is a simple, yet powerful backup tool that comes included with Ubuntu.
It offers the power of rsync with incremental backups, encryption, scheduling, and support for remote services.
You can quickly revert files to previous versions or restore missing files from a file manager window.
It has a graphical frontend similar to Duplicity. It offers the power of rsync with a simple interface.

Getting Started
Backup is located in the System Settings window, which you can access from the gear-shaped menu on the panel.

-
You will find it named Backup in the System group of icons.

-
You can also launch it by searching for Backup from the Dash.

Setting up the Utility
-
Backup’s main screen gives a summary of your backup settings. By default, it backs up your Home directory and ignores the Trash and Downloads folders. It will want to put the backup in your Ubuntu One account.
 Note: If you want to enable automatic backups. Do not do it until you have customized your backup settings.

-
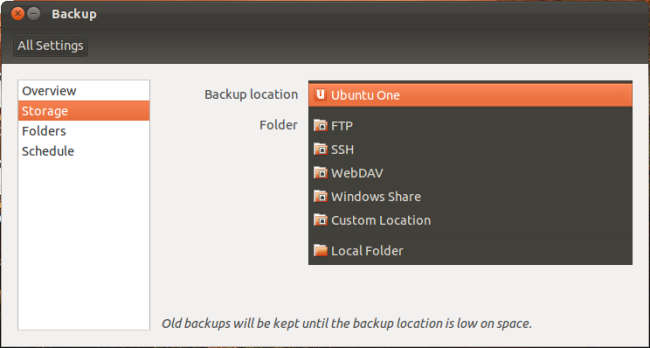
From the Storage pane, you can choose where the utility puts your backups. If you back up online to Ubuntu One - and have an Ubuntu One account on your PC. Your backup will be accessible from any computer. You can restore your personal data on any Linux system with this. You can also back up to other types of media, including remote servers, FTP, SSH, WebDAV, and Windows shared folders. Backup’s encryption protects your data with a password you set.
-
The local folder option can back up your data to an external drive or other local storage devices.
 Notice: Putting the backup on the same drive as the original files is a bad idea. You will lose both the backup and the originals if the drive fails.
-
From the Folders pane, you can change the folders that the utility backs up to. If you have important files in another folder like downloads? Remove it from the Folders to ignore list. If you do not want to back up the whole Home folder. Delete the Home folder from the Folders to back up list and add the folders that you want.

-
From the Schedule window, you can set it to automatically back up daily, weekly, biweekly, or monthly. You can also tell it how long to keep the old backups – anywhere from at least a week to at least a year or forever. The utility will automatically delete old backups when it needs space.

Carrying out a Backup
-
Once you have got it set up, you can perform your first backup by clicking the Back Up Now button on the Overview pane. If you want to enable automatic backups. Enable the automatic backups slider. The utility will start your first backup when you enable automatic backups.

-
The backup process may take a while, especially the first time it is run. However, each subsequent backup will be faster. Backup performs incremental backups, which means that it only records the changes from the last backup. That is rsync in action.

-
You will be asked to password-protect your backup. The password that you use here will encrypt your data so that no one else can view it. This is important if you are storing your backup online.
 Note: While You may want to write your password down, as you cannot recover it if you forget it. This in itself can be a security issue, so ensure if you do so you keep it in a safe place.

Restore
Restoring a Full Backup
-
Click the Restore button in the utility window to start restoring a backup. The backup will automatically select the folder that you last backed up to, but you can select any other folder that contains a backup.

-
Select the date that the backup was taken.

-
Backup restores the files to their original locations by default. You can also have it restore files to a specific folder if you do not want to overwrite the existing files.

-
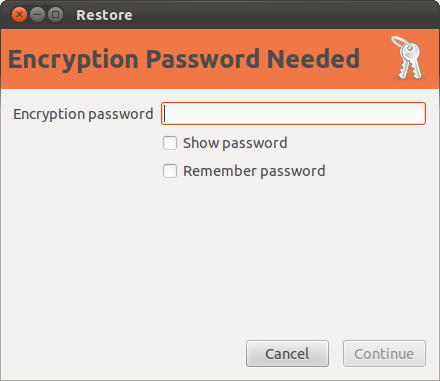
If you set a password while creating the backup, you will have to enter it to restore files.
Restoring Individual Files
-
You can also restore individual files from a backup. From a Nautilus file manager window, select a file, click the Edit menu, and select Revert to Previous Version.

-
You go through the same restore process, but only your selected file will be restored to its previous state.

-
You can also restore files that have been deleted by clicking the File menu and selecting Restore Missing Files.

-
The backup will scan your backups for files that were in the current folder, but are not anymore. You can restore them with a few clicks.

-
Backups are essential – every computer user should do them.
 Note: Ensure that if you have made a backup, that at some point you test that you can get your data back. Carry out a restore using any of the steps from 1 through 8. The last thing that you want to have happen is to find out at the point you need the data, that it never backed up correctly.
Article Properties
Affected Product
Desktops & All-in-Ones, Laptops
Last Published Date
21 Feb 2021
Version
3
Article Type
Solution