Dell AW510H Alienware Gaming Headset Usage and Troubleshooting Guide
Summary: The Alienware Gaming Headset AW510H has many features and options, refer to each section to learn about the features of the Alienware Gaming Headset AW510H and how to use them.
This article applies to
This article does not apply to
This article is not tied to any specific product.
Not all product versions are identified in this article.
Symptoms
Refer to each section to learn about the features of the Alienware Gaming Headset AW510H and how to use them.
Table of Contents
- What's in the Alienware Gaming Headset AW510H box
- About the headset
- About the audio cable
- About the USB DAC box
- Setting up your headset
- Using the headset
- Frequently Asked Questions
- Troubleshooting
- Additional Information
What's in the Alienware Gaming Headset AW510H box
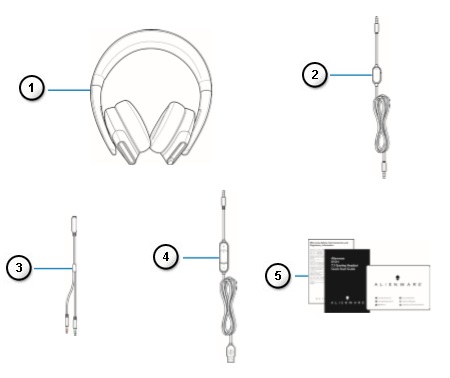 |
Figure 1: Alienware Gaming Headset AW510H Box Contents
| Numbers reference image above: | |
|---|---|
 |
Alienware Gaming Headset - AW510H |
 |
Audio cable (with microphone mute and volume control) |
 |
Y-cable with audio and microphone connectors (0.15 m) |
 |
USB DAC (Digital/Analog converter) box |
 |
Documents |
About the headset
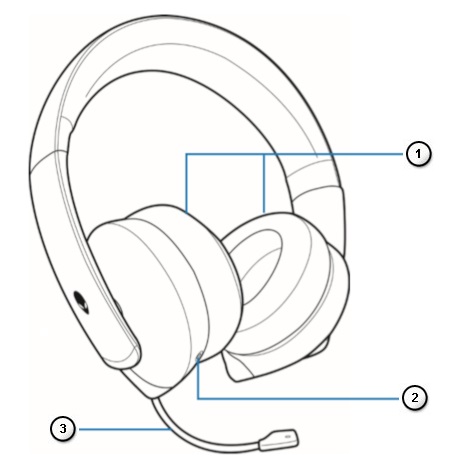 |
Figure 2: Alienware Gaming Headset AW510H Features
| Numbers reference image above: | |
|---|---|
 |
Earcups |
 |
3.5 mm audio port |
 |
Retractable boom microphone |
About the audio cable
 |
Figure 3: Alienware Gaming Headset AW510H Audio Cable Features
| Numbers reference image above: | |
|---|---|
 |
Microphone mute switch |
 |
Volume control wheel |
About the USB DAC box
 |
Figure 4: Alienware Gaming Headset AW510H Audio Cable Features
| Numbers reference image above: | |
|---|---|
 |
Microphone mute switch |
 |
Volume control wheel |
Setting up your headset
- Connecting the headset to your computer using the audio cable and Y-cable
- Connecting the headset to your computer using the USB DAC box
- Connecting the headset to your mobile device
- Configuring the headset
- Installing the Alienware Command Center (AWCC) and Alienware 510H 7.1 Gaming Headset Driver
Connecting the headset to your computer using the audio cable and Y-cable
To connect the headset to your computer using the audio cable, you have to attach it with a Y-cable. The Y-cable has two 3.5 mm plugs.
- Connect one end of the audio cable to the 3.5 mm audio port on your headset, and connect the other end to the female jack on the Y-cable (Figure 4).
- Connect the green end of the Y-cable to the headphone port on your computer (Figure 4).
- Connect the red end of the Y-cable to the microphone port on your computer (Figure 4).

Figure 5: Wiring Connections
Connecting the headset to your computer using the USB DAC box
Connect one end of the USB DAC box to the 3.5 mm audio port on your headset, and connect the other end to the USB port on your computer.
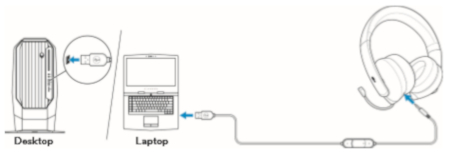
Figure 6: USB DAC Box Connections
Connecting the headset to your mobile device
Connect one end of the audio cable to the 3.5 mm audio port on your headset, and connect the other end to the headset port on your mobile device.
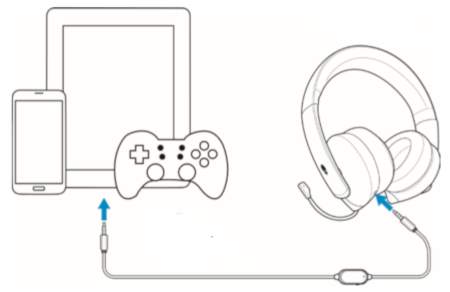
Figure 7: Connecting the Headset and a Mobile Device
 Note: USB-C to 3.5mm converter not included.
Connect the headset to your computer using the audio cable using the Y-cable or the USB DAC box. Once the headset is detected, it is ready to use.
To use your headset for gaming or to listen to music from your computer, it has to be selected as the default playback device and the default recording device in Windows Audio Settings.
- In Windows toolbar (located in the lower right-hand corner), right-click the speaker icon and select Sounds to access the Windows Audio Settings. The Sound dialog box appears.
- Click the Playback tab, set the Alienware 510H as the Default Device.
- Click the Recording tab, set the Alienware 510H as the Default Device.
- Click the Communications tab, select Do nothing, and then click Apply.
Installing the Alienware Command Center (AWCC) and Alienware 510H 7.1 Gaming Headset Driver
- Installing the Alienware Command Center Software From the Dell Support Site (recommended for Dell Branded computers)
- Installing the Alienware Command Center From the Microsoft Store (recommended for non Dell Branded computers)
Installing the Alienware Command Center Software From the Dell Support Site (recommended for Dell Branded computers)
To control the features and options you will need the Alienware Command Center (AWCC) and Alienware 510H 7.1 Gaming Headset Driver. You can get the latest versions directly from the Dell Support Site. For more information, refer to the steps below.
 Notes:
- To use the AWCC features, uninstall Alienware Headset Center (AWHC) if you have already installed AWHC on your computer.
- AWCC requires Windows 10 version 16299 or later.
- It is recommended that you update Windows and the drivers for your computer before installing the Alienware Command Center. For more information refer to Microsoft Knowledge Base article Windows Update: FAQ and Dell Knowledge Base article Drivers and Downloads FAQs.
- When your computer is preinstalled with AWCC 5.2.42 or later, you will need to install the Alienware 510H 7.1 Gaming Headset Driver, Alienware Sound Center, and possibly the Alienware Control Center as well (perform the following steps), after that you can configure your Alienware 510H 7.1 Gaming Headset. For more information refer to Dell Knowledge Base article Alienware Command Center Quick Guide.
- When your computer is not preinstalled with AWCC 5.2.42 or later, perform the following steps to install the latest AWCC. AWCC 5.2.42 or later can co-exist with older versions of AWCC on the same computer, so you can continue to use the older version to configure your computer.
- Connect the headset using the USB Cable with DAC to your computer through a USB port.
- Make sure the computer is connected to the internet.
- Browse to the 510H 7.1 Gaming Headset Online Driver Page.
- Select the Operating System installed on your computer using the drop down menu under Operating system:.
 Note: When your computer is preinstalled with AWCC 5.2.42 or later, you can skip to Step 9.
- Touch or click Download to the right of Alienware Command Center (do not close the browser window).
- Depending on your browser, you will get different options. The following steps are based on using the Chrome browser.
- Once the Alienware Command Center is downloaded, touch or click the file listed at the bottom of the screen to start the installation process, and follow the prompts.
- Wait for the Dell Update Package window to appear for the second time, and then touch or click Close.
- Touch or click Download to the right of Alienware 510H 7.1 Gaming Headset Driver.
- Once the Alienware 510H 7.1 Gaming Headset Driver is downloaded, touch or click the file listed at the bottom of the screen to start the installation process, and follow the prompts.
- Reboot the computer.
- Launch the Alienware Command Center.
 Notes:
- You may get a message that there are no AlienFX devices detected, touch or click OK.
- The Alienware Command Center may take a while to start, as it may be downloading additional software or starting the command center service.
Installing the Alienware Command Center Software From the Microsoft Store (recommended for non Dell Branded computers)
To control the features and options you will need the Alienware Command Center (AWCC) and Alienware 510H 7.1 Gaming Headset Driver. For more information, refer to the steps below.
 Notes:
- To use the AWCC features, uninstall Alienware Headset Center (AWHC) if you have already installed AWHC on your computer.
- AWCC requires Windows 10 version 16299 or later.
- It is recommended that you update Windows and the drivers for your computer before installing the Alienware Command Center. For more information refer to Microsoft Knowledge Base article Windows Update: FAQ and Dell Knowledge Base article Drivers and Downloads FAQs.
- When your computer is preinstalled with AWCC 5.2.42 or later, you will need to install the Alienware 510H 7.1 Gaming Headset Driver, Alienware Sound Center, and possibly the Alienware Control Center as well (perform the following steps), after that you can configure your Alienware 510H 7.1 Gaming Headset. For more information refer to Dell Knowledge Base article Alienware Command Center Quick Guide.
- When your computer is not preinstalled with AWCC 5.2.42 or later, perform the following steps to install the latest AWCC. AWCC 5.2.42 or later can co-exist with older versions of AWCC on the same computer, so you can continue to use the older version to configure your computer.
- Connect the headset using the USB Cable with DAC to your computer through a USB port.
- Make sure the computer is connected to the internet.
- Browse to the 510H 7.1 Gaming Headset Online Driver Page.
- Select the Operating System installed on your computer using the drop down menu under Operating system:.
- Touch or click Download to the right of Alienware 510H 7.1 Gaming Headset Driver.
- Depending on your browser, you will get different options. The following steps are based on using the Chrome browser.
- Once the Alienware 510H 7.1 Gaming Headset Driver is downloaded, touch or click the file listed at the bottom of the screen to start the installation process, and follow the prompts.
 Note: When your computer is preinstalled with AWCC 5.2.42 or later, you can skip to Step 15, otherwise proceed to the next step.
- Press and hold the Windows (
 ) key, and then press the q key.
- In the Search box type Microsoft store.
- In the search results list, touch or click Microsoft Store (Trusted Microsoft Store app).
- Touch or click Search in the upper right-hand corner of the Microsoft Store page.
- In the Search box type Alienware Command Center.
- In the search results list, touch or click Alienware Command Center (App).
- Touch or click Get it now or Install and follow the prompts.
- Reboot the computer.
- Launch the Alienware Command Center.
 Notes:
- The Alienware Command Center may take a while to start, as it may be downloading additional software or starting the command center service.
- You may get a message that there are no AlienFX devices detected, touch or click OK.
- The Additional Components Required window may appear, if so, touch or click Download and follow the prompts.
Using the headset
Adjust the headband to find an optimal fit for your head. When using the retractable microphone, position it approximately two centimeters away from your mouth.
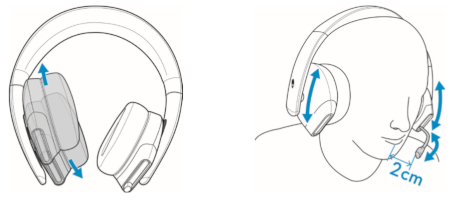
Figure 8: Adjusting the Headband
The earcups can be rotated to wear the headset around the neck comfortably, or for easier storage.

Figure 9: Adjusting the Earcups
- Use the volume control wheel on the audio cable or the volume (+/-) buttons on the USB DAC box to adjust the speaker volume.
- Scroll the volume control wheel up to increase the volume, or down to decrease the volume.
- Press the volume (+) button to increase the volume, or the volume (-) button to decrease the volume.
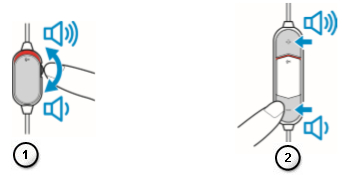 |
Figure 10: Adjusting the Volume
| Numbers reference image above: | |
|---|---|
 |
Audio Cable |
 |
USB DAC Box |
Muting/Un-muting the Microphone
Slide the microphone mute switch on the audio cable or the USB DAC box down to mute the microphone. To un-mute the microphone, slide the microphone mute switch up.
 NOTE: When using the USB DAC box, you can hear an audio prompt ("Mute") when you slide the microphone mute switch down, indicating that the microphone is in mute
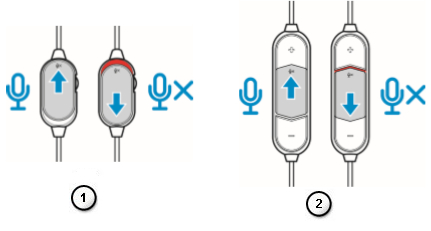 |
Figure 11: Muting and Un-muting
| Numbers reference image above: | |
|---|---|
 |
Audio Cable |
 |
USB DAC Box |
Frequently Asked Questions
| Question | Answer |
|---|---|
| What are the different operating modes? |
|
| Will this headset work with Xbox One, PS4, Nintendo Switch? | This headset will work on all consoles (including the PlayStation 4, Xbox One™ and Nintendo Switch) that allow for connectivity via the 3.5mm audio cable through the controller, or directly into the console in the case of the Nintendo Switch (not compatible with Nintendo Switch Lite).
 Note: Xbox One may require Xbox One headset adapter (sold separately). Note: Xbox One may require Xbox One headset adapter (sold separately).
Xbox One™
Setup on PlayStation 4
Setup on Nintendo Switch in handheld mode only (3.5mm)
|
| Will this headset work with my mobile device? | The AW510H will work with most mobile devices using the 3.5 mm headset jack. USB-C or Lightning to 3.5mm adapters sold separately |
| How do I clean my Headset? | The headset requires minimum maintenance to keep it in optimum condition. We recommend that you disconnect the device from the computer once a month and clean it using a soft cloth or cotton swab with a bit of warm water to prevent dirt buildup. Do not use soap or hard cleaning agents. Do not use any liquid to clean the earpads and speakers as the liquids may damage your headset. |
| Why is my microphone not working? | When the microphone on your headset is not working, perform one or more of the following steps:
|
| How do I change the Equalizer (EQ)? |
|
| Can I save the Equalizer (EQ) to my Headset? | You must have Alienware Command Center (AWCC) running in order to use your configured EQ. |
| Why am I not able to hear audio when I use the USB? | When you are unable to hear the audio when using the USB cable with DAC, perform the following steps:
|
| Why do I hear echo/feedback on my headset? |
|
| Why is my microphone volume level too low? |
|
| Why can I not see my headset in AWCC? | When you cannot see your AW510H in Alienware Command Center (AWCC), perform one or more of the following steps:
|
 Note: Do not close the page as two downloads are needed.
 Note: The Alienware Sound Center installation window may appear, if so, following the prompts to download and install The Alienware Sound Center.
 Note: When the Audio icon does not show, restart the computer.
 Note: The Alienware Sound Center installation window may appear, if so, following the prompts to download and install The Alienware Sound Center.
 Note: Once you restart the computer and open the AWCC, the Alienware Sound Center installation window may appear, if so, following the prompts to download and install The Alienware Sound Center.
 Note: The Alienware Sound Center installation window may appear, if so, following the prompts to download and install The Alienware Sound Center.
Troubleshooting
| Problems | Possible solutions |
|---|---|
| Headset has no sound. | Ensure that the headset is connected to the computer using an audio cable with the Y-cable, or the smartphone or tablet using an audio cable. |
| Try using the headset on another computer, smartphone, or tablet. | |
| Ensure that the audio player is playing music, and that the computer volume and media player volume are on, and not muted. - Click the speaker icon on the system tray in your computer. - Adjust the volume level on the volume bar. |
|
| Sound is not configured to use this connection on the computer as the Audio Output/Input. | |
| The person on the other end cannot hear me. | Ensure that the microphone is positioned close to the mouth. |
| Ensure that the microphone is not muted. | |
| When using the Y-cable, make sure it is connected to the correct ports. | |
| When using the native Audio cable, make sure it is connected to the correct port. | |
| Make sure the 3.5mm port fully is inserted into the headset. | |
| Abnormal sound is coming out of the headset. | Adjust the volume level up and down, and check if the abnormal sound changes. |
| Ensure the 3.5mm jack is inserted fully into the headset port and the USB port on your computer. | |
| Ensure that the audio cable is fully inserted into the audio port of the mobile device (if connected through the audio cable). | |
| Unbalanced sound in the headset. | Check that the computer Volume Balance is set correctly.
|
| Microphone picks up too much background noise. | Ensure that the microphone is positioned close to the mouth. |
| Remove any direct air flow (such as fan or air conditioner) to the microphone. | |
| Microphone mute is not working when connected with audio cable. | Ensure that the microphone Mic mute switch on the audio cable is set to MUTE OFF. |
| Microphone works intermittently or cannot be heard by the other party. | Increase the microphone volume. |
| Set the microphone noise reduction level in chat application to a lower level. |
Troubleshooting Guide for Microphone Problems on a Dell PC
Use the information within and the Audio Recording Troubleshooter to resolve microphone issues.
Common Troubleshooting Guide for Sound (audio) Problems in Microsoft Windows
Having issues with audio or sound on your Dell PC? If you notice symptoms like no sound or no audio, stuttering, jarring, crackling or choppy audio, intermittent audio, distorted audio, follow the troubleshooting steps.
Additional Information
Browse to the 510H 7.1 Gaming Headset Online Driver Page. for the latest software.
For the Alienware 510H 7.1 Gaming Headset Quick Start Guide, browse to the 510H 7.1 Gaming Headset Online Manual Page, and then touch or click View PDF to the right of Alienware 510H 7.1 Gaming Headset Quick Start Guide.
The Quick Start Guide provides information on the hardware in the box and the controls on the headset.
For the Alienware 510H 7.1 Gaming Headset Configuration and Installation Guide, browse to the 510H 7.1 Gaming Headset Online Manual Page, and then touch or click View PDF to the right of Configuration and Installation Guide.
The Configuration and Installation Guide provides information on the options on how to install the application for configuring the Alienware 510H 7.1 Gaming Headset.
For the Alienware 510H 7.1 Gaming Headset User Guide, browse to the 510H 7.1 Gaming Headset Online Manual Page, and then touch or click View PDF to the right of Alienware 510H 7.1 Gaming Headset User's Guide.
The User Guide provides information such as Setting up your headset on your computer and troubleshooting.
Cause
Not required
Resolution
See above
Affected Products
Alienware 7.1 Gaming Headset AW510HArticle Properties
Article Number: 000176863
Article Type: Solution
Last Modified: 21 Oct 2025
Version: 8
Find answers to your questions from other Dell users
Support Services
Check if your device is covered by Support Services.