How to View Dell Trusted Device BIOS Verification Results in CrowdStrike Falcon
Summary: Dell Trusted Device BIOS Verification telemetry can be integrated with the CrowdStrike Falcon platform using the following configuration details.
This article applies to
This article does not apply to
This article is not tied to any specific product.
Not all product versions are identified in this article.
Instructions
The BIOS Verification telemetry of Dell Trusted Device can be integrated with the CrowdStrike Falcon platform. This provides administrators the ability to view the BIOS verification statuses of their endpoints in CrowdStrike Falcon.
Affected Products:
- CrowdStrike
- Dell Trusted Device
Affected Versions:
- CrowdStrike Falcon version 7.17 and later
- Dell Trusted Device version 6.3 and later
Affected Hardware:
- Latitude
- OptiPlex
- Precision
- XPS
Affected Operating Systems:
- Windows 11
- Windows 10
An administrator may configure the environment for BIOS Verification Results in CrowdStrike Falcon. Once configured, CrowdStrike Falcon Insight-enabled environments can then Leverage CrowdStrike Falcon Insight Next-Gen SIEM for customizable information. Select the appropriate topic for more information about how to configure it.
BIOS Verification Results in CrowdStrike Falcon
- Install Dell Trusted Device.
- Install CrowdStrike Falcon Sensor.
Note: For more information about installing CrowdStrike Falcon Sensor, reference How to Install CrowdStrike Falcon Sensor.
- In either a Google Chrome or Microsoft Edge browser, go to your Falcon Console login URL.
- Falcon US-1: https://falcon.crowdstrike.com/login/
- Falcon US-2: https://falcon.us-2.crowdstrike.com/login/
- Falcon EU-1: https://falcon.eu-1.crowdstrike.com/login/
- Falcon US-GOV-1: https://falcon.laggar.gcw.crowdstrike.com/login/
- Falcon US-1: https://falcon.crowdstrike.com/login/
- Log in to the Falcon Console.
- From the left menu pane, click Investigate and then select BIOS Prevalence.
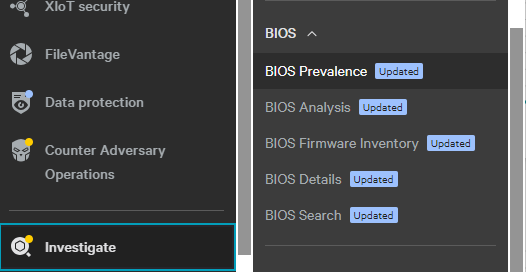
- Once the BIOS Prevalence dashboard loads, Dell computers with both Dell Trusted Device and the CrowdStrike Falcon sensor installed begin reporting enhanced telemetry data represented on this dashboard with the Manufacturer Verified field.

Leverage CrowdStrike Falcon Insight Next-Gen SIEM
CrowdStrike Falcon Insight-enabled environments can leverage Next-Gen SIEM for customizable searches and reports.
- In either a Google Chrome or Microsoft Edge browser, go to your Falcon Console login URL.
- Falcon US-1: https://falcon.crowdstrike.com/login/
- Falcon US-2: https://falcon.us-2.crowdstrike.com/login/
- Falcon EU-1: https://falcon.eu-1.crowdstrike.com/login/
- Falcon US-GOV-1: https://falcon.laggar.gcw.crowdstrike.com/login/
- Falcon US-1: https://falcon.crowdstrike.com/login/
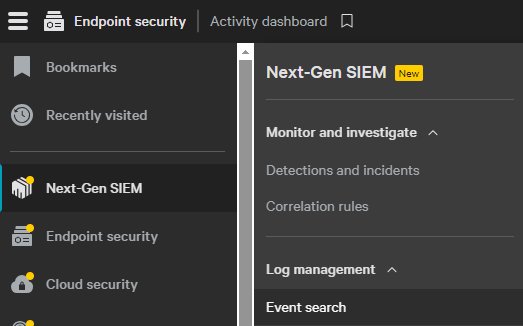
- From the left menu pane, click Next-Gen SIEM and then select Event search.
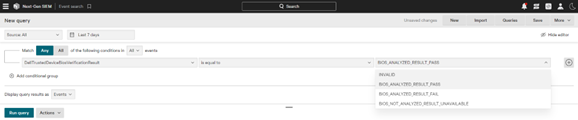
- In the Match field:
- In the first field, type and then select
DellTrustedDeviceBIOSVerificationResult. - In the second field, select is equal to.
- In the third field, select the appropriate result:
- INVALID
- BIOS_ANALYZED_RESULT_PASS
- BIOS_ANALYZED_RESULT_FAIL
- BIOS_NOT_ANALYZED_RESULT_UNAVAILABLE
- In the first field, type and then select
- Click the Run query button to perform the search using the search parameters selected (Step 3).

To contact support, reference Dell Data Security International Support Phone Numbers.
Go to TechDirect to generate a technical support request online.
For additional insights and resources, join the Dell Security Community Forum.
Affected Products
CrowdStrike, Dell Trusted DeviceArticle Properties
Article Number: 000226602
Article Type: How To
Last Modified: 15 Sep 2025
Version: 6
Find answers to your questions from other Dell users
Support Services
Check if your device is covered by Support Services.