Dell Video Conferencing Room Solutions: Reimaging a Teams or Zoom Room Device
Summary: This article provides the required steps to reimage a Teams Room or Zoom Room device for the Video Conferencing Room Solutions (VCRS bundle) on a Dell OptiPlex 7000 or 7080 XE Micro Form Factor. ...
This article applies to
This article does not apply to
This article is not tied to any specific product.
Not all product versions are identified in this article.
Instructions
Table of Contents:
- Operating System Reinstall (OSRI) Overview
- Reimaging a Teams or Zoom Rooms Device as Part of a Dell Virtual Conferencing Room Solutions
Operating System Reinstall (OSRI) Overview
The Dell Virtual Conferencing Room Solutions (VCRS) for Microsoft Teams or Zoom Room is an all-in-one bundle for teleconferencing. The bundle includes at minimum the following components (depending on your configuration):
- Dell OptiPlex 7080 or 7000 XE Micro with Microsoft Teams Room or Zoom Solutions.
- Logitech Tap Controller.
- A Windows 10 or 11 Internet of Things (IOT) version in Kiosk mode with Microsoft Teams Room or Zoom installed.
Reimaging a Teams or Zoom Rooms Device as Part of a Dell Virtual Conferencing Room Solutions
The Operating System (OS), Windows 10, or 11 IOT, is delivered in Kiosk Mode, using the Windows Internet of Things Enterprise OS in Long-Term Servicing Channel (LTSC) (Win10) or General Availability Channel (GAC) (Win11).
All OS updates are provided through Windows Update. If the computer is missing a wanted update, keep the unit powered on and connected to the Internet. This should allow automatic updates to download and apply to the computer.
Note: Maintenance routines typically run overnight.
Any issues beyond this that cannot be corrected with an OSRI, should be communicated to Microsoft (Teams Room) or Zoom (Zoom Room) for collaborative support with Dell.
During the deployment of a Microsoft Teams Room or Zoom Room using the Dell VCRS, the factory-shipped image may become damaged or unusable. This typically happens if the process of implementing a Video Conferencing Room Solutions is not followed properly with Users that have already performed some configuration themselves before the Dell Services Team is engaged.
It is easier to return to a factory-shipped image rather than to troubleshoot the configuration and try to undo some of the changes that were initially made.
To re-image a Dell VCRS, follow the steps below. The below steps get the OptiPlex system back to its factory OS image (in Kiosk mode) with, depending on your machine Service Tag, Teams, or Zoom room pre-installed and configured for the Dell VCRS Out Of the Box (OOB) experience.
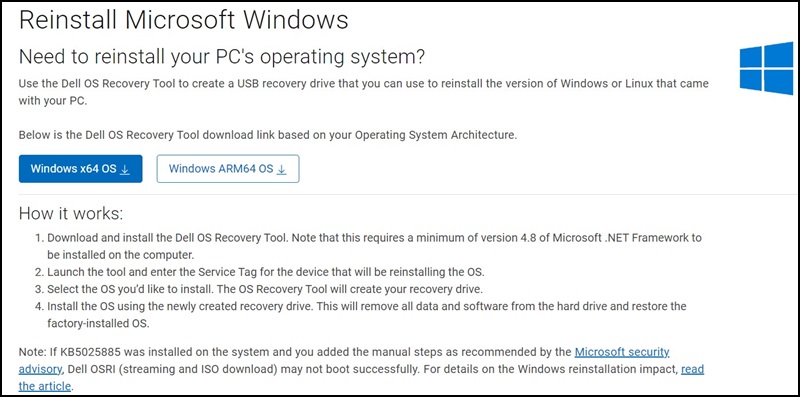
Step 1: Identify the Machine Service Tag, Download, and Install the Dell Operating System Recovery Tool (DORT)
- Identify the Service Tag for your OptiPlex system (you need the tag to download the Win OS IOT image).
- A USB flash drive with at least 32 GB of free space or greater is required.
- Download and install the Dell OS Recovery Tool (DORT) at the following link: Reinstall Microsoft Windows
Step 2: Creating the Dell Operating System Recovery Media
Create bootable install media following the steps below and selecting, based on the system Service Tag, the ISO image that was pre-installed at the factory.
- Launch the Dell OS Recovery Tool application.
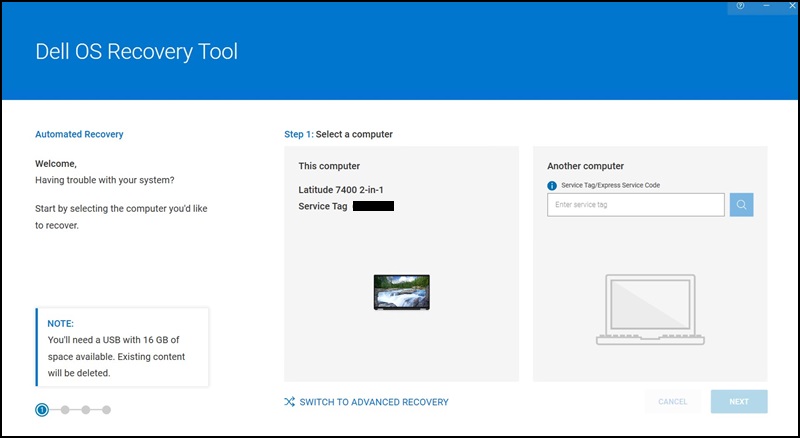
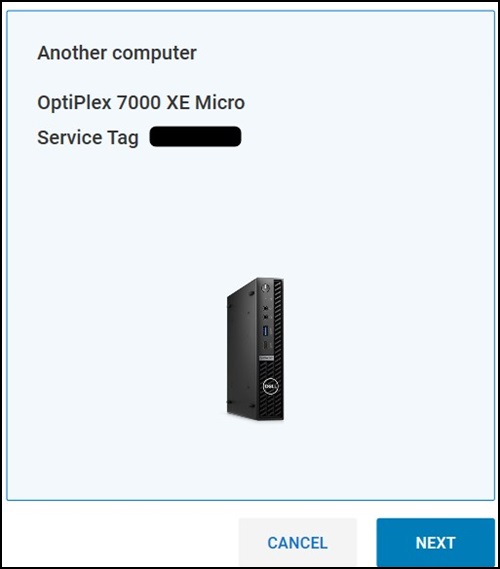
- If you are using another working computer to create the recovery media, choose the For Another Computer option. Enter the Service Tag of the computer that you want to create the recovery media for, and click the Magnifying Glass icon to search for the computer identity.
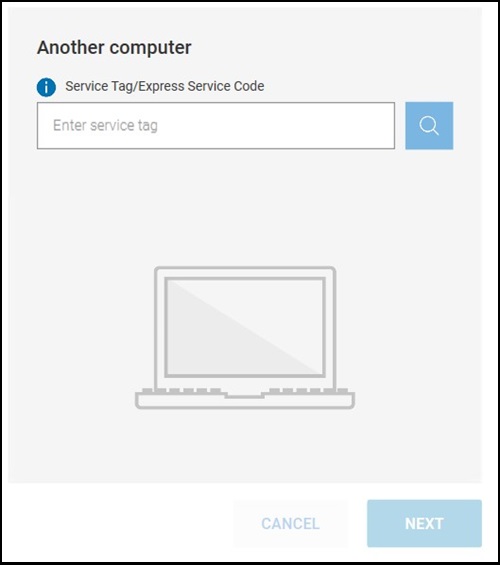 Note: If the Service Tag of your Dell computer is not recognized, contact Dell Technical Support.
 - After identifying the computer, click NEXT.
- At this point, you are prompted with some different options depending on the selection mode - Advance or Automated Recovery mode.
If the Automated recovery mode (Default mode) is selected the Dell OS Recovery Tool selects the best option for the recovery and proceed with the creation of the media itself.
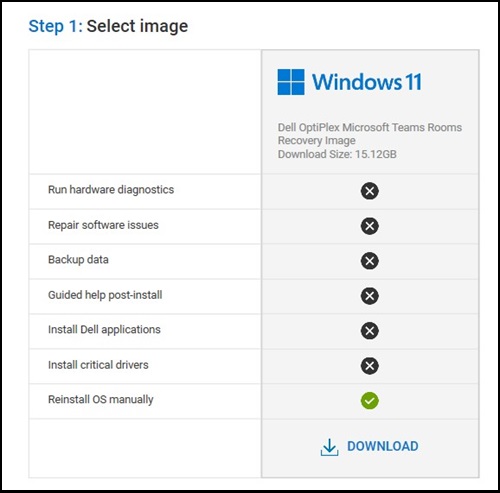
In the Advanced recovery mode, you are prompted with all the recovery images that are available for the specific computer. - Select the image prompted and click Download.
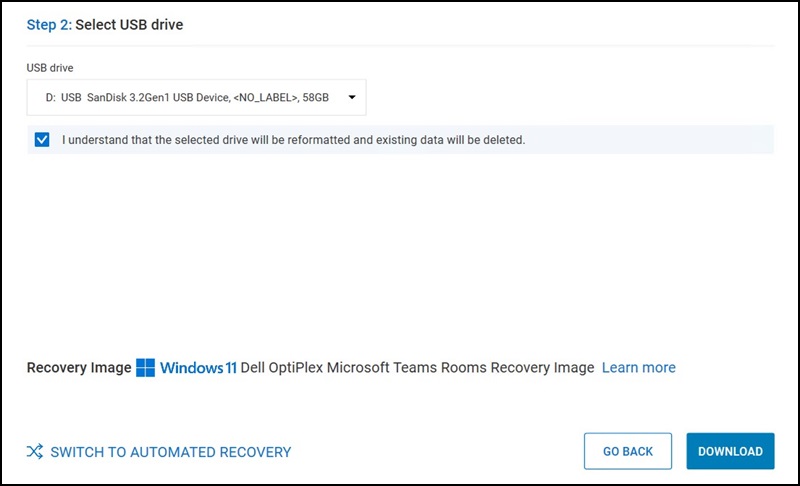
- Disconnect any USB drive/s that are connected to the computer.
- Connect a USB drive with at least 32 GB of free storage space. This USB drive is going to be formatted to create the USB recovery media.
- Under the USB drive, select the USB drive that you would like to use to create the USB recovery media.
- Check the box next to, "I understand that the selected drive will be formatted and existing data are deleted."
Warning: Dell Technologies recommends that you back up any important data from the USB drive. The Dell OS Recovery Tool formats the USB drive and all the data on the USB drive will be permanently erased.
- Click Download.
- The OS recovery image starts to download and is being verified.
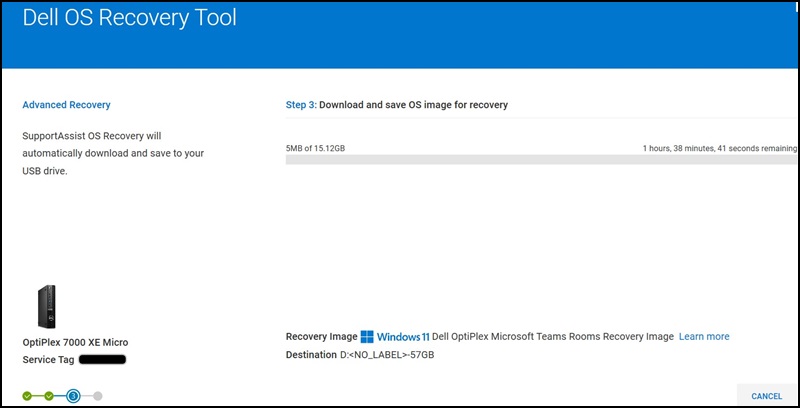
- The recovery image is now mounted to the USB drive.
- After the USB recovery media is successfully created, a summary screen is displayed. Click Finish. The recovery media creation is complete.

Step 3: Use the USB Recovery Media Created to Re-Install the Operating System
- Connect the USB recovery media to the Dell VCRS computer where you want to re-install the OS.
- Restart or power on the computer.
- At the Dell logo screen, press the F12 key repeatedly until you see the Preparing one-time boot menu in the upper right corner of the screen.
- On the boot menu, under UEFI boot, select the USB recovery drive option (USB, partition 1) and press the Enter key.
- When Windows Setup appears, select the language and keyboard preferences.
- On the Windows Installation dialog box, click Install Now.
- Review the license agreement, and select I accept the license terms to proceed with the installation.
- In the window "Which type of installation do you want?", click Custom (advanced).
- In the "Where do you want to install Windows" window, select the largest internal disk as the Primary Partition, and then click Next.
Note: If the Primary Partition shows 0GB free, select the Unallocated Space and click Next.
- Windows Setup automatically creates a partition, formats it, and then begins installing Windows.
Note: The installation process takes some time and your computer may restart several times.
Affected Products
OptiPlex 7000 XE Micro, OptiPlex 7080 XE Micro Form Factor, Dell ProSupport for Solutions - Video ConferencingArticle Properties
Article Number: 000269681
Article Type: How To
Last Modified: 05 Aug 2025
Version: 3
Find answers to your questions from other Dell users
Support Services
Check if your device is covered by Support Services.