Article Number: 000126038
Instalowanie karty PCIe w systemie Windows: Kompleksowy przewodnik
Summary: Dowiedz się, jak zainstalować kartę PCIe w systemie Windows. Wskazówki dotyczące gniazd PCIe, opcji adapterów i proste instrukcje instalacji krok po kroku
Article Content
Instructions
Jeśli chcesz dodać kartę PCIe do systemu firmy Dell, wykonaj poniższe czynności, aby zakończyć instalację.
- Zdejmij pokrywę boczną. Jeśli nie wiesz, jak go usunąć, odwiedź stronę pomocy technicznej firmy Dell , aby uzyskać dokumentację systemu.
- Karta PCIe zostanie dodana do gniazda PCIe. (Patrz Rysunek 1)
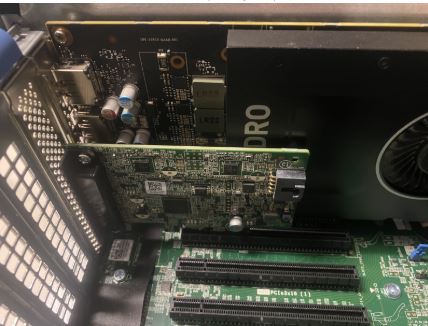
(Rysunek 1 . Gniazdo PCIe)
- Po dodaniu identyfikatora karty PCIe. Do podłączenia złącza Display Port karty PCIe do portu karty graficznej potrzebny jest kabel Display Port do Display Port. (Patrz Rysunek 2.)

(Rysunek 2. Kabel DP do DP)
- Jeśli po zainstalowaniu karty PCIe jest to karta Thunderbolt, należy zaktualizować najnowszy sterownik kontrolera Thunderbolt. Przejdź do witryny ze sterownikami , aby wyszukać sterownik dla swojego systemu. Sterownik kontrolera Thunderbolt można znaleźć w sekcji "Chipset". (Patrz Rysunek 3)
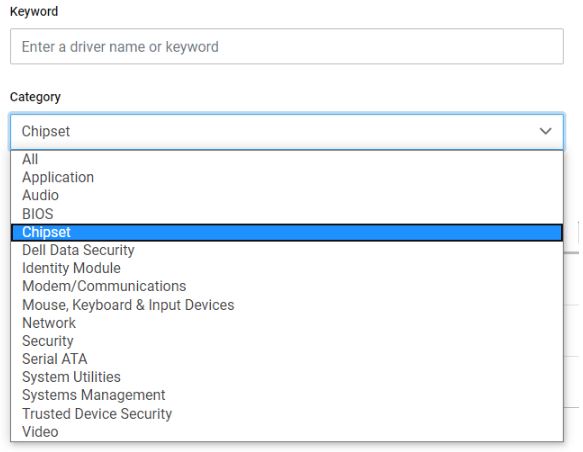
(Rysunek 3 . Kategoria sterowników firmy Dell)
Po zakończeniu instalacji tego sterownika i ponownym uruchomieniu systemu funkcja karty PCIe powinna być teraz w stanie korzystać z gniazda PCIe.
Additional Information
Polecane artykuły
Poniżej przedstawiono niektóre polecane artykuły dotyczące tego tematu, które mogą Cię zainteresować.
Article Properties
Last Published Date
03 Apr 2024
Version
8
Article Type
How To