Dell Command Update를 사용한 고급 드라이버 복원
Resumen: 이 문서에서는 Dell Command Update 툴에서 고급 드라이버 복원을 시작하는 방법에 대해 설명합니다. 고급 드라이버 복원을 사용하면 한 번의 클릭으로 드라이버를 설치할 수 있습니다. Windows 재설치 후 모든 드라이버를 설치할 수 있습니다. 또한 드라이버 손상 문제를 해결하기 위해 시스템 드라이버를 다시 설치하는 데 사용할 수 있습니다. ...
Este artículo se aplica a
Este artículo no se aplica a
Este artículo no está vinculado a ningún producto específico.
No se identifican todas las versiones del producto en este artículo.
Instrucciones
Dell Command Update에서 고급 드라이버 복원을 사용하는 방법:
- Dell Command Update 애플리케이션을 엽니다.
- ADR(Advanced Driver Restore)을 허용하도록 설정이 활성화된 경우 기본 화면에 Windows 재설치를 위한 고급 드라이버 복원 섹션이 표시됩니다.
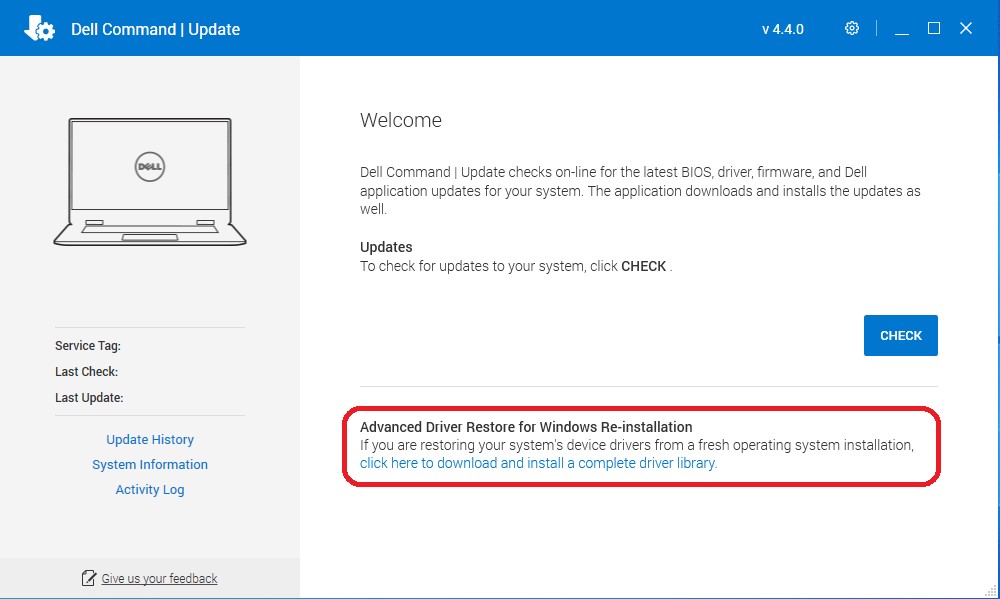
- "Click here to download and install a complete driver library"를 클릭합니다.
참고: 기본 화면에 없는 경우 아래에 나와 있는 활성화할 설정 섹션을 따릅니다.
- 설치가 완료되면 시스템을 재시작해야 합니다.
활성화할 설정:
- 관리자 권한으로 Dell Command Update를 실행합니다. Dell Command Update에서 오른쪽 상단 모서리에 있는 기어 아이콘을 클릭하여 Settings 를 선택합니다 .
- 고르다 왼쪽 창의 "Advanced Driver Restore"
- 슬라이더 버튼 "Enable"을 클릭하여 애플리케이션에서 ADR이 활성화되어 있는지 확인합니다.
- Dell 기술 지원 부서는 "Dell 지원 사이트에서 드라이버 라이브러리 다운로드(권장)"를 권장합니다.
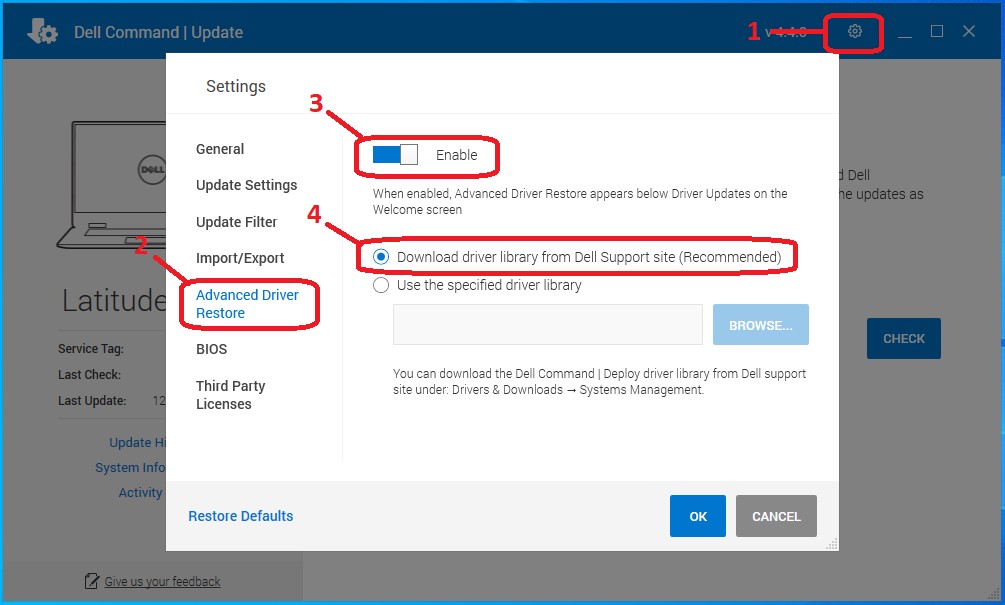
- 확인을 누릅니다. 이제 문서 상단에 표시된 대로 옵션이 나타납니다.
이러한 단계를 통해 문제가 해결되지 않을 경우 Dell 기술 지원 부서에 문의하십시오.
관련 정보는 다음 Dell 기술 자료 문서를 참조하십시오.
Información adicional
권장 문서
다음은 사용자가 관심 있을 만한, 이 주제와 관련된 몇 가지 권장 문서입니다.
Productos afectados
OptiPlex, Dell Pro Plus, Latitude, Dell Pro Rugged, XPS, Fixed Workstations, Mobile Workstations, Dell Command | UpdatePropiedades del artículo
Número del artículo: 000177525
Tipo de artículo: How To
Última modificación: 05 ene 2026
Versión: 16
Encuentre respuestas a sus preguntas de otros usuarios de Dell
Servicios de soporte
Compruebe si el dispositivo está cubierto por los servicios de soporte.