NFS 远程 I/O 错误;更改已启用 FS 的存储桶的存储桶所有者可能会导致应用程序和/或用户无法访问 NFS 文件
Résumé: 不允许或限制以前的存储区所有者 ObjectControllerException: 以前的存储桶所有者不允许使用 Method updateObjectInternal
Cet article concerne
Cet article ne concerne pas
Cet article n’est associé à aucun produit spécifique.
Toutes les versions du produit ne sont pas identifiées dans cet article.
Symptômes
用户对 用户界面上的存储桶所有者页面所做的更改:
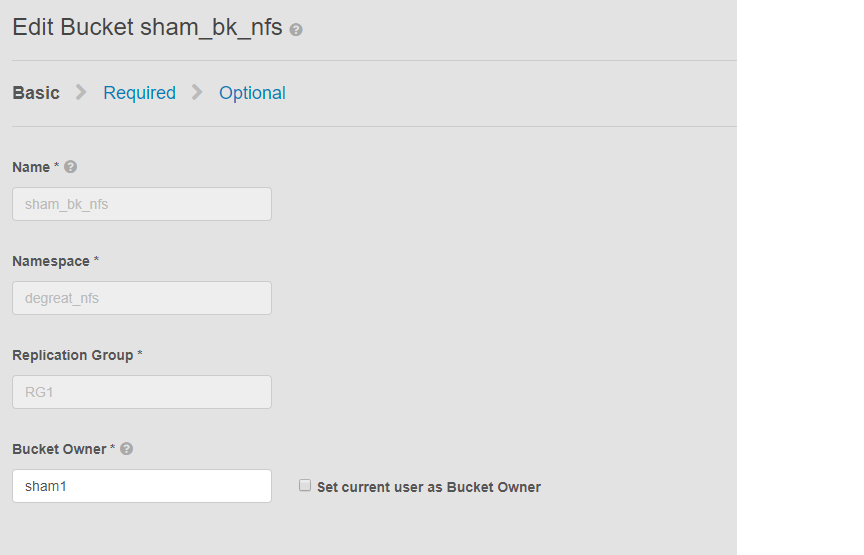
此问题适用于启用了 NFS 的存储区以及通过用户界面更改存储区所有者。这可能会导致连接到的应用程序或用户失去对 Linux 文件系统上的存储区的访问权限。即使我们将更改再次恢复给原始所有者,也无法进行访问,从而导致 DU。
在此示例中:
存储区所有者已使用用户界面更改为“sham2”。由于 ECS 中的限制,即使在将存储区所有者名称更改回“sham1”之后也是如此。ECS 不会使用用户界面将存储区所有者更改回“sham1”。目前只能通过 CLI 使用带有有效负载的 API 来完成此操作,以便将 resetowner 标记设置为 true。
识别问题的方法,在 Linux 计算机上要求用户触摸文件,例如:
此问题适用于启用了 NFS 的存储区以及通过用户界面更改存储区所有者。这可能会导致连接到的应用程序或用户失去对 Linux 文件系统上的存储区的访问权限。即使我们将更改再次恢复给原始所有者,也无法进行访问,从而导致 DU。
在此示例中:
存储区所有者已使用用户界面更改为“sham2”。由于 ECS 中的限制,即使在将存储区所有者名称更改回“sham1”之后也是如此。ECS 不会使用用户界面将存储区所有者更改回“sham1”。目前只能通过 CLI 使用带有有效负载的 API 来完成此操作,以便将 resetowner 标记设置为 true。
识别问题的方法,在 Linux 计算机上要求用户触摸文件,例如:
admin@node1~>touch file
touch: setting times of `file': Remote I/O error

se svc_log with the string  "method updateObjectInternal "

Command:
# svc_log -a -sr dataheadsvc | grep "method updateObjectInternal"
Example:
admin@node1~>svc_log -a -sr dataheadsvc | grep "method updateObjectInternal"
svc_log v1.0.22 (svc_tools v1.5.3)                 Started 2019-06-06 10:45:04

Running on nodes:              <All nodes>
Time range:                    2019-06-05 10:45:04 - 2019-06-06 10:45:04
Filter string(s):              <All messages>
Show nodename(s):              True
Search reclaim logs (if any):  False

com.emc.storageos.data.object.exception.ObjectControllerException: method updateObjectInternal not allowed for previous bucket owner sham1
Caused by: com.emc.storageos.data.object.exception.ObjectControllerException: method updateObjectInternal not allowed for previous bucket owner sham1
Cause
使用特定用户作为所有者创建存储区,然后更改存储区的所有权。最后,使用 ACL 页面向原始所有者授予完全控制权会失败,并出现 ECS 日志异常:
ObjectControllerException: method updateObjectInternal not allowed for previous bucket owner <ownerid>
This is a known issue currently being evaluated by Dell EMC at this time.
Résolution
解决方法是通过 CLI 使用 API 将存储区所有者更改为存储区所有者,并将有效负载更改为 resetowner 标记为 true。
1.确定当前存储区所有者。
2.使用 vi 编辑器创建简单的 xml 文件。在下面的示例中,它被称为 /tmp/bucket-owner.xml。这是一个多步骤过程。我们必须将其临时设置为 sham2 的新所有者。如下面的示例中所示,在设置回原始所有者 sham1 之前,请确认输出:
。7.配置更改完成后,我们应该不会再看到相同的错误
1.确定当前存储区所有者。
需要用户界面 root 密码才能生成令牌。例如:
admin@ecsnode1:~> tok=$(curl -iks https://XX.XX.XX.XX:4443/login -u 'root:ChangeMe' | grep X-SDS-AUTH-TOKEN)
验证当前存储区所有者(在您的情况中替换存储区和命名空间):
admin@node1:~> curl -s -k -X GET -H "$tok" https://XX.XX.XX.XX:4443/object/bucket/sham_bk_nfs/info?namespace=degreat_nfs | xmllint --format - | grep '<owner>'
  <owner>sham2</owner>
这确认参数reset_previous_owners需要设置为 true。恢复的存储区所有者位于用户界面上,但通过 CLI 的 API 确认 ECS 仍将存储区所有者视为“sham2”。
2.使用 vi 编辑器创建简单的 xml 文件。在下面的示例中,它被称为 /tmp/bucket-owner.xml。这是一个多步骤过程。我们必须将其临时设置为 sham2 的新所有者。如下面的示例中所示,在设置回原始所有者 sham1 之前,请确认输出:
admin@node1:~ # vi /tmp/bucket-owner.xml

admin@ecsnode1:~ # cat /tmp/bucket-owner.xml
<object_bucket_update_owner>
   <namespace>degreat_nfs</namespace>
   <new_owner>sham2</new_owner>
   <reset_previous_owners>true</reset_previous_owners>
</object_bucket_update_owner>

3. Change the bucket owner to the temporary owner.
通过 xml 文件将存储桶所有者更改为“sham2”所需的 API 语法如下:
admin@ecsnode1:~> curl -v -k -X "POST" "https://xx.xx.xx.xx:4443/object/bucket/sham_bk_nfs/owner" -H "$tok" -H "Content-Type: application/xml" -H "ACCEPT:application/xml" -d @/tmp/bucket-owner.xml -v
* Hostname was NOT found in DNS cache
*   Trying xx.xx.xx.xx...
* Connected to xx.xx.xx.xx (xx.xx.xx.xx) port 4443 (#0)
* successfully set certificate verify locations:
*   CAfile: none
  CApath: /etc/ssl/certs/
* SSLv3, TLS unknown, Certificate Status (22):
* SSLv3, TLS handshake, Client hello (1):
* SSLv3, TLS handshake, Server hello (2):
* SSLv3, TLS handshake, Certificate (11):
* SSLv3, TLS handshake, Server key exchange (12):
* SSLv3, TLS handshake, Server finished (14):
* SSLv3, TLS handshake, Client key exchange (16):
* SSLv3, TLS change cipher, Client hello (1):
* SSLv3, TLS handshake, Finished (20):
* SSLv3, TLS change cipher, Client hello (1):
* SSLv3, TLS handshake, Finished (20):
* SSL connection using TLSv1.2 / ECDHE-RSA-AES256-GCM-SHA384
* Server certificate:
*        subject: CN=localhost
*        start date: 2019-03-25 09:53:41 GMT
*        expire date: 2029-03-22 09:53:41 GMT
*        issuer: CN=localhost
*        SSL certificate verify result: self signed certificate (18), continuing anyway.
> POST /object/bucket/sham_bk_nfs/owner HTTP/1.1
> User-Agent: curl/7.37.0
> Host: xx.xx.xx.xx:4443
> X-SDS-AUTH-TOKEN: BAAcUy9KYlhxTlVYb2M0bnF3bTNscEsvSEdDeWhJPQMAjAQASHVybjpzdG9yYWdlb3M6VmlydHVhbERhdGFDZW50ZXJEYXRhOmJhOGQ3ZTkzLTMyMGYtNDNmNy05Y2FkLWM4YWQzMWFiMzY1MAIADTE1NTk3Mzk3OTA2MDgDAC51cm46VG9rZW46YjQ4NGNiZjEtNTkwNy00YWI3LTgzYTctM2Y3OGRhM2RiY2NiAgAC0A8=
> Content-Type: application/xml
> ACCEPT:application/xml
> Content-Length: 179
>
* upload completely sent off: 179 out of 179 bytes
< HTTP/1.1 200 OK
< Date: Thu, 06 Jun 2019 10:56:08 GMT
< Content-Length: 0
< Connection: keep-alive
<
* Connection #0 to host xx.xx.xx.xx left intact
4. Edit the simple.xml file previously created in step 2 and this time insert original owner of sham1
admin@node1:~ # vi /tmp/bucket-owner.xml

admin@ecsnode1:~ # cat /tmp/bucket-owner.xml
<object_bucket_update_owner>
   <namespace>degreat_nfs</namespace>
   <new_owner>sham1</new_owner>
   <reset_previous_owners>true</reset_previous_owners>
</object_bucket_update_owner>

5. Change the bucket owner back to the original owner
The API syntax required to change the bucket owner back to "sham1" through the xml file is as follows:
admin@ecsnode1:~> curl -v -k -X "POST" "https://xx.xx.xx.xx:4443/object/bucket/sham_bk_nfs/owner" -H "$tok" -H "Content-Type: application/xml" -H "ACCEPT:application/xml" -d @/tmp/bucket-owner.xml -v
* Hostname was NOT found in DNS cache
*   Trying xx.xx.xx.xx...
* Connected to xx.xx.xx.xx (xx.xx.xx.xx) port 4443 (#0)
* successfully set certificate verify locations:
*   CAfile: none
  CApath: /etc/ssl/certs/
* SSLv3, TLS unknown, Certificate Status (22):
* SSLv3, TLS handshake, Client hello (1):
* SSLv3, TLS handshake, Server hello (2):
* SSLv3, TLS handshake, Certificate (11):
* SSLv3, TLS handshake, Server key exchange (12):
* SSLv3, TLS handshake, Server finished (14):
* SSLv3, TLS handshake, Client key exchange (16):
* SSLv3, TLS change cipher, Client hello (1):
* SSLv3, TLS handshake, Finished (20):
* SSLv3, TLS change cipher, Client hello (1):
* SSLv3, TLS handshake, Finished (20):
* SSL connection using TLSv1.2 / ECDHE-RSA-AES256-GCM-SHA384
* Server certificate:
*        subject: CN=localhost
*        start date: 2019-03-25 09:53:41 GMT
*        expire date: 2029-03-22 09:53:41 GMT
*        issuer: CN=localhost
*        SSL certificate verify result: self signed certificate (18), continuing anyway.
> POST /object/bucket/sham_bk_nfs/owner HTTP/1.1
> User-Agent: curl/7.37.0
> Host: xx.xx.xx.xx:4443
> X-SDS-AUTH-TOKEN: BAAcUy9KYlhxTlVYb2M0bnF3bTNscEsvSEdDeWhJPQMAjAQASHVybjpzdG9yYWdlb3M6VmlydHVhbERhdGFDZW50ZXJEYXRhOmJhOGQ3ZTkzLTMyMGYtNDNmNy05Y2FkLWM4YWQzMWFiMzY1MAIADTE1NTk3Mzk3OTA2MDgDAC51cm46VG9rZW46YjQ4NGNiZjEtNTkwNy00YWI3LTgzYTctM2Y3OGRhM2RiY2NiAgAC0A8=
> Content-Type: application/xml
> ACCEPT:application/xml
> Content-Length: 179
>
* upload completely sent off: 179 out of 179 bytes
< HTTP/1.1 200 OK
< Date: Thu, 06 Jun 2019 10:56:08 GMT
< Content-Length: 0
< Connection: keep-alive
<
* Connection #0 to host xx.xx.xx.xx left intact


6.  Confirm the bucket owner change is reflected.
确认存储桶所有者的更改现在为“sham1”。
admin@ecsnode1:~> curl -s -k -X GET -H "$tok" https://XX.XX.XX.XX:4443/object/bucket/sham_bk_nfs/info?namespace=degreat_nfs | xmllint --format - | grep '<owner>'
<owner>sham1</owner>
在 API 上恢复存储区所有者后,确认主机现在可以访问 Linux 文件系统上的存储区。
。7.配置更改完成后,我们应该不会再看到相同的错误
svc_log -f "method updateObjectInternal not allowed" -start "20 hour ago" -sr all -sh -st hour
svc_log v1.0.22 (svc_tools v1.6.8)                 Started 2020-01-23 09:28:17

Running on nodes:              <All nodes>
Time range:                    2020-01-22 13:28:17 - 2020-01-23 09:28:17
Filter string(s):              'method updateObjectInternal not allowed'
Show nodename(s):              True
Search reclaim logs (if any):  False

Count of message occurrences per hour:

2020-01-22 13:xx - 5066
2020-01-22 14:xx - 9580
2020-01-22 15:xx - 9574
2020-01-22 16:xx - 9580
2020-01-22 17:xx - 9570
2020-01-22 18:xx - 9576
2020-01-22 19:xx - 9564
2020-01-22 20:xx - 9576
2020-01-22 21:xx - 9576
2020-01-22 22:xx - 9572
2020-01-22 23:xx - 9564
2020-01-23 00:xx - 9586
2020-01-23 01:xx - 9574
2020-01-23 02:xx - 9572
2020-01-23 03:xx - 4564
2020-01-23 04:xx - 0
2020-01-23 05:xx - 0
2020-01-23 06:xx - 0
2020-01-23 07:xx - 0
2020-01-23 08:xx - 0
2020-01-23 09:xx - 0


Dell EMC is aware of this issue and are working on a fix in a future release.
Informations supplémentaires
相关 NFS 知识库文章:
- 如何创建基本 NFS 导出并在客户端上装载它
- ECS:dataheadsvc 日志流式传输错误:请求 ReadLinkRequest 中不支持 NFSv3 过程 LINK
- NFS 装载失败并出现 No such file or directory(没有此类文件或目录)或 ERROR_OBJECT_NOT_FOUND(错误:未找到对象), ECS, NFS mount failing with No such file or directory or ERROR_OBJECT_NOT_FOUND
- NFS 远程 I/O 错误;更改已启用 FS 的存储桶的存储桶所有者可能会导致应用程序/用户无法访问 NFS 文件
- NFS 写入会在一定数量的数据后引发 I/O 错误。
- 将来自 ECS 的 NFS 文件共享与 VMware NFS 数据存储区配合使用
- 装载 ECS NFS 导出的最佳实践
- ECS,如何在 Windows 客户端上装载 NFS 共享
- 在 UI 中更改文件导出设置后,NFS 无法装载
- Oracle WebCenter Content (WCC) 是否与 ECS 兼容?
订阅产品更新。
您可以按照以下知识库文章中的说明订阅更新:
DELL EMC:如何订阅产品页面 - 戴尔支持?
Produits concernés
Elastic Cloud StorageProduits
ECS Appliance, ECS Appliance Software with Encryption, ECS Appliance Software without Encryption, Elastic Cloud StoragePropriétés de l’article
Numéro d’article: 000055535
Type d’article: Solution
Dernière modification: 29 Jul 2026
Version: 5
Trouvez des réponses à vos questions auprès d’autres utilisateurs Dell
Services de support
Vérifiez si votre appareil est couvert par les services de support.