如何在 Dell Security Management Server Virtual 中配置代理设置
摘要: 参阅以下说明,了解如何在 Dell Security Management Server Virtual(以前称为 Dell Data Protection Virtual Edition)中配置代理设置。
本文章適用於
本文章不適用於
本文無關於任何特定產品。
本文未識別所有產品版本。
說明
本文介绍如何在 Dell Security Management Server Virtual(以前称为 Dell Data Protection | Virtual Edition)中配置代理设置。
受影响的产品:
- Dell Security Management Server Virtual
- Dell Data Protection Virtual Edition
可能需要配置 Dell Security Management Server Virtual 代理设置才能:
- 下载虚拟设备更新。
- 验证开箱即用的产品许可证。
- 与 Advanced Threat Prevention (ATP) 租户通信。
提醒:
- 批量产品许可证不需要外部验证。
- ATP 租户仅与 Dell Endpoint Security Suite Enterprise 一起使用。
- 代理设置可能需要配置多个功能。
单击虚拟设备更新或产品许可证和高级威胁防护 (ATP) 租户,了解有关设置代理的更多信息。
虚拟设备更新
Dell Security Management Server Virtual 的代理设置在 v9.11.0 和更高版本、 v9.7.0 到 9.10.1、 v9.5.0 到 9.6.0、 v9.0.0 到 9.4.1 以及 v8.2.0 到 8.5.0 之间变化。单击相应的版本,了解特定的步骤。有关版本信息,请参阅 如何确定 Dell Data Security 服务器版本。
v9.11.0 及更高版本
提醒:在 Dell Security Management Server Virtual v9.11 及更高版本中,为虚拟设备更新、产品许可证和 ATP 租户更新代理的步骤是相同的。
- 登录到 Dell Security Management Server Virtual 管理控制台。
 提醒:
提醒:- Dell Security Management Server Virtual 的默认凭据为:
- Username:
delluser - 密码:
delluser
- Username:
- 管理员可以更改产品的虚拟设备菜单中的默认密码。
- Dell Security Management Server Virtual 的默认凭据为:
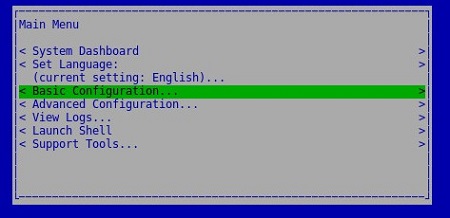
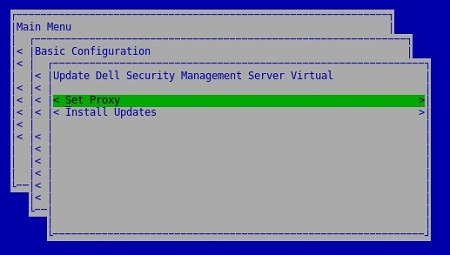
- 从 主菜单中,选择 Basic Configuration ,然后按 Enter 键。
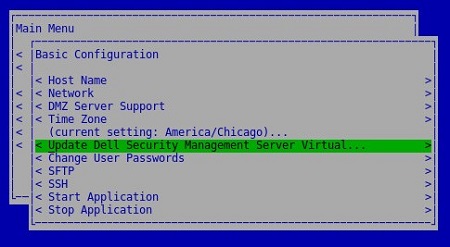
- 选择 Update Dell Security Management Server Virtual,然后按 Enter 键。
- 选择 Set Proxy,然后按 Enter 键。

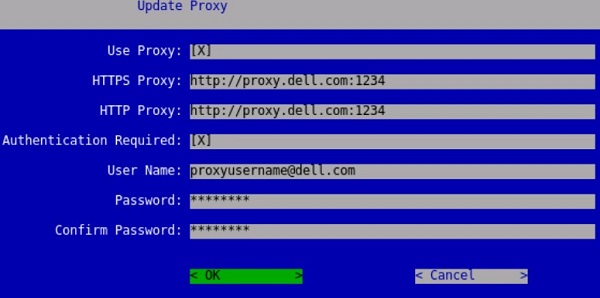
- 在 “Update Proxy ”菜单中:
- 在 Use Proxy 右侧按空格键以启用此功能。
- 填充 HTTPS 代理和 HTTP 代理。
- 如果需要代理身份验证,请按 Authentication Required 右侧的空格键以启用此安全功能,然后转至步骤 5D。如果不需要代理身份验证,请转至步骤 5E。
- 填充用户名、密码并确认密码。
- 选择 OK,然后按 Enter 键。
 提醒:有关升级过程的更多信息,请参阅 如何升级 Dell Security Management Server Virtual。
v9.7.0 至 9.10.1
- 登录到 Dell Security Management Server Virtual 管理控制台。
 提醒:
提醒:- Dell Security Management Server Virtual 的默认凭据为:
- Username:
ddpuser - 密码:
ddpuser
- Username:
- 管理员可以更改产品的虚拟设备菜单中的默认密码。
- Dell Security Management Server Virtual 的默认凭据为:
- 从 主菜单中,选择 Basic Configuration ,然后按 Enter 键。

- 选择 Update Dell Security Management Server Virtual,然后按 Enter 键。

- 选择 Set Proxy Settings,然后按 Enter 键。

- 在 “Proxy Settings ”菜单中:
- 在 Use Proxy 右侧按空格键以启用此功能。
- 填充 HTTPS 代理、HTTP 代理和 FTP 代理。
- 如果需要代理身份验证,请按 Authentication Required 右侧的空格键以启用此安全功能,然后转至步骤 5D。如果不需要代理身份验证,请转至步骤 5E。
- 填充用户名、密码并确认密码。
- 选择 OK,然后按 Enter 键。
 提醒:有关升级过程的更多信息,请参阅 如何升级 Dell Security Management Server Virtual。
v9.5.0 至 9.6.0
- 登录到 Dell Enterprise Server Virtual 管理控制台。
 提醒:
提醒:- Dell Data Protection Enterprise Server Virtual Edition 的默认凭据为:
- Username:
ddpuser - 密码:
ddpuser
- Username:
- 管理员可以更改产品的虚拟设备菜单中的默认密码。
- Dell Data Protection Enterprise Server Virtual Edition 的默认凭据为:
- 从 主菜单中,选择 Basic Configuration ,然后按 Enter 键。

- 选择 Update DDP Enterprise Server - VE,然后按 Enter 键。

- 选择 Set Proxy Settings,然后按 Enter 键。

- 在 “Proxy Settings ”菜单中:
- 在 Use Proxy 右侧按空格键以启用此功能。
- 填充 HTTPS 代理、HTTP 代理和 FTP 代理。
- 如果需要代理身份验证,请按 Authentication Required 右侧的空格键以启用此安全功能,然后转至步骤 5D。如果不需要代理身份验证,请转至步骤 5E。
- 填充用户名、密码并确认密码。
- 选择 OK,然后按 Enter 键。
 提醒:有关升级过程的更多信息,请参阅 如何升级 Dell Security Management Server Virtual。
v9.0.0 至 9.4.1
- 登录到 Dell Enterprise Server Virtual 管理控制台。
 提醒:
提醒:- Dell Data Protection Enterprise Server Virtual Edition 的默认凭据为:
- Username:
ddpuser - 密码:
ddpuser
- Username:
- 管理员可以更改产品的虚拟设备菜单中的默认密码。
- Dell Data Protection Enterprise Server Virtual Edition 的默认凭据为:
- 从 主菜单中,选择 Basic Configuration ,然后按 Enter 键。
- 选择 Update DDP Enterprise Server - VE,然后按 Enter 键。

- 选择 Set Proxy Settings,然后按 Enter 键。

- 在 “Proxy Settings ”菜单中:
- 在 Use Proxy 右侧按空格键以启用此功能。
- 填充 HTTPS 代理、HTTP 代理和 FTP 代理。
- 如果需要代理身份验证,请按 Authentication Required 右侧的空格键以启用此安全功能,然后转至步骤 5D。如果不需要代理身份验证,请转至步骤 5E。
- 填充用户名、密码并确认密码。
- 选择 OK,然后按 Enter 键。
 提醒:有关升级过程的更多信息,请参阅 如何升级 Dell Security Management Server Virtual。
v8.2.0 至 8.5.0
提醒:如果您对执行这些步骤感到不安,请联系支持部门。有关详细信息,请参阅 Dell Data Security 国际支持电话号码。
- 登录到 Dell Enterprise Server Virtual 管理控制台。
 提醒:
提醒:- Dell Data Protection Enterprise Server Virtual Edition 的默认凭据为:
- Username:
ddpuser - 密码:
ddpuser
- Username:
- 管理员可以更改产品的虚拟设备菜单中的默认密码。
- Dell Data Protection Enterprise Server Virtual Edition 的默认凭据为:
- 从 主菜单中,选择 Launch Shell ,然后按 Enter 键。

- 键入
su ddpsupport分析文件,然后按 Enter 键。
- 键入以下项的密码 :
ddpsupport分析文件,然后按 Enter 键。 提醒:
提醒:- Dell Data Protection Enterprise Server Virtual Edition 的默认凭据为:
- Username:
ddpsupport - 密码:
ddpsupport
- Username:
- 管理员可以更改产品的虚拟设备菜单中的默认密码。
- Dell Data Protection Enterprise Server Virtual Edition 的默认凭据为:
- 键入
sudo nano /etc/environment分析文件,然后按 Enter 键。
- 按向下箭头转到新的空白行。

- 键入以下文本,填充代理服务器和端口,其中
proxy.company.com和1234所示为:http_proxy=https://proxy.company.com:1234/ https_proxy=https://proxy.company.com:1234/ ftp_proxy=https://proxy.company.com:1234/ no_proxy="localhost,127.0.0.1" HTTP_PROXY=https://proxy.company.com:1234/ HTTPS_PROXY=https://proxy.company.com:1234/ FTP_PROXY=https://proxy.company.com:1234/ NO_PROXY="localhost,127.0.0.1"
提醒:Proxy.company.com和端口1234仅作为示例。您环境中的代理服务器 FQDN 和端口配置将会不同。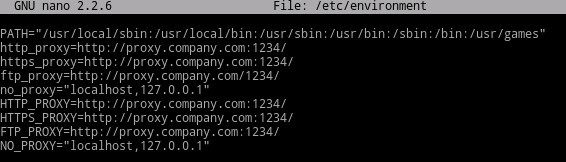
- 按 CTRL+X 以退出。系统提示保存时,按 Y键以继续。

- 按 Enter 键以保存而不更改文件名。

- 键入
exit然后按 Enter 键注销ddpsupport。
- 键入
exit,然后按 Enter 键从 shell 注销到 UI。
- 从主菜单中选择 Basic Configuration,然后按 Enter 键。

- 选择 Reboot Appliance 并按 Enter 键。

- 选择 Yes,然后按 Enter 键。
 提醒:有关升级过程的更多信息,请参阅 如何升级 Dell Security Management Server Virtual。
产品许可证和高级威胁防护 (ATP) 租户
Dell Security Management Server Virtual 的代理设置在 v9.11.0 和更高版本、 v9.7.0 到 9.10.1 以及 v8.2.0 到 9.6.0 之间有所不同。单击相应的版本,了解特定的步骤。有关版本信息,请参阅 如何确定 Dell Data Security 服务器版本。
v9.11.0 及更高版本
提醒:在 Dell Security Management Server Virtual v9.11 及更高版本中,为虚拟设备更新、产品许可证和 ATP 租户更新代理的步骤是相同的。
- 登录到 Dell Security Management Server Virtual 管理控制台。
 提醒:
提醒:- Dell Security Management Server Virtual 的默认凭据为:
- Username:
delluser - 密码:
delluser
- Username:
- 管理员可以更改产品的虚拟设备菜单中的默认密码。
- Dell Security Management Server Virtual 的默认凭据为:
- 从 主菜单中,选择 Basic Configuration ,然后按 Enter 键。

- 选择 Update Dell Security Management Server Virtual,然后按 Enter 键。

- 选择 Set Proxy,然后按 Enter 键。
- 在 “Update Proxy ”菜单中:
- 在 Use Proxy 右侧按空格键以启用此功能。
- 填充 HTTPS 代理和 HTTP 代理。
- 如果需要代理身份验证,请按 Authentication Required 右侧的空格键以启用此安全功能,然后转至步骤 5D。如果不需要代理身份验证,请转至步骤 5E。
- 填充用户名、密码并确认密码。
- 选择 OK,然后按 Enter 键。
 提醒:有关升级过程的更多信息,请参阅 如何升级 Dell Security Management Server Virtual。
v9.7.0 至 9.10.1
提醒:如果您对执行这些步骤感到不安,请联系支持部门。有关详细信息,请参阅 Dell Data Security 国际支持电话号码。
- 登录到 Dell Security Management Server Virtual 管理控制台。
 提醒:
提醒:- Dell Security Management Server Virtual 的默认凭据为:
- Username:
ddpuser - 密码:
ddpuser
- Username:
- 管理员可以更改产品的虚拟设备菜单中的默认密码。
- Dell Security Management Server Virtual 的默认凭据为:
- 从 主菜单中,选择 Launch Shell ,然后按 Enter 键。

- 键入
su ddpsupport分析文件,然后按 Enter 键。
- 键入以下项的密码 :
ddpsupport分析文件,然后按 Enter 键。 提醒:
提醒:- Dell Data Protection Enterprise Server Virtual Edition 的默认凭据为:
- Username:
ddpsupport - 密码:
ddpsupport
- Username:
- 管理员可以更改产品的虚拟设备菜单中的默认密码。
- Dell Data Protection Enterprise Server Virtual Edition 的默认凭据为:
- 键入
sudo nano /opt/dell/server/security-server/conf/application.properties分析文件,然后按 Enter 键。
- 向下滚动到
proxy server settings使用箭头键。
- At
proxy.server.enabled=false删除false和类型true。
- At
proxy.server.host=,请键入代理服务器的完全限定域名 (FQDN)。 提醒:您环境中的 FQDN 可能不同于图像中的示例 proxy.company.com。
 - At
proxy.server.port.ssl=,键入代理服务器的 SSL 端口。 提醒:您环境中的端口可能不同于图像中的示例端口 443。
 - At
proxy.server.port.http=,键入代理服务器的 HTTP 端口。 提醒:您环境中的端口可能不同于图像中的示例端口 80。
 - 如果代理服务器需要身份验证,请转至步骤 11a。如果代理服务器不需要身份验证,请转至步骤 12。
- At
proxy.server.username=,键入代理服务器的用户名。 提醒:图中的示例是
proxyusername@company.com,可能与您环境中的用户名不同。 - At
proxy.server.password=取代ENC跟CLR。
- At
proxy.server.password=,替换CLR()密码为proxyusername@company.com。 提醒:图中的示例是
proxypassword,可能与您环境中的密码不同。
- At
- 按 CTRL+X 以退出。在提示保存时,键入
Y以继续。
- 按 Enter 键以保存而不更改文件名。

- 键入
exit然后按 Enter 键注销ddpsupport。
- 键入
exit,然后按 Enter 键从 shell 注销到 主菜单。
- 从 主菜单中,选择 Basic Configuration ,然后按 Enter 键。

- 选择 Stop Application,然后按 Enter 键。

- 选择 Yes,然后按 Enter 键。

- 停止所有服务后,按 ESC 键返回 到 Basic Configuration 菜单。
- 选择 Start Application,然后按 Enter 键。

- 选择 Yes,然后按 Enter 键。

- 启动所有服务后,按 ESC 键返回 到 Basic Configuration 菜单。

v8.2.0 至 9.6.0
提醒:如果您对执行这些步骤感到不安,请联系支持部门。有关详细信息,请参阅 Dell Data Security 国际支持电话号码。
- 登录到 Dell Enterprise Server Virtual 管理控制台。
 提醒:
提醒:- Dell Data Protection Enterprise Server Virtual Edition 的默认凭据为:
- Username:
ddpuser - 密码:
ddpuser
- Username:
- 管理员可以更改产品的虚拟设备菜单中的默认密码。
- Dell Data Protection Enterprise Server Virtual Edition 的默认凭据为:
- 从 主菜单中,选择 Launch Shell ,然后按 Enter 键。

- 键入
su ddpsupport分析文件,然后按 Enter 键。
- 键入以下项的密码
ddpsupport分析文件,然后按 Enter 键。 提醒:
提醒:- Dell Data Protection Enterprise Server Virtual Edition 的默认凭据为:
- Username:
ddpsupport - 密码:
ddpsupport
- Username:
- 管理员可以更改产品的虚拟设备菜单中的默认密码。
- Dell Data Protection Enterprise Server Virtual Edition 的默认凭据为:
- 键入
sudo nano /opt/dell/server/security-server/conf/application.properties分析文件,然后按 Enter 键。
- 向下滚动到
Proxy server settings使用箭头键。
- At
proxy.server.enabled=false删除false和类型true。
- At
proxy.server.host=,请键入代理服务器的完全限定域名 (FQDN)。 提醒:您环境中的 FQDN 可能不同于图像中的示例 proxy.company.com。
 - At
proxy.server.port.ssl=,键入代理服务器的 SSL 端口。 提醒:您环境中的端口可能不同于图像中的示例端口 443。
 - At
proxy.server.port.http=,键入代理服务器的 HTTP 端口。 提醒:您环境中的端口可能不同于图像中的示例端口 80。
 - 如果代理服务器需要身份验证,请转至步骤 11a。如果代理服务器不需要身份验证,请转至步骤 12。
- At
proxy.server.username=,键入代理服务器的用户名。 提醒:图中的示例是
proxyusername@company.com,可能与您环境中的用户名不同。 - At
proxy.server.password=取代ENC跟CLR。
- At
proxy.server.password=,替换CLR()密码为proxyusername@company.com。 提醒:图中的示例是
proxypassword,可能与您环境中的密码不同。
- At
- 按 CTRL+X 以退出。在提示保存时,按
Y以继续。
- 按 Enter 键以保存而不更改文件名。

- 键入
exit然后按 Enter 键注销ddpsupport。
- 键入
exit,然后按 Enter 键从 shell 注销到 主菜单。
- 从 主菜单中,选择 Basic Configuration ,然后按 Enter 键。

- 选择 Stop Application,然后按 Enter 键。

- 选择 Yes,然后按 Enter 键。

- 停止所有服务后,按 ESC 键返回 到 Basic Configuration 菜单。

- 选择 Start Application,然后按 Enter 键。

- 选择 Yes,然后按 Enter 键。

- 启动所有服务后,按 ESC 键返回 到 Basic Configuration 菜单。

要联系支持部门,请参阅 Dell Data Security 国际支持电话号码。
转至 TechDirect,在线生成技术支持请求。
要获得更多见解和资源,请加入戴尔安全社区论坛。
其他資訊
影片
受影響的產品
Dell Encryption文章屬性
文章編號: 000131892
文章類型: How To
上次修改時間: 10 7月 2025
版本: 15
向其他 Dell 使用者尋求您問題的答案
支援服務
檢查您的裝置是否在支援服務的涵蓋範圍內。