How to Upgrade the Firmware on a Dell™ PowerConnect™ 3024, 3048, or 5012 Switch Using Solarwinds™ TFTP Server 5.0
Summary: This article provides information about upgrading the firmware on a PowerConnect 3024, 3048, OR 5012 using Solarwinds™ TFTP Server 5.0.
This article applies to
This article does not apply to
This article is not tied to any specific product.
Not all product versions are identified in this article.
Symptoms
Perform the following steps:
Ensure the following criteria are set and correct prior to starting the process:
-
- Single switch (not in a stacked configuration) configured with a static IP address and netmask
- System running a TFTP Server application connected directly to the switch via console (null modem cable) and Ethernet (Category 5 or higher).
- TFTP Server system configured with a static IP address and netmask.
NOTE: A firmware update across a fiber uplink is not possible. The switch does not initialize the fiber ports fast enough to allow the switch to boot from the TFTP Server on the other side of the fiber.
- Download the TFTP server software from https://support.solarwinds.net/updates/New-customerFree.cfm and install the program.
- Run the TFTP server application.
The first time it is run, it will create a folder on the root of the C: drive called TFTP-ROOT. By default, this will be the root directory of the TFPT server.
NOTE: If you wish to change the default root directory, you can do so from the TFTP Root Directory tab of the Configuration options. Click File on the menu bar then select Configure on the pull down to access the Configuration options. (Figure 1)

Figure 1 - Configure TFTP Server. - On the Security tab of the Configuration options, select Transmit and Receive files. (Figure 2)

Figure 2 - TFTP Server Transmit and Receive Files Configuration Option.
-
Click OK to save the settings, but leave the main TFTP Server window open.
NOTE: If the application window is closed, the TFTP service will be stopped. -
Download the firmware from the Dell Support site located at www.premiersupport.dell.com.
The filename for the 6.0.4 firmware is 604firm.zip. -
Unzip the file and place the firmware binary file (RDUx_604.fir) in the root directory of the TFTP Server (C:\TFTP-ROOT by default).
-
Connect to the management interface of the switch using a terminal emulation program (HyperTerminal Private Edition, Tera Term, etc.)
-
Browse to the System Manager/Firmware Upgrade menu.
-
Highlight the option for Next Boot From: and press the <Spacebar> to change the setting to Net (the default is Last Saved).
-
For the TFTP Server IP address option, input the IP address of the system running the TFTP Server application (this will also be shown in the bottom right-hand corner of the main TFTP Server application window).
-
For the TFTP Path/Filename option, input only the filename. If the file is in another folder, input the path from the TFTP root directory. (Figure 3)
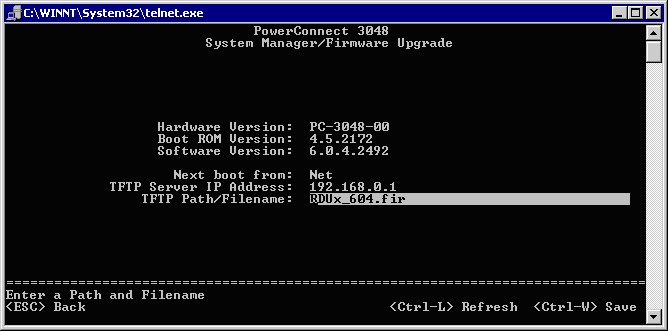
Figure 3 - TFTP Path/Filename.
-
Press the <Ctrl> + <W> keys to save the changes.
-
Press the < Esc> key to navigate back to the System Manager menu and then select the Reset option.
The switch will attempt to boot from the TFTP Server. Once the TFTP Server establishes a connection, it will output status information and errors to the main application window as seen in Figure 4.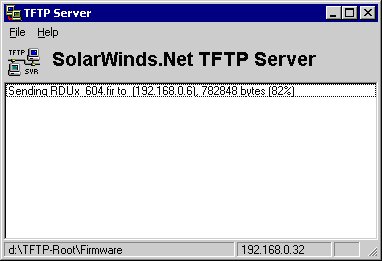
Figure 4 - TFTP Main Application Window.
-
Once the switch has booted, verify that the Firmware Upgrade menu now displays the new firmware version and verify that the firmware file is not corrupt by navigating through a couple of menus.
If there appears to be any problem, try downloading another copy of the firmware file and re-flash with the new file.
If there appears to be no problem with the firmware flash, navigate back to the System Manager/Firmware Upgrade menu and change the Next Boot From: option to Net & Save. -
Save the settings again by pressing the <Ctrl> + <W> keys .
-
Press the < Esc> key to navigate back to the System Manager menu and then select the Reset option.
The switch will now boot to the new firmware from the TFTP Server and automatically save the new firmware to the flash memory. The Next Boot From: option will be changed back to Last Saved. -
Once the switch has booted, verify that the Firmware Upgrade menu now displays the new firmware version.
Cause
Dell Technologies
Resolution
Copyright 2021
Affected Products
PowerConnect 5012, PowerConnect 3024, PowerConnect 3048Article Properties
Article Number: 000139967
Article Type: Solution
Last Modified: 05 Jun 2025
Version: 7
Find answers to your questions from other Dell users
Support Services
Check if your device is covered by Support Services.