Article Number: 000201067
Dell Display and Peripheral Manager for macOS
Summary: Dell Display and Peripheral Manager (DDPM) is software that enhances productivity and customization for Dell monitors and webcams on macOS.
Article Content
Instructions
Dell Display and Peripheral Manager for macOS
NOTE: Dell Display and Peripheral Manager (DDPM) replaces Dell Display Manager for macOS. Download DDPM for macOS to continue using your devices seamlessly.
How to download and install Dell Display and Peripheral Manager?
- Browse to: Dell Drivers & Downloads
- Identify your Dell monitor or accessory.
- Enter the Service Tag or Model Number and click Search.
- Or click Browse all products to manually select the Model from the catalog.
NOTE: To download DDPM without identifying your product, go to Dell Display and Peripheral Manager. Then select Drivers & Downloads. - Select Apple Mac OS as the Operating System.
NOTE: The Dell support website detects the Operating System used by your computer to set the Operating System field. If you are using Mac device, the Dell Display and Peripheral Manager download link is displayed for Mac OS. Alternatively, the Operating System can be selected from the Operating System dropdown.
- Click the Download button next to Dell Display and Peripheral Manager.
- Using the Finder, browse to the Downloads folder.
- Double-click the downloaded .zip file to extract the package.
- Go to the extracted folder, install DDPM by running the DDPM_Installer.pkg.
- Follow the installation flow to complete the installation.
- After installation, launch DDPM from Launchpad.
NOTE: DDPM requires Accessibility and Automation permission for the Easy Arrange and Easy Memory to open the documents, resize and arrange them to the selected layout. When prompted by OS, click OK to allow access.
If you have a webcam connected, allow DDPM to access the camera when prompted. Update webcam firmware requires Automation to access the downloaded firmware package and Input Monitoring for the updating tool to update the firmware.
You can also enable these permissions from Privacy and Security under System Settings.
What are the Key Features Available for Monitors?
- Optimal Front of Screen Experience: The Menu Launcher dialog box provides quick access to commonly used features, such as:
- Resolution
- Brightness and Contrast
- Color
- Easy Arrange
- KVM and webcam (if applicable)
To access these controls, click the Dell Display and Peripheral Managers icon on the status bar. When multiple Dell monitors are connected to the Mac, you can select any monitor from the drop-down menu (Figure 1).
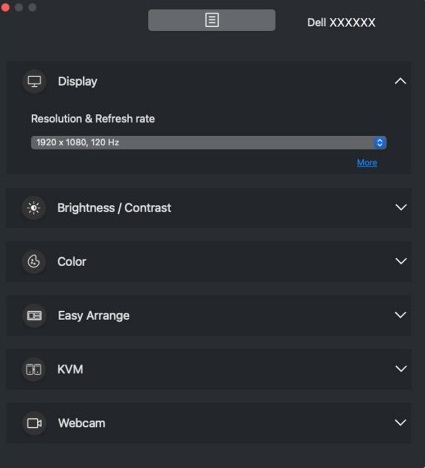
Figure 1: Dell Display and Peripheral Manager Menu - Display: The Display menu provides a single window to customize display related settings of the monitor such as resolution, refresh rate, orientation, and Smart HDR (Figure 2).

Figure 2: Dell Display and Peripheral Manager Display Menu - Brightness and Contrast: This menu enables you to adjust the brightness or contrast settings of their monitor manually and automatically based on their scheduled time (Figure 3 - 5).

Figure 3: Manual Mode for Brightness or Contrast

Figure 4: Schedule Mode for Brightness or Contrast

Figure 5: Scheduling Time for Brightness or Contrast Settings in Schedule Mode
Monitors that have Ambient Light Sensor can use Auto mode to automatically adjust brightness and color temperature based on surrounding light conditions. You can choose to define the brightness range based on your preference (Figure 6).

Figure 6: Auto Mode for Brightness or Contrast - Input Source: This allows you to manage multiple video inputs on your Dell monitor. This makes it easy to switch between inputs while you work with multiple computers. You can arrange the inputs as Picture in Picture (PIP) or Picture By Picture (PBP) mode (Figure 7 and 8).
NOTE: See your monitor User Guide for available inputs and Keyboard, Video, Mouse (KVM) feature availability.
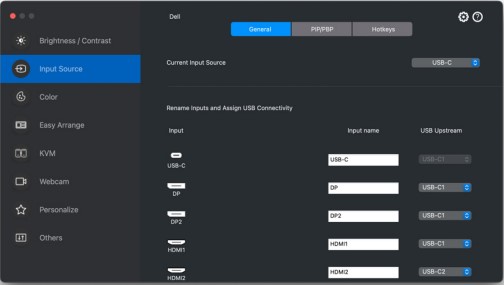
Figure 7: General Controls for Input Sources

Figure 8: Input Source PIP and PBP Controls - Color: The Color menu allows you to associate any Preset Mode with an application. When Auto Mode is enabled, the DDPM application automatically switches to the corresponding Preset Mode. This happens whenever the associated application is activated (Figure 9).

Figure 9: Dell Display and Peripheral Manager Color Menu - Easy Arrange: With Easy Arrange, you can organize multiple applications on your screen and snap them into a template of your choice, making multitasking easy and effortless. You can choose from predefined or custom layouts to configure your screen layout (Figure 10).
Easy Arrange can also be used to personalize dual monitors side by side or expand desktop space by spanning across two monitors.

Figure 10: Easy Arrange Menu - Easy Arrange Memory: This feature allows you to assign applications or even files to the partitions of Easy Arrange, save the layout to create a profile, and then restore the profile (Figure 11).
NOTE: For each app added to the Easy Memory for the first time, you must explicitly provide automation permission to DDPM. You must click OK when the computer displays the permission dialog.
Clicking Don't Allow causes DDPM to be prohibited from launching the app on its own. You are not able to save the profile.

Figure 11: Easy Arrange Profile ConfigurationNOTE: Easy Arrange Memory usability may vary according to application type and launch behavior. Easy Memory works with general productivity apps such as Microsoft Office, Adobe, web browsers and more.
Easy Memory might not be able to perform a window partition at launch if any of the following takes place:- The app displays a dialog box that appears upon launch (that is, login screen, error dialog, or unsaved files)
- The app is launched in full screen mode
- Files are opened as individual tabs within the app
- Overlapping Easy Arrange layouts
- Application Windows Snap: This feature helps you with placing a program quickly to any screen. When enabled in Dell Display and Peripheral Manager, dragging the application window triggers a floating menu that contains recently used Easy Arrange layouts. You can drop the application to any of the listed layouts to perform window placement (Figure 12).

Figure 12: Application Windows Snap - KVM: Dell Display and Peripheral Manager for macOS offers two ways to setup KVM - USB KVM & Network KVM. The KVM feature is available when connected monitors support KVM functionality. (Figure 13).

Figure 13: USB KVM Settings
- Network KVM
This feature allows sharing of a keyboard and mouse and transfer of files between client devices in a cluster. Sharing of files is also supported across the OS that is from a Windows device to a macOS device and vice versa (Figure 14).

Figure 14: Network KVM Settings
Cluster consists of client device and monitor. A maximum of four client devices can be added to a cluster. You can setup the cluster in three different ways (Figure 15 - 17):

(Figure 15: Multiple Display)
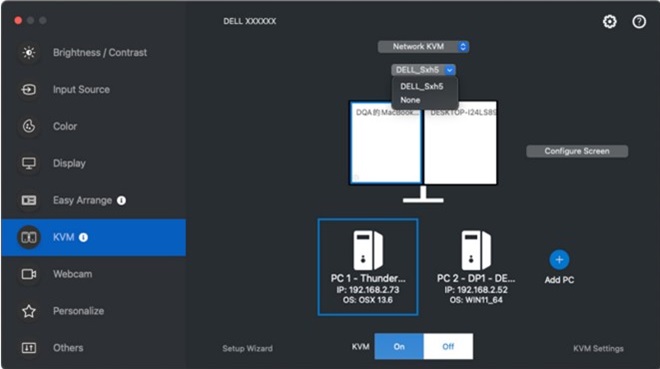
(Figure 16: Single Display (PBP On))
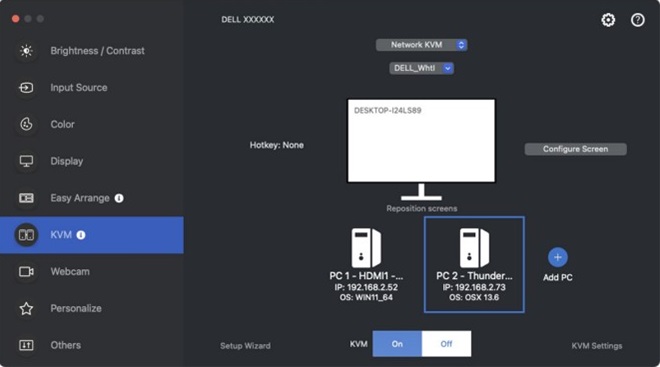
(Figure 17: Single Display (PBP Off))
Note:- Availability of Network KVM features depends on the network policy set out by the company/IT. This feature requires opening of network access control list (ACL) for network incoming/outgoing traffic control.
- Network KVM is modular (optional to install). It does not install by default, and users can choose not to install it while downloading the software and use other features of Dell Display Manager. If users want to install Network KVM later, it requires fresh installation of version 2.3 and above.
- You may experience delayed response from remote computers on Network KVM due to network latency limitations.
- Certain key combinations, function keys, specialized keys, and touch bar keys are not supported for controlling remote computers. While clipboard sharing in a cluster, Cut and Paste is not supported on remote computers.
- The established Cluster may not resume connection after Network KVM is turned back on from the off state, after the main computer is wake from suspension, or after connecting to a supported monitor. In this case, you may manually switch the cluster from the drop-down list, or you may manually connect the offline computer from the Network KVM main page.
- Dell Display Manager enables secure content and file sharing between computers with end-to-end encryption. However, it does not function as anti-malware software, providing no scanning or protection against malicious files during transfers. It is recommended to install anti-malware or other security tools before using File and Content Transfer in Network KVM. If you prefer not to share files between computers, you can navigate to KVM Settings and use Manage Cluster to turn off this feature.
- If your cluster has a mix of Windows and Mac devices, connect keyboard and mouse to Mac if possible as remote mac device cannot be accessed.
- It is not recommended to turn on both-Apple Universal Control and Network KVM as it might cause confusion.
- For details on how to setup refer Setting up the Network KVM section of the user guide available at: Dell Display and Peripheral Manager | Manuals and Documents
- Network KVM
- USB- C Prioritization: Users can select option for High Data speed priority or High Resolution through USB-C prioritization option available under Advanced settings of the Display menu (Figure 18.

Figure 18: Dell Display and Peripheral Manager for macOS USB C Prioritization - Power Conservation: On supported Dell models, PowerNap energy conservation options are available in the Others menu. You can choose to set the brightness of the monitor to the minimum level, or to put the monitor to sleep when the screen saver is activated (Figure 19).

Figure 19: Power Conservation through PowerNap settings - Color Management: This feature allows you to sync the color space of the monitor with the associated International Color Consortium (ICC) profile (Figure 20).

Figure 20: Color Management
What are the Key Webcam Features Available for the Dell Webcams and Cameras of Video Conferencing Monitors?
- Webcam Control Features
- AI Auto Framing
AI auto-framing keeps you at the center of the picture by tracking your movement and adjusting accordingly. - Field of View (FOV) adjustment
This feature allows you to customize how much you want to show yourself and your surroundings.- 65° FOV: Best for face-to-face conversations
- 78° FOV: Provides a glimpse of your environment while maintaining eye contact
- 90° FOV: Wide-angle, ideal for showing objects or whiteboard content
- Other features available are Preset, Autofocus, Exposure, and Priority (Figure 21).

Figure 21: Dell Display and Peripheral Manager Webcam Control Menu
- AI Auto Framing
- Color and Image: This option allows you to achieve optimal image quality at various lighting conditions using High Dynamic Range (HDR). Other settings like Auto White Balance, Brightness, Sharpness, Contrast, Saturation, and Anti Flicker for the Dell webcam makes it easier to get an image of your choice (Figure 22).
NOTE: AI Auto Framing and HDR are available on the WB7022 webcam when it is connected to the Mac using a USB 3.0 cable.

Figure 22: Dell Display and Peripheral Manager webcam Color and Image Menu - Camera Microphone: You can switch the integrated microphone on or off for clear communication optimized for your personal workspace.
NOTE: A microphone is available on the WB5023 webcams.
- Firmware Updates: Firmware can be upgraded in the Settings dialog. You can click Update to download and update Dell webcam firmware immediately (Figure 23).

Figure 23: Dell Display and Peripheral Manager webcam Firmware Menu - Remote Management and Control (for IT Managers Only): Dell Display and Peripheral Manager use CLI commands for the following:
- Asset management Querying monitor inventory logs
- Display info and Monitor control: Query the current monitor settings and to set basic monitor settings such as brightness, color preset, volume, resolution and much more.
- Export and import settings: Export Settings command writes all DDPM settings for all active monitors to the designated file. Import Settings command reads all the settings recorded in the designated filename and assigns them to other monitors of the same model.
NOTE: CLI commands are restricted for IT managers only. Contact a Dell sales representative for more information.
Which Dell Monitors are Supported on Dell Display and Peripheral Manager for Mac?
| Dell C Series Monitors | Dell UltraSharp (U) Series Monitors | Dell UltraSharp PremierColor (UP) Series Monitors | Dell P Series Monitors |
|---|---|---|---|
| C2722DE | U3219Q | UP2720Q | P2424HEB |
| C2422HE | U3419W | UP2720QA | P2724DEB |
| C3422WE | U4919DW | UP3221Q | P3424WEB |
| C2423H | U2520D | P5524Q | |
| C2723H | U2520DR | P5524QT | |
| C8621QT | U2720Q | P6524QT | |
| C5519Q | U2720QM | P7524QT | |
| C5519QA | U4320Q | P8624QT | |
| C5522QT | U2421E | P2425E | |
| C6522QT | U2421HE | P2425HE | |
| C7520QT | U2721DE | P2725HE | |
| U3421WE | |||
| U3821DW | |||
| U4021QW | |||
| U2422H | |||
| U2422HE | |||
| U2422HX | |||
| U2722D | |||
| U2722DE | |||
| U2722DX | |||
| U2723QE | |||
| U2723QX | |||
| U3023E | |||
| U3223QE | |||
| U3223QZ (Webcam Features Also Available for this Model) |
|||
| U3423WE | |||
| U4323QE | |||
| U3224KB (Webcam Features Also Available for this Model) |
|||
| U3224KBA (Webcam Features Also Available for this Model) |
|||
| U4924DW | |||
| U2424H | |||
| U2424HE | |||
| U2724D | |||
| U2724DE | |||
| U3824DW | |||
| U3425WE | |||
| U4025QW |
Note: Note that webcam features on Dell Display and Peripheral Manager for Mac are only available for select monitor models as indicated in Table 1.
Which Dell Peripherals are Supported on Dell Display and Peripheral Manager for Mac?
| Dell Webcams |
|---|
| WB7022 |
| WB3023 |
| WB5023 |
Frequently Asked Questions
- Is Dell Display and Peripheral Manager for macOS supported on a VDI Desktop?
Dell Display and Peripheral Manager for macOS does not support VDI Desktop or other virtualized environment. - Does the Dell Display and Peripheral Manager Software Work on All Apple Products?
The Dell Display and Peripheral Manager supports the following devices launched after 2018- MacBook Pro MacBook Air, Mac Mini, Mac Pro. It does not support the iMac. macOS versions 12,13 and 14 are supported. - Must I Update my Dell Display Firmware to Support Dell Display and Peripheral Manager for Mac?
Yes, your Dell monitor must be updated to the latest firmware version to work with Dell Display and Peripheral Manager for Mac.
To update display firmware:- Go to the Dell Drivers & Downloads page.
- Enter your Monitor Model Number or Service Tag.
- Select Apple Mac OS and download the firmware package.
- Connect your Type-C or Thunderbolt cable to your monitor, Run the Firmware Package, and follow the on-screen instructions to complete the firmware update for your monitor.
NOTE: The firmware update may take several minutes to complete. Disable sleep mode on your Mac when updating your monitor firmware.- Some hardware-dependent features are only available on monitors or webcams that support those features. See your monitor or webcams User Guide for information about which features are available.
- Screenshots in this document are for illustrative purposes only. The User Interface (UI) might appear different if some features are not available in your monitor or accessory.
- For details on each feature mentioned here, see User Guide for Dell Display and Peripheral Manager for macOS at Dell Product Documentation for your Dell monitor.
Additional Information
Recommended Articles
Here are some recommended articles related to this topic that might be of interest to you.
Article Properties
Affected Product
Dell C2423H, Dell C2723H Monitor, Dell C5519QA, Dell 24 Video Conferencing Monitor I C2422HE, Dell 27 Video Conferencing Monitor I C2722DE, Dell 34 Video Conferencing Curved Monitor I C3422WE, Dell C5519Q, Dell C5522QT, Dell C6522QT, Dell C7520QT
, Dell C8621QT, Dell Display and Peripheral Manager, Dell Pro Webcam WB5023, Dell U2421E, Dell U2421HE, Dell U2422H, Dell U2422HE, Dell U2422HX, Dell U2520D, Dell U2520DR, Dell U2720Q, Dell U2720QM, Dell U2721DE, Dell U2722D, Dell U2722DE, Dell U2722DX, Dell U3219Q, Dell U3419W, Dell U3421WE, Dell U3821DW, Dell U4021QW, Dell U4320Q, Dell U4919DW, Dell UP2720Q, Dell UP3221Q, Dell Webcam WB3023, Dell Webcam WB7022, Dell P2424HEB, Dell P2425E, Dell P2425HE, Dell P2724DEB, Dell P2725HE, Dell P3424WEB, Dell P5524Q, Dell P5524QT, Dell P6524QT, Dell P7524QT, Dell P8624QT, Dell U2424H, Dell U2424HE, Dell U2723QE, Dell U2723QX, Dell U2724D, Dell U2724DE, Dell U3023E, Dell U3223QE, Dell U3223QZ, Dell U3224KB, Dell U3423WE, Dell U3425WE, Dell U3824DW, Dell U4025QW, Dell U4323QE, Dell U4924DW
...
Last Published Date
01 Apr 2024
Version
22
Article Type
How To