Dell Display Manager Usage and Troubleshooting
Summary: The Dell Display Manager application has been replaced by the Dell Display and Peripheral Manager for Windows. See the End of Security Support Period table for details on when security support for this application ends. Below, you will find information about how to continue using and troubleshooting Dell Display Manager version 2.3 and earlier. ...
This article applies to
This article does not apply to
This article is not tied to any specific product.
Not all product versions are identified in this article.
Instructions
End of Security Support Period
Dell Technologies strives to provide security updates during the regular life cycle of the following in-scope products.
Dell Technologies strives to provide limited security updates beyond End of Life (EOL) as noted below.
At the End of Life, Dell Display Manager and Dell Peripheral Manager will be replaced by a new product, Dell Display, and Peripheral Manager.
|
Product |
End of Security Support |
Severity Levels |
|---|---|---|
|
Dell Display Manager 2.3 and Prior |
June 24, 2025 |
Critical to Medium |
|
Dell Peripheral Manager 1.7 and Prior |
May 15, 2025 |
Critical to Medium |
Consult the Dell Vulnerability Response Policy for more information about severity classifications and vulnerability remediation.
Affected Products:
- Dell Display Manager
- Dell Peripheral Manager
NOTE: The Dell Display Manager is not applicable for the Dell 27 Gaming Monitor G2725D.
Dell Display Manager (DDM) enhances everyday productivity through comprehensive management tools giving you optimal front of screen experience, efficient display management, and effortless multitasking.
NOTE: Dell Display Manager is software for Dell monitors and is not applicable for laptop displays.
Table of contents
- How to download Dell Display Manager (DDM)
- Connecting your monitor
- Features of Dell Display Manager
- Command-Line Interface for Dell Display Manager Remote Management
- Remote Firmware Update for Dell Display Manager
- Dell Display (Monitor) Models supported by Dell Display Manager
- Frequently asked questions
NOTE: Certain functions are hardware-dependent. See your monitor user guide for information about the functions that are available.
NOTE: Screenshots in this document are for illustrative purposes only. You monitor may not support some functions.
How to download Dell Display Manager
See the list of Dell monitors that support Dell Display Manager. It is recommended you download and use Dell Display Manager 2.x if your monitor supports it.
In a multiple-monitor setup, DDM 1.x and DDM 2.x can both be installed on a computer simultaneously. However, if all your monitors support DDM 2.x, we recommend that you uninstall DDM 1.x and use DDM 2.x only.
To download and install Dell Display Manager for your Dell monitor:
-
Go to the Dell Display Manager page.
-
Click the Download button next to Dell Display Manager Application.
-
See the list of Dell monitors that support Dell Display Manager to find the supported version of Dell Display Manager.
-
Using File Explorer (also known as Windows Explorer), browse to the location where the downloaded file is saved.
-
Double-click the .exe driver installation file that you downloaded and follow the on-screen instructions to complete the installation process.
-
After the installation is complete, restart the computer.
Alternatively you can also go to https://www.dell.com/support/ddm and download the software from there.
Connecting your monitor
Connect your monitor to your computer as described in your monitor's user guide.
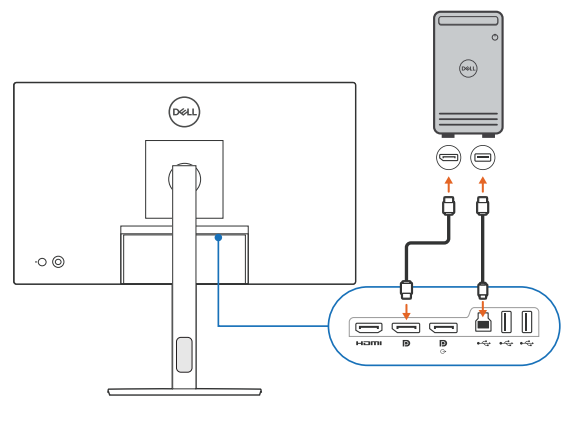
Figure 1: Connecting your monitor to a desktop
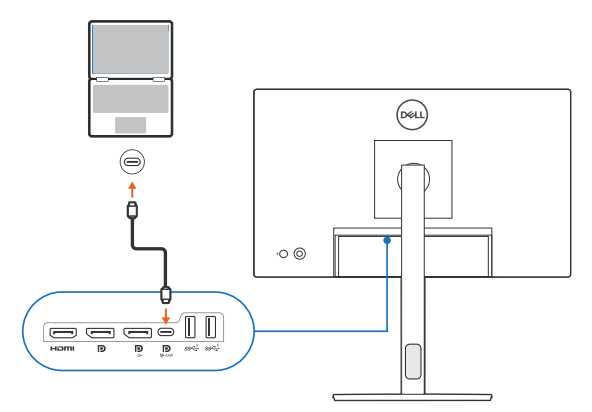
Figure 2: Connecting your monitor to a laptop
NOTE: The connectivity diagrams are for illustrative purposes only. See the monitor user guide for the complete information.
Launching Dell Display Manager
Before launching Dell Display Manager, go to Others in your monitor's On-Screen Display (OSD) menu and ensure that the DDC/CI feature is enabled.
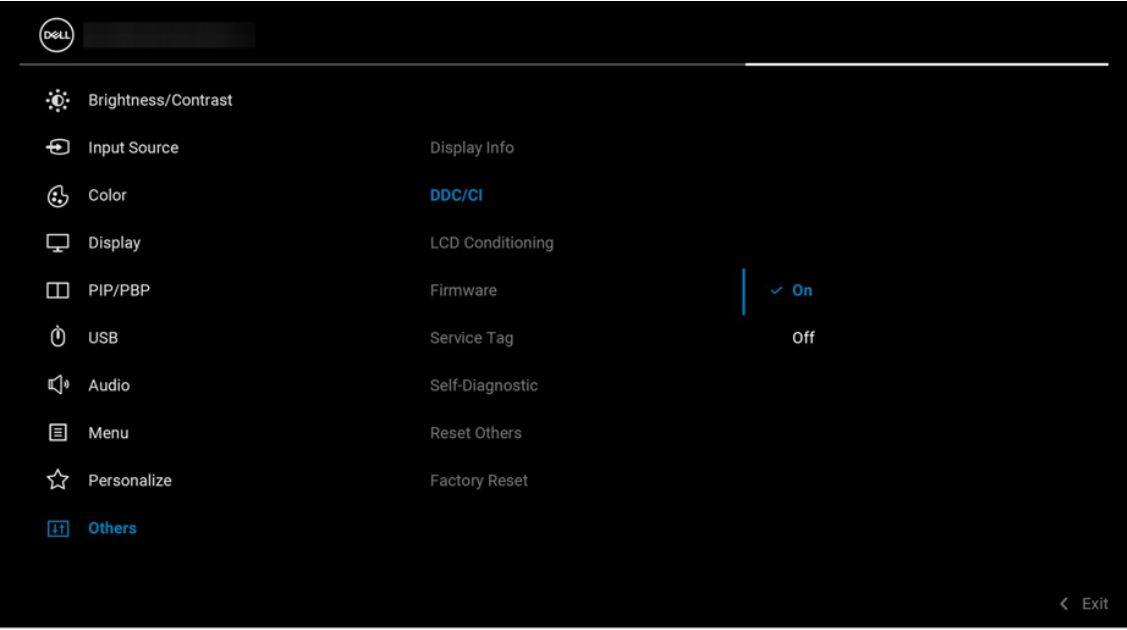
Figure 3: Enabling DDC/CI in the OSD menu of Dell Monitor before using DDM2.x
Features of Dell Display Manager
Select the Dell Display Manager version for more details.
Dell Display Manager 2.x Demo
NOTE: Some features are based on the specific Dell monitor capability.
Dell Display Manager 2.x
Duration: 09:01
When available, closed caption (subtitles) language settings can be chosen using the Settings or CC icon on this video player.
Dell Display Manager 2.x features
This section contains brief information about the features of DDM 2.x. For a complete list of features and more details, see the DDM 2.x user guide at Dell Display Manager 2.x Documentation.
NOTE: Some features may not be applicable to your monitor model. See your monitor user guide for information about the features that are available.
Display
The Display menu provides a single window to customize display related settings of the monitor such as resolution, refresh rate, orientation, and Smart HDR.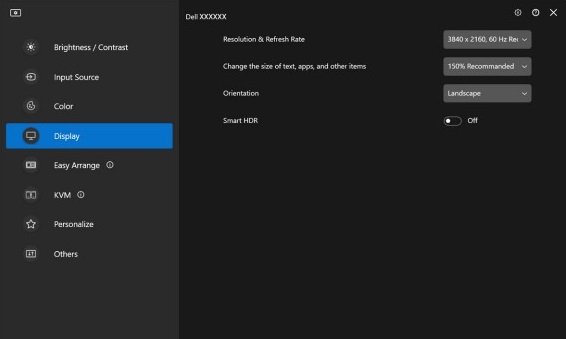
Figure 4: Dell Display Manager Display Menu
Brightness and Contrast
This menu enables you to adjust the brightness or contrast settings of their monitor manually and automatically based on their scheduled time.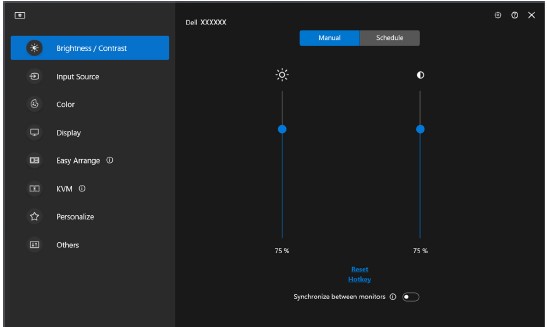
Figure 5: Manual Mode for Brightness or Contrast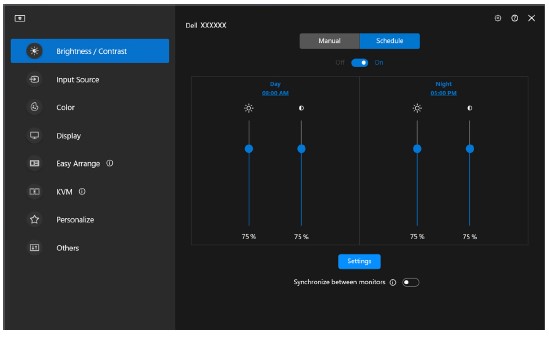
Figure 6: Schedule Mode for Brightness or Contrast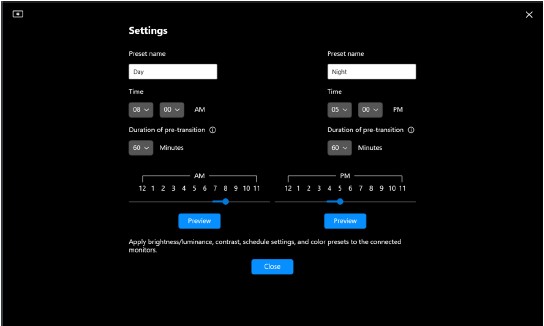
Figure 7: Scheduling Time for Brightness or Contrast Settings in Schedule Mode
Monitors that have Ambient Light Sensor can use Auto mode to automatically adjust brightness and color temperature based on surrounding light conditions. You can choose to define a brightness range based on your preference.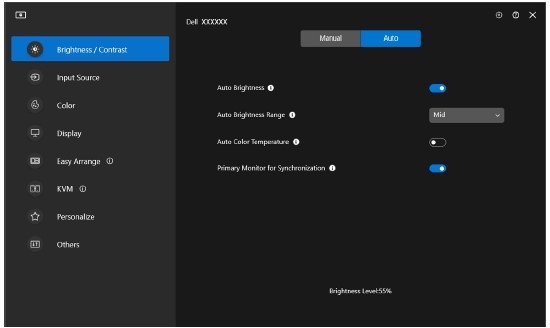
Figure 8: Auto Mode for Brightness or Contrast
Easy Arrange
The Easy Arrange menu simplifies the applications window organization on the monitor. To use it:
- Select any of the predefined layouts to virtually divide the screen into multiple zones.
- Drag the application to your selected zone to position the application in the zone. The application snaps to the selected zone.

Figure 9: Easy Arrange Layout
You can also create customized layouts. Hover over the layout that you want and click the pen icon once it appears. Click and drag the partition line until the layout is customized to your preference. You can also save your customized layouts and use it in future.
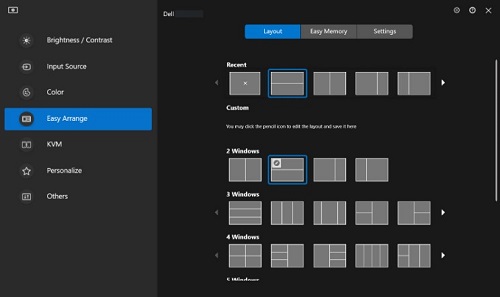
Figure 10: Customized Layout
Easy Arrange Memory
This feature allows you to assign applications or even files to the partitions of Easy Arrange. You can save that layout to create a profile and then restore the profile.
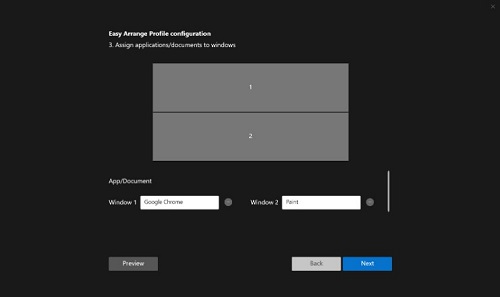
Figure 11: Assign applications or documents to windows
You can even assign a time when you want the profile to launch. Easy Arrange Memory launches the applications in the defined layout automatically at the specified time.
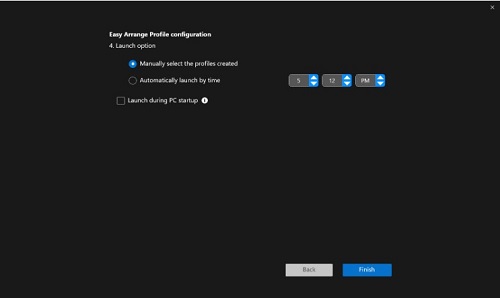
Figure 12: Launch option
NOTE: Easy Arrange Memory usability may vary according to application type and launch behavior. Easy Memory works with general productivity apps such as Microsoft Office, Adobe, web browsers and more.
Easy Memory might not be able to perform a window partition at launch if any of the following takes place:
- The app displays an open dialog box upon launch (that is, login screen, error dialog, or unsaved files)
- The app is launched in full screen mode
- Files are opened as individual tabs within the app
- Overlapping Easy Arrange layouts
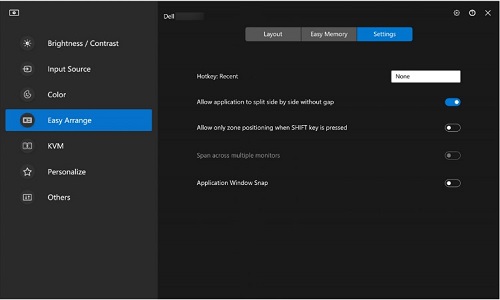
Figure 13: Easy Arrange Settings to set personal preference
Application Windows Snap
Application Windows Snap helps you with placing a program quickly to any screen. When enabled in Dell Display Manager 2.x, dragging the application window triggers a floating menu that contains recently used Easy Arrange layouts. You can drop the application to any of the listed layouts to perform window placement.
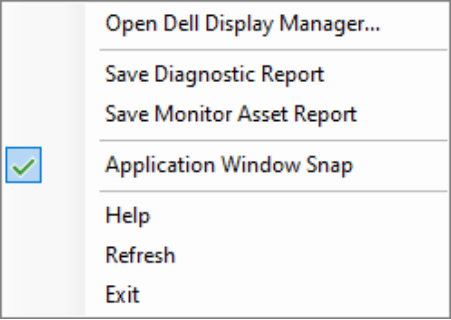
Figure 14: Enabling or disabling application Windows Snap from the DDM icon on the status bar
NOTE: You may turn the Windows Snap feature off when you want to use Span across multiple monitors.
Gaming settings
You can configure the Gaming menu that is available only on Alienware and Dell Gaming monitors. For more information, see DDM 2.x User guide.
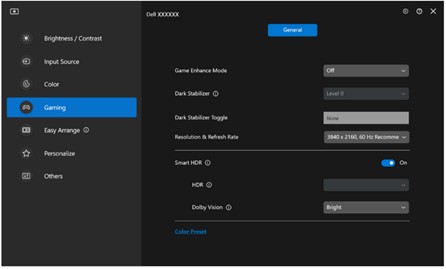
Figure 15: Gaming menu - General settings
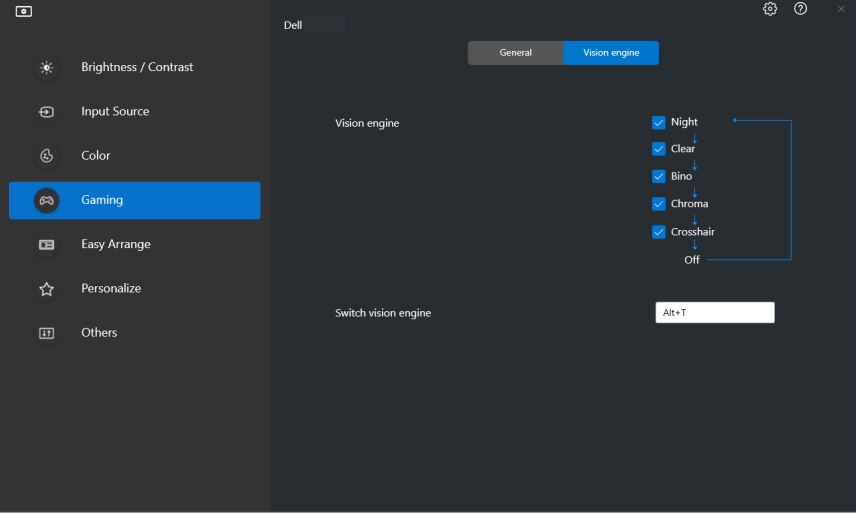
Figure 16: Gaming menu - Vision Engine settings
NOTE: Vision Engine is available on select Dell Gaming monitors only.
Keyboard, Video, Mouse (KVM)
USB KVM
This feature allows sharing of a keyboard and mouse between multiple computers. You can set up the KVM switch with the USB KVM wizard.
The KVM feature is available when connected monitors support KVM functionality. DDM 2.x communicates with your monitor even when the monitor is displaying video from another computer.
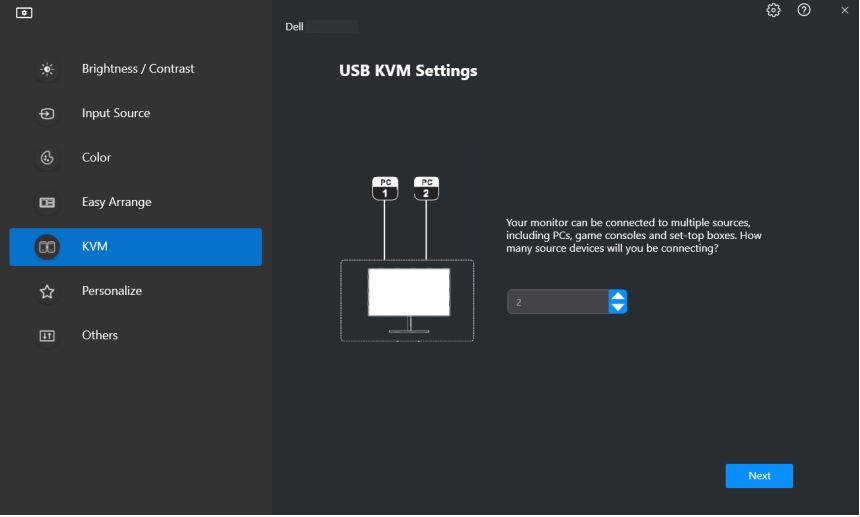
Figure 17: USB KVM Settings
For information about how to setup KVM, see Setting up the KVM section of the user guide available at Dell Display Manager 2.x | Manuals and Documents.
Network KVM
This feature allows sharing of a keyboard and mouse while transferring a file between client devices in a cluster. Sharing of files is also supported across operating systems. (For example: From Windows to macOS and the opposite way)
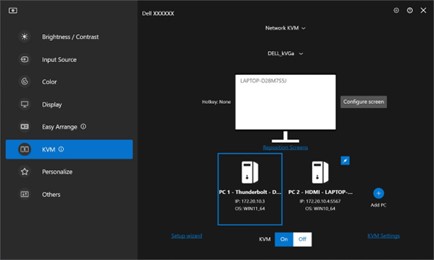
Figure 18: Network KVM Settings
Cluster consists of client device and monitor. A maximum of four client devices can be added to a cluster. You can setup the cluster in three different ways:

Figure 19: Multiple Displays

Figure 20: Single Display (PBP on)

Figure 21: Single Display (PBP off)
Note:
- Availability of Network KVM features depends on the network policy set out by the company or IT. This feature requires opening the access control list (ACL) for network incoming and outgoing traffic control.
- Network KVM is modular (optional to install). It does not install by default, and users can choose not to install it while downloading the software and use other features of Dell Display Manager. If users want to install Network KVM later, it requires fresh installation of version 2.3 and above.
- You may experience delayed response from remote computers on Network KVM due to network latency limitations.
- Certain key combinations, function keys, specialized keys, and touch bar keys are not supported for controlling remote computers. While clipboard sharing in a cluster, Cut and Paste is not supported on remote computers.
- The established Cluster may not resume connection after Network KVM is turned back on from the off state, after the main computer is woken from suspension, or after connecting to a supported monitor. In this case, you may manually switch the cluster from the drop-down list, or you may manually connect the offline computer from the Network KVM main page.
- Dell Display Manager enables secure content and file sharing between computers with end-to-end encryption. However, it does not function as anti-malware software, providing no scanning or protection against malicious files during transfers. It is recommended to install anti-malware or other security tools before using File and Content Transfer in Network KVM. If you prefer not to share files between computers, you can go to KVM Settings and use Manage Cluster to turn off this feature.
- If your cluster has Windows and Mac devices, connect keyboard and mouse to Mac if possible, as remote Mac device cannot be accessed.
- It is not recommended to turn on both-Apple Universal Control and Network KVM as it might cause confusion.
- 9. For details on how to setup see the Setting up the Network KVM section of the user guide available at: Dell Display Manager 2.x
USB-C Prioritization
Users can select option for High Data speed priority or High Resolution through USB-C prioritization option available under Advanced settings of the Display menu.
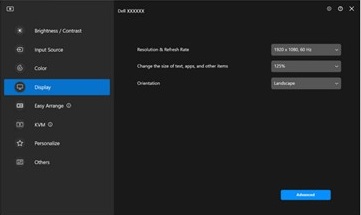
Figure 22: Click Advanced
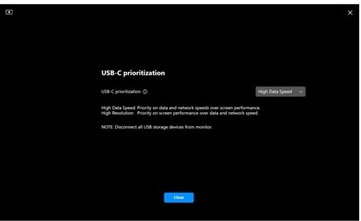
Figure 23: USB-C Prioritization
Audio Menu
Audio Profiles can be customized from the audio menu.
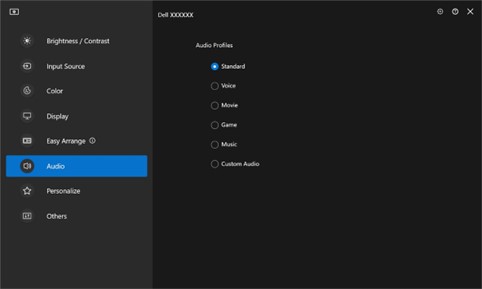
Figure 24: Audio Profiles
Firmware and software updates
With DDM 2.x, you can get automatic notification for new updates on monitor firmware and software.
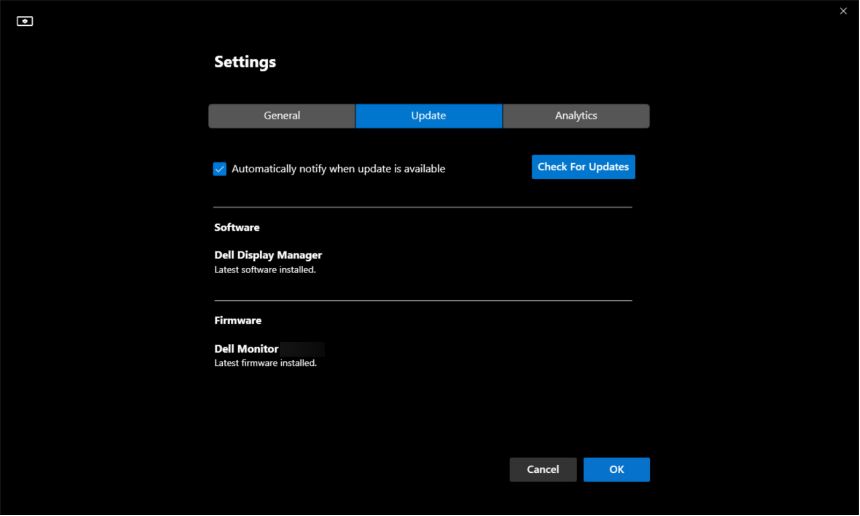
Figure 25: Firmware and software updates
Color Management
DDM 2.x allows you to sync the color space of the monitor with the associated International Color Consortium (ICC) profile.
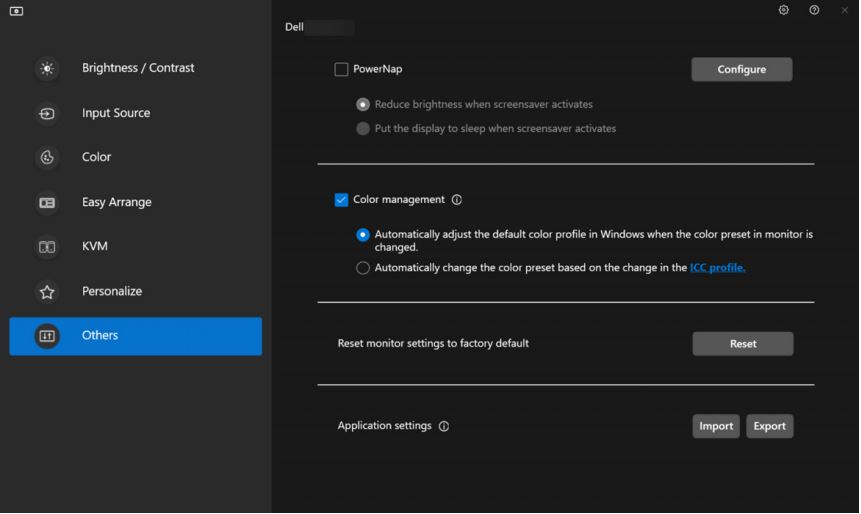
Figure 26: Color Management
Remote Management and Control (for IT managers only)
DDM 2.1 comes with CLI commands for the following:
-
Asset management- Querying monitor inventory logs
-
Display info and Monitor control- Query the current monitor settings and to set basic monitor settings such as brightness, color preset, volume, resolution, and more.
-
Export and import settings- Export Settings command write all DDM settings for all the active monitors to the designated file. Import Settings command reads all the settings recorded in the designated filename and assigns them to other monitors of the same model.
-
Firmware updates- Deploy firmware updates across a fleet.
NOTE: For a complete list of supported features and functionality, see the DDM 2.x User guide at Dell Product Documentation for your Dell monitor.
Dell Display Manager 1.x Demo
NOTE: Some features are based on the specific Dell monitor capability.
Dell Display Manager 1.x
Duration: 07:06
When available, closed caption (subtitles) language settings can be chosen using the Settings or CC icon on this video player.
Dell Display Manager (1.x) features
Accessing Dell Display Manager (DDM) features and the most recent Easy Arrange layouts is easier than ever. Enter preset hotkeys to bring up Dell Display Manager (DDM) UI at the touch of the keyboard. Also, switch between your favorite Easy Arrange layouts and templates.
| Function | Hot Keys |
|---|---|
| Quick Key to enable Dell Display Manager (DDM) UI. | Ctrl + Shift + D (customizable by the user) |
| Toggle between Easy Arrange layouts. | Page Up or Page Down Or Click the > icon to move across layouts. |
| Accessing five most recently used layouts | Ctrl + Shift + Home (customizable by the user) |
A more intuitive way to configure monitor settings. Drag and drop the Dell Display Manager UI menu from one monitor to another. In a multimonitor configuration, it allows you to control and change the monitor settings.
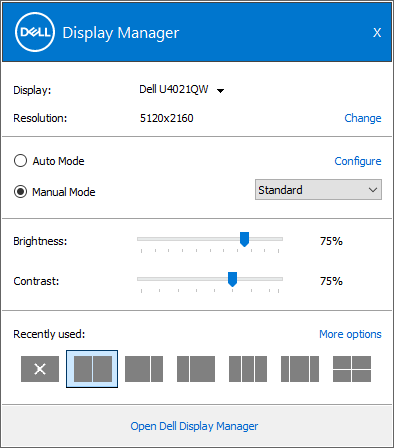
Figure 27: A screenshot of the Configure settings screen of Dell Display Manager
More customization options to view data based on individual preferences. Users can now customize up to 48 max zones and assign them accordingly.
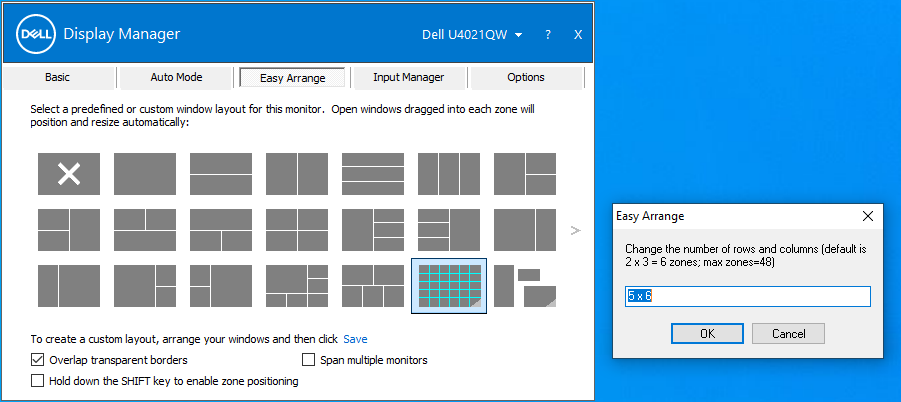
Figure 28: A screenshot of the Zone customization screen in Dell Display Manager
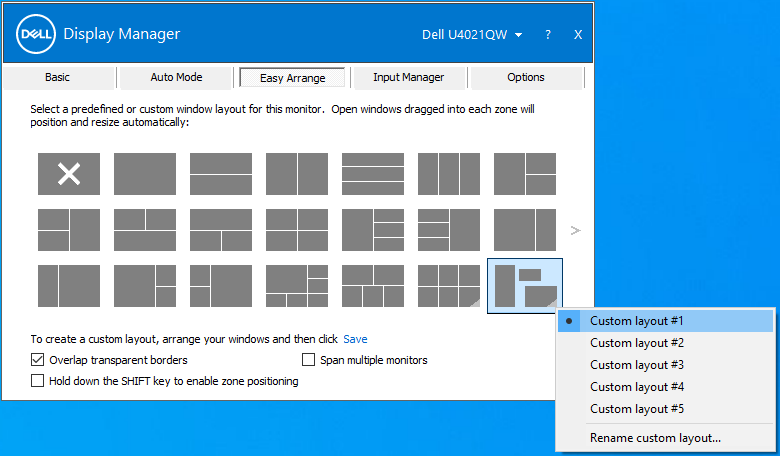
Figure 29: A screenshot of the Name your screen layout in Dell Display Manager
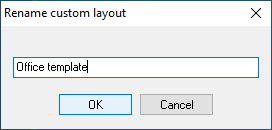
Figure 30: A screenshot of the rename custom layout box
Viewing and using Dell Display Manager (DDM) in portrait mode is now possible. Dell Display Manager (DDM) Easy Arrange templates automatically switch to portrait mode when monitor orientation is pivoted vertically.
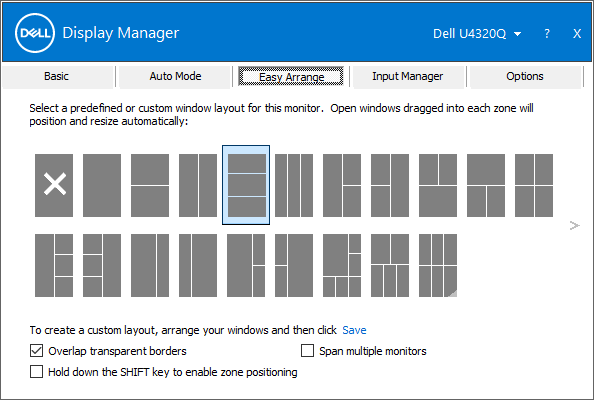
Figure 31: A screenshot of the Portrait mode screen in Dell Display Manager
KVM Wizard to simplify the KVM setup. Follow the step-by-step open windows guide at the click of the KVM Wizard icon on the Dell Display Manager (DDM) user interface. (available on select Dell monitors with KVM capability only.)
Figure 32 A screenshot of the Input manager in Dell Display Manage
Remote Management and Control (for IT managers only)
- IT managers can issue specific instructions using command lines to Dell Display Manager (DDM) to perform tasks within specific times to an individual monitor or an entire fleet
- Remote Control capabilities (includes Power on and off, restoring factory defaults, changing monitor front of screen settings, optimal resolution, display modes, disabling OSD menu access, input switching).
- Asset Management capabilities (includes monitor asset inventory monitoring, generating diagnostic reports on usage hours).
More ways to multitask
Up to 38 layouts: With Dell Display Manager’s Easy Arrange, you can organize multiple applications on your screen. You can snap them into a template of your choice, which makes multitasking effortless.
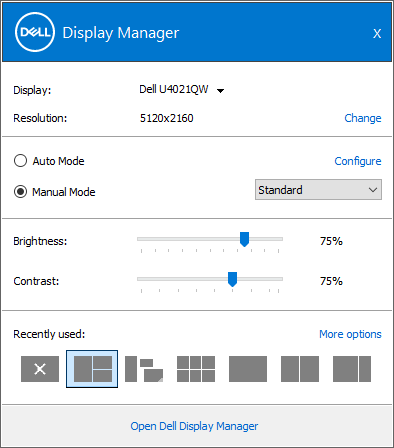
Figure 33: A screenshot of the Recently used templates in Dell Display Manager
Easy arrange can also be used to personalize the dual monitors side by side or expand desktop space by spanning across two monitors.
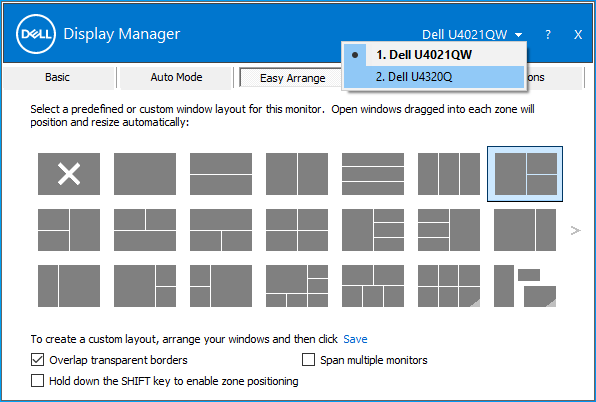
Figure 34: A screenshot of Dual monitors in Dell Display Manager
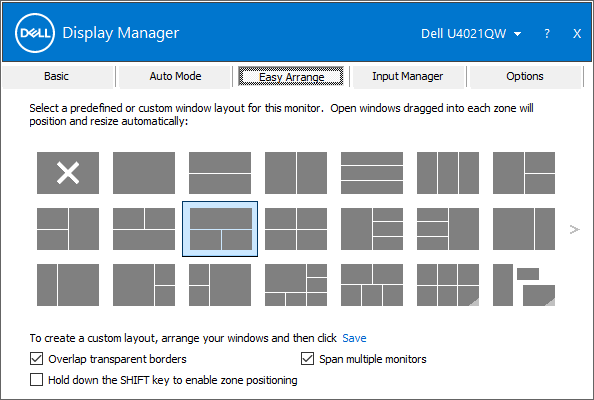
Figure 35: A screenshot of Arrange a dual monitor view in Dell Display Manager.
Seamless transitions: Rapidly restore previous application windows when reconnecting with Auto restore, a feature that remembers where you left off.
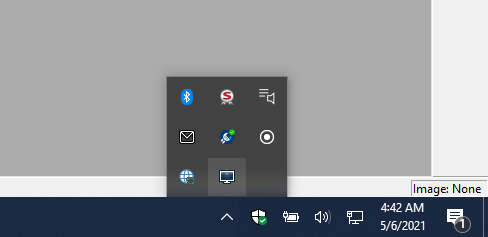
Figure 36: A screenshot of the restore icon in the system tray
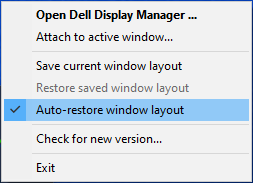
Figure 37: A screenshot of the Auto restore window layout in the system tray menu
Input Manager:
- Enables switching across multiple inputs
- You can assign names to each input and define a shortcut key for quick access to multiple connected devices - useful for programmers and gamers.
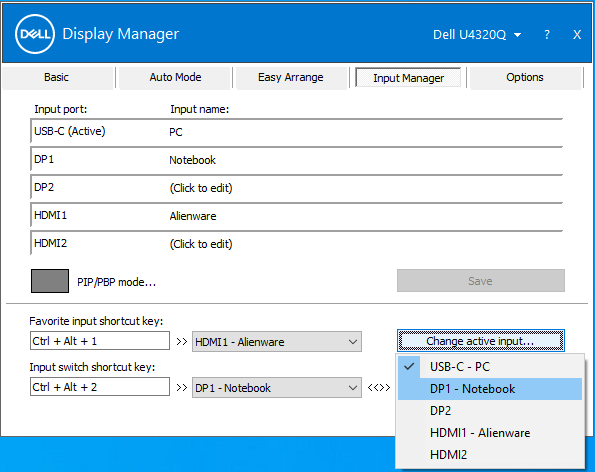
Figure 38: A screenshot of Using multiple inputs in Dell Display Manager
Optimal front of screen experience
Create your best work: Adjust brightness, contrast, and resolution directly through the software for an optimal front of screen experience.
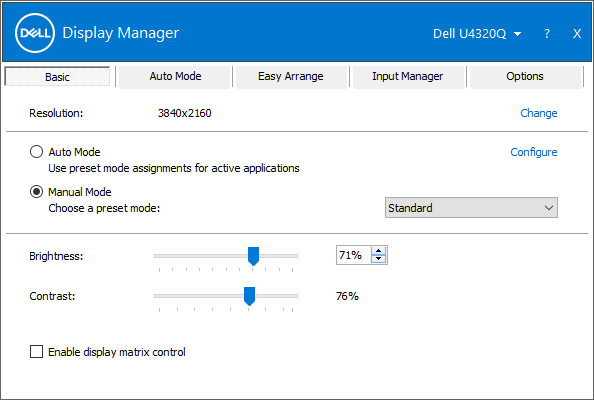
Figure 39: Optimal screen resolution in Dell Display Manager
Optimize your view: Automode configures your preset display settings as you multitask.
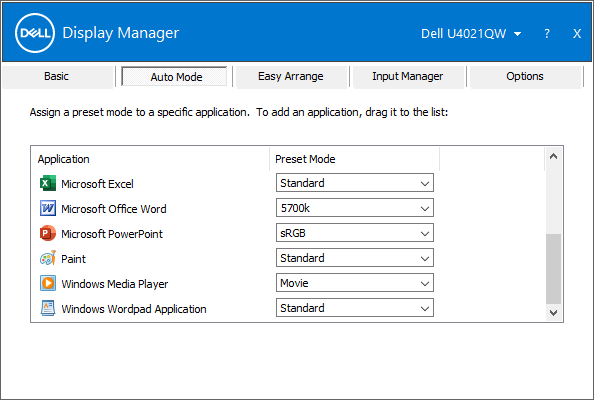
Figure 40: Preset setting by application in Dell Display Manager
Efficient manageability
Asset Report Creation: IT managers can save and document the monitor asset information.
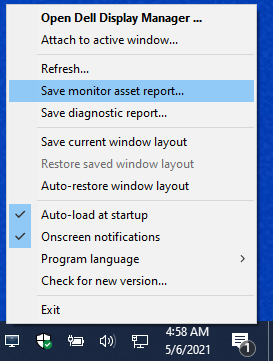
Figure 41: Asset report creation
To generate a monitor asset report:
-
Hold the Shift key and right-click the Dell Display Manager icon in the Taskbar.
-
Select Save monitor asset report and save the .mif file.
-
After saving the file, you can open it using the Notepad app.
For example, the log from a C2722DE included the following information:
Name = "ModelName" - "Dell C2722DE"

       Name = "SerialNumber" - "Service Tag-xxxxxxxxxx"

       Name = "UsageTime" - Value = "xxx hours"

       Name = "OptimalResolution" - Value = "2560x1440 at 60 Hz"


       PowerNap: Manage energy consumption using power management settings.
Command-Line Interface for Dell Display Manager Remote Management
IT administrators can use the Command-Line Interface (CLI) commands in this section to remote manage Dell Monitors.
NOTE:
- Dell Display Manager version 2.1 and above must be installed on all computers using the CLI commands. The CLI commands can be used for mass installation.
- The advanced management features such as pushing firmware updates remotely across a fleet are available only on select models. (Including the Dell Ultrasharp and Dell C Series monitors.)
Useful Command-Line commands for Asset Management
Asset management includes a list of commands to support the generic administration of monitors.
See the following table for the various commands and a description with an associated example of the usage. (The example uses /Number: Where the Number can be 1, 2, 3 and so on.) It replaces it with the enumerated display number of the targeted clients. You can append the output of all these commands into a single log.
| Command | Description |
|---|---|
Log [filename] |
Output the results for Read/Write commands to a specified file in an existing directory. Example:
|
Inventory [filename] |
Create an inventory report and write the output in a specified file format. (Such as .txt.) Example:
|
SaveDiagnosticReport [filename] |
Write the DDM diagnostic log in to a specific text file identified in the path. Example:
|
ReadFirmwareVersion |
It provides the firmware version as a string(for example,'M2T109'). If there are multiple monitors connected, you may use the prefix to query each of the monitors. Example: (Two monitors connected)
Expected ReturnsL
|
ReadMonitorActiveHours |
Through VCPC0, this command gives the number of active hours the monitor was powered on. Example:
|
ReadAssetAttributes |
It provides a comma-delimited string. It contains the PID, model string, ASCII serial number, ISO week, year of manufacture, and VCPC0 value (if the firmware supports it) or age in hours. Read from monitor 1, Example:
|
CountMonitorsCI |
This command returns the number of monitors that DDM supports. Example:
|
ReadCapabilities |
Provide an MCCS capability string. Example:
|
RestoreFactoryDefaults |
Restore to factory defaults. Example:
|
AutoSetup |
Runs an autosetup (analog only)* Perform auto setup function (H/V position, clock, clock phase, A/D converter, and so on.) Example:
|
RestoreLevelDefaults |
Restores level defaults*. Restore factory defaults for brightness, luminance, and contrast adjustments. Example:
|
RestoreColorDefaults |
Restores color defaults*. Example:
|
ReadPossible [opcode] |
Provides the comma-delimited VCP opcode values supported by the firmware. D6 is the VCP opcode. Example:
|
ReadMax [opcode] |
Provide the maximum value VCP continuous opcode (12) supports. Example:
|
ReadControl [opcode] |
Provide the VCP opcodes current hexadecimal value. Example:
|
WriteControl [opcode] [value] |
Set the VCP opcode to a hexadecimal value. Example:
|
IncreaseControl [opcode] [value] |
Increase the value of the VCP control as the command specifies. Example:
|
DecreaseControl [opcode] [value] |
Decrease the value of the VCP control as the command specifies. Example:
|
WriteBrightnessLevel [x] |
Sets brightness to X% (0-100)*
NOTE: For UP series with luminance, the luminance level is the value instead of the percentage.
Example:
|
ReadBrightnessLevel |
Provide the current brightness level.
NOTE: For UP series with luminance, the luminance level reported is the value instead of the percentage.
Example:
|
WriteContrastLevel [x] |
Set the contrast level to X% (0-100)*. Example:
|
ReadContrastLevel |
Provide the current contrast level. Example:
|
ReadColorPreset |
Provide the friendly English name preset. Example:
|
WriteColorPreset [Movie/CAL1,etc] |
It changes the Preset mode that the monitors support. If you have turned on 'Auto Color Preset', it requires you to turn off the Auto-ColorPreset before running this command to change the manual color preset. Example:
|
AutoColorPreset [on/off] |
Turn the auto-color preset feature on or off. Example:
|
WritePower [on/standby/off] |
NOTE: After WritePower to off, the monitor may not react to on (as the monitor may not respond to DDC/CI requests). Central control should use Standby to on.
Example:
|
WriteActiveInput [DVI2/HDMI/DP2,etc] |
Switch between the active inputs. Example:
|
ReadActiveInput |
Provide the input that is active. Example:
|
SwapVideo |
Swap the main and the (primary) sub inputs. Example:
|
SwapUSB |
Swaps the USB inputs on the main sub inputs.
NOTE: This command only works in two PBP mode.
Example:
|
WriteSubInput [DP1, DP2, HDMI1… etc] |
Assign sub inputs. Example:
|
WritePxP [mode] |
Set the monitor to PIP or PBP modes (the available modes are subject to the monitor models). Possible settings: (For example: Off, pip, pip-small, pip-large, pip-2h, pbp, split, pbp-2h, pbp-2h-fill, pbp-3a, pbp-3b, pbp-3c, pbp-3d, pbp-3e, pbp-4a, quad, pbp-4b, pbp-2h-37, pbp-2h-73, pbp-2h-28, pbp-2h-82, pbp-2h-2575, pbp-2h-7525, pbp-2h-2674, pbp-2h-7426, pbp-2h-3367, pbp-2h-6733, or pbp-2v.) Example:
|
WritePxpMode [mode main sub1 sub2] |
Set the monitor to PIP or PBP modes (the available modes are subject to the monitor models) and their respective input source. Settings are: (off, pip, pip-small, pip-large, pip-2h, pbp, split, pbp-2h, pbp-2h-fill, pbp-3a, pbp-3b, pbp-3c, pbp-3d, pbp-3e, pbp-4a, quad, pbp-4b, pbp-2h-37, pbp-2h-73, pbp-2h-28, pbp-2h-82, pbp-2h-2575, pbp-2h-7525, pbp-2h-2674, pbp-2h-7426, pbp-2h-3367, pbp-2h-6733, pbp-2v.) Example:
|
Zoom |
Switch between PxP and full screen mode. Example:
|
WriteOSDLanguage [language] |
Set the OSD language. The Dell firmware supports English, French, German, Japanese, Portuguese, Russian, Spanish, and Simplified Chinese. Example:
|
OSD [lock/unlock] |
Lock or unlock access to the OSD menu. Example:
|
Rescan |
Rescan and discover the monitors if the DDM or DDPM application is unable to detect. Example:
|
WriteOptimalResolution |
Set the optimal resolution of the display. Example:
|
WriteEALayout [x] |
Set the Easy Arrange grid type to the value X (X = 0-48) where 0 is to turn off the EA Layout. Example:
|
Exit |
Close the application or program. Example:
|
ExportSettings |
The ExportSettings command writes all the DDM settings for every active monitor to the designated file. If there are multiple monitors for export, use enumerate monitor number to export the settings. (For example: Example:
|
ImportSettings |
The ImportSettings command reads all the settings recorded in the designated filename and assigns them to other monitors of the same model. You are prompted to import when a monitor of the configured model is connected. Example:
|
ScreenNotification [off, on] |
Enable or disable screen notification. Example:
|
AutoStartup [off, on] |
Enable or disable auto load at startup. Example:
|
PowerNap [off, ReduceBrightness, Sleep] |
Enable or disable power nap. Example:
|
ColorManagement [off, bymonitor, byhost] |
Enable or disable color management. Example:
|
AutoBrightness [off, on] |
To enable or disable Auto Brightness. Example:
|
AutoColorTemp [off, on] |
To enable or disable Auto Color Temperature. Example:
|
PrimaryMonitorforSync [off, on] |
To enable or disable Primary Monitor for Sync. Example:
|
AutoBrightnessRangeLevel [Low, Mid, High] |
To set Auto Brightness Range Level to Low, Mid, High. Example:
|
ReadCurrentResolutionRefreshRate |
To return to the current display timing. Example:
|
ReadAllResolutionRefreshRate |
To return display all support modes (Resolution, Refresh Rate), indicate the recommended resolution. Example:
|
WriteResolution |
To set Display Resolution. Example:
|
WriteRefreshRate |
To set Refresh Rate supported as listed on the operating system. Example:
|
Export Monitor On-Screen-Display (OSD) Settings
There is a command apart from the DDM application settings. Using this command exports and imports the On-Screen display (OSD) settings between monitors of the same model. (If the selected FY24 and above monitors support the Multi-Monitor Sync* function.)
Syntax/ExportOSDSettings [filename]
Example:ddm.exe /1:ExportOSDSettings C: empmodel1.bin
The OSD menu settings include:
- Brightness or Contrast
- Input Source
- Color (Color Preset, Hue, Saturation)
- Display (For example: Response time, sharpness, ALS, MST, MMS, USB-C Prioritization, and Uniformity Compensation)
- PBP and/or PIP
- Menu
- Personalize
Import Monitor On-Screen-Display (OSD) Settings
ImportOSDSettings command reads all the settings recorded in the designated filename and configuration on the respective monitors of the same model. The user is prompted to import when a monitor of the configured model is connected. To import OSD settings, it is required to connect USB upstream port between the computer and the monitors. If the same model of monitors is connected in a daisy chain, the settings are also copied from the first monitor to the other monitors.
Syntax/ImportOSDSettings [filename]
If you intend to import without user intervention, you may turn off the prompt./writeimportpermission off /ImportOSDSettings [filename]
Note: Clone OSD settings require a USB upstream port connected between the computer and one or more monitors. If the same model of monitors is connected in a daisy chain, the settings are also copied from the first monitor to other monitors.
Service Tag is optional. It can be found in the Others tab of the monitor OSD menu.
Service Tag is optional. It can be found in the Others tab of the monitor OSD menu.
Remote Firmware Update for Dell Display Manager
Pre-Requisites for carrying out a Firmware Update
Connect a USB Type-C or USB upstream cable between the monitor and your computer. (Preferably a direct connection between your computer and the monitor.) You can connect the computer with monitor 1 and then USB cables between the monitors with Multi-Stream Transport (MST) turned on for multiple monitors.
See the setup configurations below:
NOTE: Monitor 1 and Monitor 2 can be identical or different models.
Configuration A (The computer is connected to monitor 1 and monitor 1 is daisy-chained using a USB connection to monitor 2.)
- A USB A to B cable between the monitor to the computer is mandatory to allow the firmware update (Shown in Red.)
- A USB A to B cable is required between the computer and Monitor 1 if the computer is connected with monitor 1 using either a DP or mDP cable. (Shown in Red.)
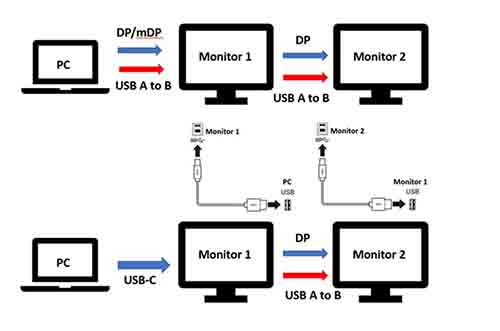
Figure 41 Configuration A
Configuration B (The computer is directly connected to monitor 1 and monitor 2).
- A DP, mDP, or HDMI cable is used between the computer and Monitor 1. The computer must also connect with monitor 1 and monitor 2 using a USB upstream cable.
- A USB C or Thunderbolt cable between monitor 1 and monitor 2 does not require any other cables to be used.
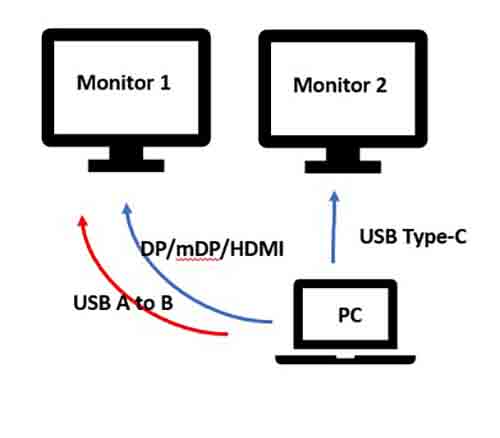
Figure 42 Configuration B
Firmware mass deployment for your monitors using command-line commands in the Windows Operating System
There are two methods that allow you to deploy firmware (FW) updates remotely:
-
Deploy the firmware update through either Microsoft EndPoint Manager, SCCM, or Intune using PowerShell scripts (See the summary section for more details.)
-
Send a command to update the firmware using the Dell Display Manager Command Line: (
ddm.exe /fwupdate deferorddm.exe /fwupdate force)
NOTE: DDM is disabled while a firmware update is in progress. The update can take between 15 to 30 minutes depending on the complexity of the monitor models. At the end of the update, the monitor must restart automatically and it blanks momentarily.
Here are the commands to perform software and firmware updates:
| Command | Description |
|---|---|
LiveUpdate |
Issue this command to update the software silently if an update is available. The installation requires admin rights, and the update only happens after the monitor is connected.
|
NoUpdate [on/off] |
Turn On, Off, SW, FW, or the Auto Update Notification. By default, DDM sends a notification to you to inform you of the SW or FW update when they are available.
|
LockUpdate |
Disable the SW and FW update on the UI so that the IT admin centrally manages the updates. Once it is disabled, IT admin must use
|
Here are the various windows notifications that inform you on the progress and update status:
| Condition | Message | Example |
|---|---|---|
| FW is available update. | An update is available for <monitor model>. Update your monitor by connecting the monitor directly to the computer using a USB cable. <Right Now> <Reminder Later> | Defer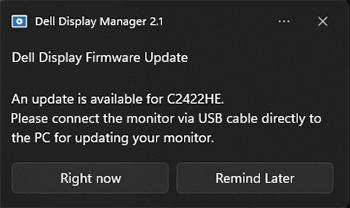 Force 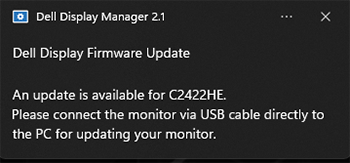 |
| FW is updating. | Updating the firmware for <monitor model>. The application resumes after completion. | 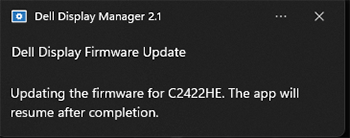 |
| FW is updated successfully. | Updated the firmware for the <monitor model>_<service tag> successfully | 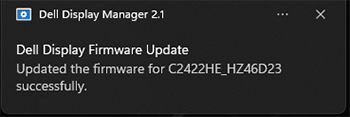 |
| FW is unable to update successfully. | Failed to update the firmware for <monitor model>_<Service Tag>. | 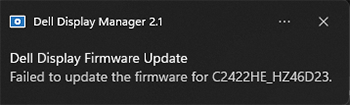 |
The Command-Line commands to update the firmware are:
|
|
This mode allows you to defer the firmware update and update now. You can defer the firmware update so that they do not disrupt the current activities. You are reminded the next day when the monitor is connected again. |
|
|
This mode allows you to update the firmware immediately. You are informed of the activities before the firmware updates. |
|
Deployment through EndPoint Manager, SCCM, or Intune |
|
Dell Display (Monitor) Models supported by Dell Display Manager
Dell Display (Monitor) Models supported by Dell Display Manager (Windows Operating System)
Dell Display Manager 2.x requires Windows 11 or Windows 10 build 17763 or newer.
| Model | Supports DDM 2.x | Supports DDM 1.x Only |
|---|---|---|
| Alienware Monitors |
|
|
| Dell Gaming Monitors |
|
|
| Dell C Series Displays |
|
|
| Dell SE Series Monitors |
|
|
| Dell P Series Monitors |
|
|
| Dell S Series Monitors |
|
|
| Dell E Series Monitors |
|
|
| Dell UltraSharp (U) Series Monitors |
|
|
| Dell Ultrasharp Premier Color (UP) Series Monitors |
|
|
Dell Display (Monitor) Models supported by Dell Display and Peripheral Manager (For macOS)
macOS users are supported through Dell Display and Peripheral Manager for select models. For more information, see: Dell Display and Peripheral Manager for macOS
Additional Information
Frequently asked questions
- DDM 2.x is compatible with Windows 11 (x64 based) and Windows 10 (x64 based) build 17763 and later. ARM-based computers with Windows 11 (arm64 based) with Qualcomm Snapdragon X-Elite/X-Plus and above chipsets are also support Dell Display Manager from version 2.3.2 onwards. It is not supported on the following chipsets (Table 7)
Table 7: DDM 2.x Non-Compatiblity Chipset List Manufacturer
Brand
Model
IoT Applicability
Qualcomm®
Snapdragon™
Snapdragon 850
Qualcomm®
Snapdragon™
Snapdragon 7c
Qualcomm®
Snapdragon™
Snapdragon 7c Gen2
Qualcomm®
Snapdragon™
Snapdragon 7c+ Gen3
Qualcomm®
Snapdragon™
Snapdragon 8c
Qualcomm®
Snapdragon™
Snapdragon 8cx
Qualcomm®
Snapdragon™
Snapdragon 8cx Gen2
Qualcomm®
Snapdragon™
Snapdragon 8cx Gen3
Qualcomm®
Qualcomm®
QCM6490
IoT Enterprise Only
Qualcomm®
Qualcomm®
QCM6490
IoT Enterprise Only
Qualcomm®
Qualcomm®
QCM5430
IoT Enterprise Only
Qualcomm®
Qualcomm®
QCM5430
IoT Enterprise Only
Qualcomm®
Snapdragon™
Microsoft SQ1
Qualcomm®
Snapdragon™
Microsoft SQ2
Qualcomm®
Snapdragon™
Microsoft SQ3
- DDM 1.x works with the following Microsoft Windows Operating Systems: Windows 11, Windows 10, Windows 8.1 or 8, and Windows 7 (this is a legacy version and does not support ARM processor).
For macOS, download: Dell Display and Peripheral Manager For more information, reference: Dell Display and Peripheral Manager for macOS
Dell Display Manager (DDM) works only with select Dell monitors. See the list below for details.
No. Both DDM 1.x and 2.x are the same across all models. However, the features that are offered may vary from model to model.
Yes, it can support up to 16 monitors. (Some high-end graphics cards can support up to four external monitors, with four such cards, Dell Display Manager (DDM) can support up to 16 monitors.)
Yes, your Dell display must be updated to the latest firmware version to work with Dell Display and Peripheral Manager (DDPM) for Mac. To update display firmware:
- Browse to Dell Driver and Downloads.
- Identify your Dell monitor.
- Enter the Service Tag or Model Number of the Dell monitor and click Search.
- Alternatively, click Browse all products to manually select the Dell monitor from the catalog.
- Select the Operating System as Apple macOS (as shown in Figure 24 [English Only]) and Download the firmware package.
- Connect the USB-C or Thunderbolt cable to your monitor, run the firmware package, and follow the on-screen instructions to complete the firmware update for your monitor.
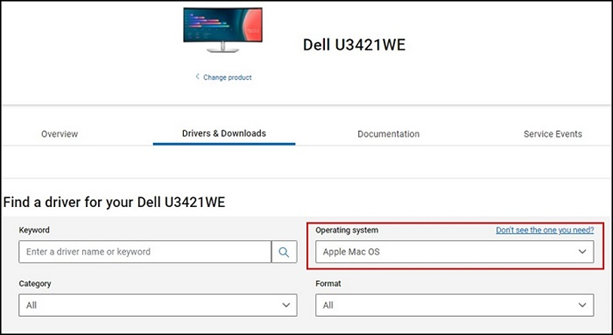
Figure 37: Selecting your Apple in the dropdown on the Dell Drivers page
NOTE: Firmware update may take several minutes to complete. Disable sleep mode on your Mac when updating your monitor firmware.
Dell Display Manager (DDM) does not support VDI Desktop or other virtualized environments.
Dell Display Manager (DDM) is compatible with all graphics cards from major graphics card vendors such as NVIDIA, AMD, and Intel.
- Enables switching across multiple inputs
- You can assign names to each input and define a shortcut key for quick access to multiple connected devices - useful for programmers and games
See the Microsoft Knowledge Base article for information about how to uninstall programs: Uninstall or remove apps and programs in Windows
NOTE: The program is listed as Dell Display Manager.
No, you can have different Dell Display Manager versions running on the computers. However, Dell highly recommends running the latest version of Dell Display Manager so that you get up-to-date fixes, enhancements, and new device enablement.
No, there are various settings in Dell Display Manager that you can configure. It does not have to be the same settings, and it is up to you which settings to use.
NOTE: For an Easy Arrange layout, you can select the layout that most suitable for each of the input sources to improve their productivity. Managing both input sources in a consistent manner for hotkey and other settings, it is easier to keep the settings the same.
Using accent keys such as â, ê, î, ô, and û resulted in ^^a, ^^e, ^^i, ^^o, and ^^u being seen instead.
This issue has been fixed. Download and install the latest DDM version (Ver 2.1.0.45 or newer).
Yes, the firmware package can be pushed down without Dell Display Manager.
Remote firmware update is only possible for Windows.
No, the monitor is still required to connect with the computer throughout the firmware update. If you unplug the cable during the firmware update, Dell Display Manager prompts you that the firmware has failed to update.
The firmware does not update successfully, and Dell Display Manager prompts you that the firmware has failed to update. If ITDM wants to update again, you must issue the command again. It is not advisable to unplug during the firmware update process. If you are not ready to perform the firmware update, you can defer the update until you are ready.
Deploy the CLI command to collect the firmware version and check against the firmware version on the server. This helps to generate the current version and updated firmware version. (See the commands provided in the article.)
Deploy the CLI command to generate the asset reports on the firmware version in the fleet.
No.
The firmware update can be done through the dock. However, the pre-requisite is that there is a data path between the computer and the monitors. So, the monitor can stay connected to dock with a USB-C, USB upstream, or thunderbolt cable connected between the dock and the monitor. We cannot use a DP or HDMI cable.
See these Dell Knowledge Base articles for related information:
Affected Products
Alienware and Dell Gaming Monitors, C Series, D Series, E Series, P Series, S Series, SE Series, UltraSharp Premier (UP) Series, UltraSharp (U) Series, Dell Display Manager 2.xArticle Properties
Article Number: 000060112
Article Type: How To
Last Modified: 22 May 2025
Version: 75
Find answers to your questions from other Dell users
Support Services
Check if your device is covered by Support Services.