Start a Conversation

This post is more than 5 years old

Solved!

Go to Solution

1690

October 2nd, 2014 06:00

Multi-Tenant Views

Is it possible to create a multi-tenant environment in ViPR SRM, where users can monitor their own resources without stepping on other user's stuff?

14 Posts

October 2nd, 2014 10:00

When you combine ViPR SRM with ViPR controller this gets even easier.  As each resource in the ViPR SolutionPack is already tagged with a ViPR tenant the data enrichment is already done for you.  All you need to do is assign a filter where tenname = 'Name of Tenant'

When you setup the user, set the storage roll, and just apply the tenant filter to the other options.

First create your new user and add the "Storage Administrator User" role.

User_-_Administration_-_EMC_M_R.png

Then set the tenname filter for that user's account. User_-_Administration_-_EMC_M_R.png

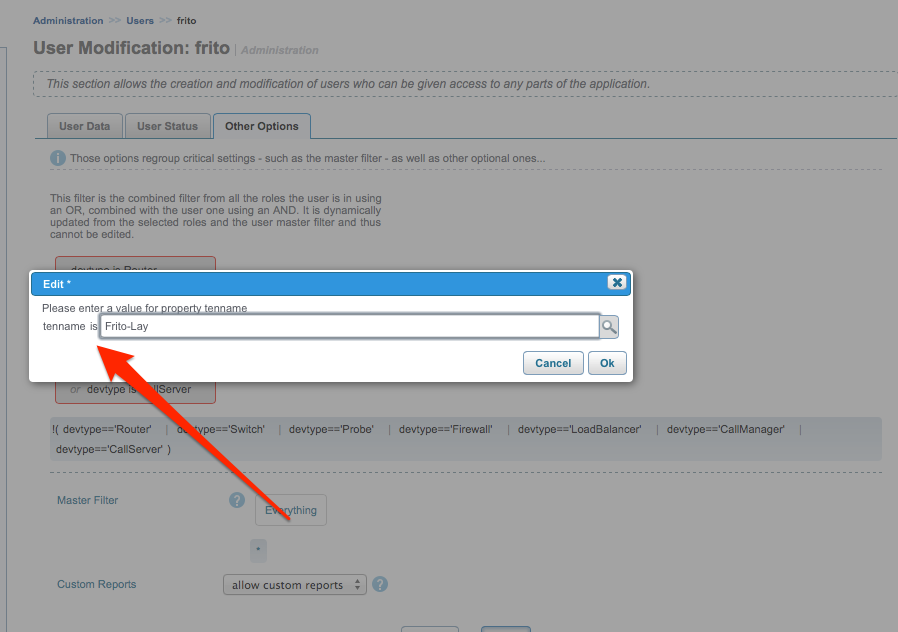
When you are done the tenant's other options should look like this:

User_-_Administration_-_EMC_M_R.png

The ViPR administrator will be able to see all tenants and resources as normal.  This is what they can see when logged in:

Report_-_Tenants_-_EMC_M_R.png

And when the account with the filter setup logs in, they will only see the tenants and projects for that user's tenant in ViPR.

Report_-_Tenants_-_EMC_M_R.png

You can now choose to make the Tenant's landing page the tenant dashboard or project dashboard based on your preferences.  You can do this by setting up a ViPR tenant profile and using the Login Report settings in the Profile Administration as shown by lonespeedster above.

P.S.  This technique will not work if you have multiple tenant's named Frito-Lay.  The name is probably good enough for small shops or quick demonstration purposes.  If you do for some weird reason have multiple  tenants named the same thing then you will have to use the Tenant's ViPR URN instead.  You can see this ID easily if you are in ViPR Portal and edit the tenant as administrator.  Simply set tenid=='urn:storageos:TenantOrg:....' instead of tenname in your user configuration settings.  The tenant's URN ID is the part starting with urn:storageos to the end of the URL in the browser.

Edit_Tenant.png

Use this ID instead of the tenant's name in the user's master filter as shown below and now you can name or rename tenants in ViPR and the tenant view will remain the same regardless of name or number of tenant named the same thing.

User_-_Administration_-_EMC_M_R.png

Enjoy,

Fred

5 Practitioner

 • 

274.2K Posts

October 2nd, 2014 09:00

Yes, SRM does have the ability to setup a multi-tenant environment. Let’s consider a scenario where I’d like to provide access to a set of Isilon shares to a user named “sam”. On a high-level, these are the things I need to do:

NOTE: This is a very simple example of multi-tenancy. We can do a lot more with alert configuration, report customization etc. in SRM with regards to multi-tenancy.


  • Tag the desired resources using the data-enrichment feature
  • Create a role to provide access to the required features in SRM
  • Create a user with required filter
  • Create a use-profile to login with the preferred report (Optional)

< >


This is where I’ll be defining the boundary of what Sam can monitor and avoid him from viewing un-authorized resources. Hence, grouping or tagging resources is the fundamental step in establishing a multi-tenant environment. Having that said, SRM has the ability to tag whatever resources that you’d like to be tagged – storage systems, hosts, LUNs, shares – whatever you need!

The first step is to enable the data-enrichment module on the appropriate solution pack, in this case the Isilon solution pack.


  • Navigate to: Administration > Centralized Management > Data Enrichment
  • Check if you can see the “Collector Manager :: emc Isilon :: ISILON-PTF1” the Data Enrichment inventory


  • If not, enable it by clicking on “Register a new module”. You will be prompted with a “Register a new module” window highlighting all of the Front End, Back end and Collector serves. Choose the collector server which has the Isilon solution pack installed, then choose “collecting” under categories and locate the  “Collector Manager :: emc Isilon :: ISILON-PTF1”. Once located, you can select it and click on “Register


Once you have the data-enrichment registered, click on “Collector Manager :: emc Isilon :: ISILON-PTF1” in the Data-Enrichment inventory view. You will be navigated to the Isilon tagging page named as “Module ‘emc-isilon :: ISILON-PTF1’ on server ‘server-name’”.

This is the place where you would group your desired resources, in our case, the selective Isilon shares. To effectively use the feature, you must be familiar with the property-names used within the SRM application and this post assumes that you know the basics. For more details on property-names and filters, check out the following link: Click here

  • Click on the “New-tagging” and provide a name to tagging. In my case, I’m gonna say “share-owners”. This is basically the name provided to the entire tag-association, which will be used by SRM internally.


  • To tag\group our desired Isilon shares, let’s start with specifying the field for Isilon cluster name. Click on “Add new key”. You will be prompted with a “create new key” window. Type in “device” (which is a “property name” in SRM for identifying a storage system\Array by name) under the field “New column” and choose “string” from the drop-down choice under the “Type” field. Click on “Save”. This is where we will enter our desired Isilon cluster name.


  • Next, let’s create a field to specify the desired Isilon shares. Click on   “new-key” again. Type in “part” (Which is a “property-name” in SRM for identifying resources such as LUNs\Shares etc by name) under the field “New column”. Choose “after device” from the drop down menu under “after” field. Choose “string” from the drop down menu under the “Type” field. Click on “Save”. Obviously, this is where we will be entering the Isilon share-names.
    • Note: The reason why specified the “device” property name in the previous point is to uniquely identify the share-names. This would avoid ambiguity if multiple Isilon clusters have similar share-names.


  • Finally, to tag your shares, we need to specify a new field. In my case I’m trying to group shares based on the respective owners, hence I’m gonna have the name of the as “shownr” (abbreviation for share owner – the reason why I’m using the abbreviation is because the SRM “property-names”  are limited to 8 characters, but the values can be more than 8 characters ). Click on “Add new property” and type “shownr” under the “New column” field. Click on “Save”.


  • It’s time for us to type in the desired shares on my Isilon cluster. Note that when you type the cluster name or share names, SRM will try to autofill, verifying the accuracy of the names.In my case,  the value for the “shownr” is  ‘sam’. Please note that you can create multiple values under a single field (otherwise known as property-name).


  • You’ll have to add the lines manually by clicking on the following icon on the left-end of the inventory.


  • As you can see, all of the entered values are in italic font, meaning that they haven’t been saved into the system. Click on “Save”. You will be prompted with the “Save Data Enrichment” window  to complete the operation (so that the collector can associate the shares with the newly created tag from the next-polling cycle)


We’re done with tagging our Isilon shares. In order for SRM to recognize the newly created “tags” within the entire system, we’ll have to wait for a polling cycling (on the collector server - which happens every 15 minutes) and a refresh of the property-store (on the frontend server- which happens every 1 hour). Now, if you’re impatient as I am, please follow these steps to do a manual refresh:

  • Navigate to Administration > Centralized Management > Physical overview  > “Click on the server where the Isilon Solution Pack is installed”
  • Search for “emc-isilon” to locate the Isilon solution pack. Click on the emc-isilon instance, which will span a new tab named “Collector-Manager – emc-isilon


  • Inside the “Collector-Manager – emc-isilon” tab, click on the “restart” button. This will refresh the collector engine to poll the latest information from the Isilon clusters and apply the newly created tags on the desired Isilon shares.


  • Give it a couple of minutes to complete the polling cycle before proceeding to the next step. This is extremely important. You can check out the tail section of .log file under “Logs” section within “Collector-Manager – emc-isilon” tab (below the restart button) to see if the polling cycle has completed


The second step is to refresh the property-store.

  • Navigate to Administration > Centralized Management -> Physical overview -> “Click on the server where the Frontend is installed
  • Click on the Tasks tab and in the search tab type in “property-store
  • Once you’ve located the “property-store” task, select it and click on “Run now”.


  • It will take a couple of minutes to complete the refresh so please be patient. In the meantime, you can proceed with creating a role.


< >


The roles in SRM will help me define what a SRM user can and can’t do, which is one of the most important steps in a multi-tenant environment.

  • Navigate to Administration > Roles
  • Click on “new role” to create a new role
  • Type the name of role in the name field. In my case “Isilon shares
  • Navigate to the “Template Access” tab. This is where you define the access to several report templates.
    • Mark the following as “read-only
      • RP: EMC Isilon
        • Template: EMC Isilon
      • Default: ReportPack
        • Template ReportPacks
        • Template: SolutionPacks
    • Mark the rest as “No Access
  • Navigate to the “Modules and restriction Access” tab. This is where you specify the feature accessibility
    • Mark “Watch4net Frontend” as “Yes
    • Mark the rest of the options as “No
  • Click on “save” to create the role

By the time you’re done creating the role, the property-store refresh should have been completed


< >


This is relatively a no brainer task. I’ll create a user named “Sam” and attach the user to the tag\group he’s responsible for.


  • Navigate to Administration > Users
  • Click on the “New User” to create a new user
  • Under the “User Data” tab, type in the name of the user in the “User Login” field. Type in the Password in the “New Password” and “Confirm Password” fields
  • Click on the “User Status” tab and select the role that we just created “Isilon shares” and click on “Add Role
  • Click on the “Other Options” tab and click on the “Everything” under “Master Filter” field. Choose “Refine > Using a Wizard” and you will be prompted with the little “Edit” window.


  • Type the name of the field we created in the very first section – “shownr”. Then type in the value for the field, which would be the user-name “sam”. Click on OK


  • Note: If the refresh completed successfully, you should be able to see the property-name being present as an option to auto-fill. If you see, “No Suggestions” then the refresh is not completed yet.
  • Click on “Save” to create the user

< >


Now, if the purpose of having this user is just to monitor the quota usage of his shares, then you can setup a profile that would enable him to view the preferred report the moment he logs in. This can be a useful feature, if the user doesn’t know his way around SRM to browse to his preferred report.


  • Get the URL of the desired report. In my case, it’s the quota usage report:
  • Isolate the report identifier from the URL (highlighted in yellow) minus the forward slash, which would be “0-c2-ffffff32-8bf101bb-13bb7b00-404a2b57-a6075f7e
  • Note you can also add the string “report.jsp” to have full screen report view. The identifier would look like this: report.jsp#/0-c2-ffffff32-8bf101bb-13bb7b00-404a2b57-a6075f7e
  • Navigate to Administration > Profiles
  • Click on “New Profile
  • Under “Main Properties” tab type in the name of the profile under the name field. In my case it’s “sam profile
  • Under the “Customizable settings” add the report identifier (isolated from the URL) under the “Login Report” field. In my case, I’ve used the “report.jsp#/0-c2-ffffff32-8bf101bb-13bb7b00-404a2b57-a6075f7e”


  • Under the Members tab, select the user, in my case “sam” and click on “Add to Profile
  • Click on Save to create the profile.

Now when Sam logs in this is what he’ll be looking at:


Tada!!!!


On the other hand, this is what “sam” will be looking at If I had used the report identifier “0-c2-ffffff32-8bf101bb-13bb7b00-404a2b57-a6075f7e” without the “report.jsp” prefix in the “Login Report” field within the user-profile.


Hope that helps!

No Events found!

Top