How to Recover and Reset the ChromeOS on a Dell Chromebook
Summary: The following article provides information about how to use the ChromeOS recovery tool. Step-by-Step instructions to recover and reset the ChromeOS on a Dell Chromebook.
Instructions
Table of Contents:
- The Chrome Operating System
- Resetting your Dell Chromebook
- Recovering your Dell Chromebook
- Troubleshooting Steps
The Chrome Operating System
The Google Chrome operating system powers Dell Chromebooks. It is based on Google's popular Chrome Browser. It has been developed to provide a fast, simple, and more secure computing experience for users who spend most of their time online.
The key benefits are:
- Fast:
-
A custom BIOS boots in five seconds and resumes in less than one second
- Simple:
-
It updates automatically in the background, and the user data stays in the cloud
- Secure:
-
A file system and firmware that is verified against modifications at boot and during run time and the Trusted Platform Module (TPM) provides added protection
Resetting your Dell Chromebook
All local data that is stored on your Dell Chromebook can be cleared by resetting it to its original factory settings. This is also known as a PowerWash. This is of most use resolving user profile difficulties on your device. Most troubleshooting guides recommend trying a reset before attempting to recover a Chromebook.
-
Sign out of the Chromebook:
-
Method One:
-
Press and hold down the CTRL + ALT + SHIFT + R keys.
-
Select Restart.
-
Select Powerwash > Continue from the box that appears.
-
-
Method Two:
-
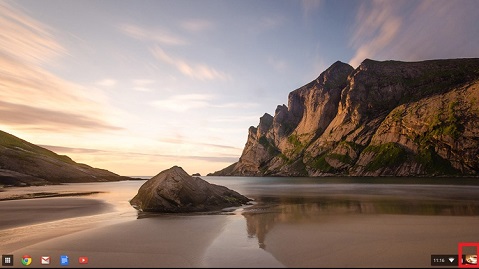
Click the status area in the bottom right-hand side corner - where your account image appears.
-
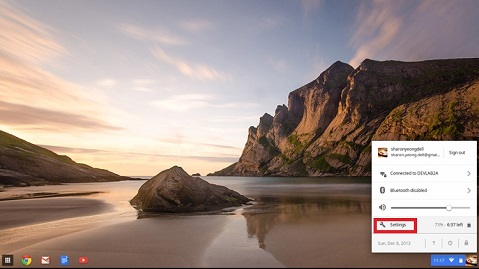
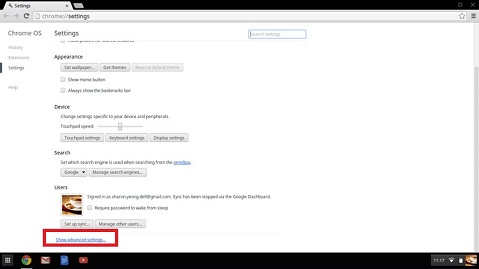
Select Settings and click Show Advanced settings at the bottom of the page.
-
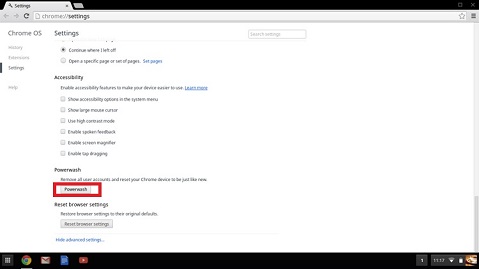
Find the PowerWash section and click Restart.
-
-
-
In the window that opens, select Restart.
This takes it back to how it came fresh from the factory. Running through the setup again for the device is required.
Recovering your Dell Chromebook
This means installing a new version of the ChromeOS on your Dell Chromebook by going through the recovery process. This is important after a major part replacement. (Motherboard or Storage Drive.) Alternatively, if there are problems updating the Chromebook or if it stops working.
Is there a ChromeOS is missing or damaged message? If so, try a hard reset of the Chromebook first. Hold Down Refresh + Power together. If the message continues, carry on with this guide.
Is there a ChromeOS verification is turned off message instead? Pressing Ctrl + D together enables entering developer mode. However, pressing the Space Bar instead - the screen asks to recover the device.
Enter Recover Mode
-
Disconnect any peripheral devices from the faulty Chromebook.
-
Press down and hold the ESC + Refresh keys and press the power button.
-
Release the power button.
Recover using the Internet
-
Select Recover using Internet connection.
-
The on-screen instructions go through the recovery process.
-
The Chromebook restarts to complete the recovery process.
Switch to the following method if the device does not have the Internet recovery option or there is no access to an Internet connection.
Recover using external removable media
Requirements:
- A Chrome device with Administrator rights or a Windows, Mac, or Linux device with Administrator privileges
- An 8 GB or larger USB flash drive card that can be wiped, and that works on the faulty Chromebook
Create a Recovery USB flash drive
Create a recovery drive in ChromeOS
-
On a working Chromebook, go to the Chrome Web Store and install the Chromebook Recovery Utility extension.
-
Open the recovery extension:
-
Click Extensions at the upper right corner of the browser.
-
Click the Chromebook Recovery Utility extension. If the extension window does not automatically appear on your screen, ensure it is turned on.
-
-
Click Get started.
-
Click Select a model from a list. (Alternatively, type in the model number of the Chromebook to recover. The bottom of the error message on the faulty Chromebook screen gives the number.)
-
Click Continue.
-
Connect your USB flash drive to the laptop or desktop.
-
In the dropdown menu, select the USB flash drive that is connected.
-
Click Continue.
-
Click Create now.
-
Remove the USB flash drive from the laptop or desktop, When a message on-screen saying that the recovery media is ready.
Create a recovery drive in Windows
-
Install the Chrome Browser: (If it is not already installed on the laptop or desktop)
-
Go to the Chrome Web Store and install the Chromebook Recovery Utility browser extension.
-
Open the recovery extension:
-
Click Extensions at the upper right corner of the browser.
-
Click the Chromebook Recovery Utility extension. If the extension window does not automatically appear on your screen, ensure it is turned on.
-
-
Click Get started.
-
Click Select a model from a list. (Alternatively, type in the model number of the Chromebook to be recovered. The bottom of the error message on the faulty Chromebook screen gives the number.)
-
Click Continue.
-
Connect your USB flash drive to the laptop or desktop.
-
In the dropdown menu, select the USB flash drive that is connected.
-
Click Continue.
-
Click Create now.
-
Remove the USB flash drive from the laptop or desktop, when a message is on-screen saying that the recovery media is ready.
Create a recovery drive in Linux
-
Use the following link to download the recovery tool:
-
Modify the script permissions to allow the file to run with the following terminal command:
$ sudo chmod 755 linux_recovery.sh -
Run the script with root privileges using the following terminal command:
$ sudo bash linux-recovery.sh -
Follow the prompts from the tool to complete building the recovery image.
Create a recovery drive in macOS
-
Install the Chrome Browser: (If it is not already installed on the Mac)
-
Go to the Chrome Web Store and install the Chromebook Recovery Utility browser extension.
-
Open the recovery extension:
-
Click Extensions at the upper right corner of the browser.
-
Click the Chromebook Recovery Utility extension. If the extension window does not automatically appear on your screen, ensure it is turned on.
-
-
Click Get started.
-
Click Select a model from a list. (Alternatively, type in the model number of the Chromebook to be recovered. The bottom of the error message on the faulty Chromebook screen gives the number.)
-
Click Continue.
-
Connect your USB flash drive to the Mac.
-
In the dropdown menu, select the USB flash drive that is connected.
-
Click Continue.
-
Click Create now.
-
Remove the USB flash drive from the Mac, when a message is on-screen saying that the recovery media is ready.
Reinstall the Chrome Operating System
-
Ensure that the faulty Chromebook is in Recovery Mode.
-
Insert the USB flash drive when the device displays either the ChromeOS is missing or damaged or insert the recovery USB stick on-screen message.
-
Wait for the faulty Dell Chromebook to boot from the flash drive.
-
Follow the on-screen instructions that appear.
-
On successful installation of the ChromeOS, it prompts to remove the USB flash drive.
-
Your Chromebook automatically restarts and boots.
Troubleshooting Steps
The following table has some helpful tips on resolving any trouble seen while carrying out any of the steps above. Contact us to take this further if the faults continue.
| Question | Solution |
|---|---|
| I am unable to recover my Chromebook. | It is recommended to create the recovery media with the latest version of ChromeOS. Avoid using recovery media that may contain an older version of the operating system. It helps to ensure that the latest version of ChromeOS is running once the Chromebook is recovered. |
| An error message - An unexpected error has occurred. |
Try the following steps:
|
| An error message - The device inserted does not contain a ChromeOS. |
Try the following steps:
|
| An error message - The security module on this device is not working. |
Contact the Google Chrome support team. |
| An error message - The ChromeOS recovery image is out-of-date. | Download an up-to-date recovery image. Follow all the instructions exactly as specified in the Create a recovery USB flash drive or SD card. |
| The Chromebook is successfully recovered, but now the USB or SD card cannot be used with Windows. | After completing recovery, format the USB or SD card using the recovery tool. |
| The Chromebook is successfully recovered, but now Windows does not recognize the whole size of the USB or SD card that is used for recovery. | After completing recovery, format the USB or SD card using the recovery tool. |
Additional Information
 Out of warranty? Browse to the Dell.com/support website and enter your Dell Service Tag and view our offers.