Устранение неисправностей жесткого диска или твердотельного накопителя на компьютере Dell
Сводка: В этой статье содержится информация о том, как устранять распространенные неполадки жесткого диска (HDD) или твердотельного накопителя (SSD) на компьютере Dell.
Инструкции
Перед началом работы
В этой статье рассматривается второй этап поиска и устранения неисправностей жестких дисков и твердотельных накопителей на компьютерах Dell. Она начинается с того места, где заканчивается страница библиотеки устранения неполадок с жесткими дисками и SSD .
Предварительные условия
Перед выполнением следующих расширенных инструкций убедитесь, что:
- Отключите ненужные внешние устройства.
- Выполните аппаратный сброс.
- Запустите диагностический тест оборудования
- Проверьте настройки BIOS.
- Убедитесь, что BIOS и драйверы обновлены.
Обзор
В этой статье рассказывается о том, что делать, если действия, описанные на странице библиотеки Устранение неполадок с жестким диском и твердотельным накопителем, прошли или частично устранили проблему, но система по-прежнему работает неправильно в Windows. В том числе:
- Проверка и удаление вирусов и вредоносного ПО
- Восстановление отсутствующих или поврежденных системных файлов Windows
- Восстановление компьютера до предыдущего работоспособного состояния
- Сброс до заводских настроек или переустановка Windows в качестве последнего средства
Симптомы и рекомендуемые действия, описанные в этой статье
Данная статья актуальна, если после выполнения всех предварительных действий выполняется одно или несколько из следующих условий:
|
Симптомы и состояние |
Возможная проблема |
Рекомендуемое действие |
Рекомендации |
|
Компьютер загружается необычно долго и диагностика пройдена; В Windows система работает медленно или не отвечает. |
Снижение производительности файловой системы или вредоносное ПО |
Начните с шага 1. Если проблема не устранена, перейдите к шагу 2. |
Проблемы, связанные с вредоносным ПО и программным обеспечением, могут значительно повлиять на время запуска и производительность. |
|
Компьютер работает медленно или зависает во время использования, диагностика пройдена. |
Программные помехи или ошибки, связанные с диском |
Начните с шага 1. Если проблема не устранена, перейдите к шагу 2. |
Это поведение обычно вызвано конфликтами программного обеспечения, вредоносным ПО или проблемами с файловой системой. |
|
Отображаются сообщения об ошибках, связанных с жестким диском (например, «Data error Reading Drive» или «Seek error»), а признаки указывают на возможное повреждение системных файлов. |
Повреждение программного обеспечения или файловой системы |
Начните с шага 2 и запустите SFC и DISM. Если проблема не устранена, перейдите к шагу 3. |
Эти симптомы обычно возникают в результате повреждения файлов операционной системы, которые можно восстановить с помощью встроенных инструментов. |
|
Проблема возникла после установки программного обеспечения, драйвера или обновления Windows. |
Конфликт программного обеспечения или драйвера |
Функция восстановления системы может отменить недавние изменения, не затрагивая личные файлы. |
|
|
SFC и DISM завершены, но проблема сохраняется. |
Основное повреждение операционной системы |
Перейдите к шагу 3. |
Если инструменты восстановления файлов не помогли устранить проблему, следующим шагом будет восстановление системы. |
|
Компьютер загружается с пустым экраном с мигающим курсором, а Windows не запускается. |
Повреждение загрузочного сектора или MBR |
Начните с шага 3. Если точки восстановления недоступны; перейдите к шагу 4. |
Такое поведение указывает на повреждение на уровне загрузки, требующее восстановления или переустановки. |
|
Во время загрузки отображаются сообщения об ошибках, связанные с операционной системой (например, «Отсутствует операционная система»), и Windows не запускается. |
Повреждение файлов при запуске |
Начните с шага 3. Если точки восстановления недоступны; перейдите к шагу 4. |
Отсутствующий или поврежденный файл запуска не позволяет системе загрузить Windows. |
|
Операционная система на компьютере не загружается, и доступные точки восстановления отсутствуют. |
Повреждение операционной системы или отсутствует загрузочный файл |
Перейдите к шагу 4. |
Если Windows не запускается и параметры восстановления недоступны, требуется переустановка. |
|
Восстановление системы не устранило проблему, или точки восстановления отсутствуют. |
Серьезное повреждение операционной системы |
Перейдите к шагу 4. |
Если параметры восстановления неэффективны, требуется полный сброс настроек или переустановка. |
|
При возникновении любого из вышеперечисленных симптомов диагностический тест завершается ошибкой. |
Возможный аппаратный сбой |
Остановить. Обратитесь в службу технической поддержки Dell. |
При обнаружении проблемы с оборудованием не приступайте к поиску и устранению неисправностей программного обеспечения. |
Расширенные инструкции по поиску и устранению неисправностей
Шаг 1. Проверка наличия вирусов и вредоносного ПО
Выявление и устранение программных угроз, которые могут имитировать ошибки накопителя или вызывать их.
Вирусы и вредоносное ПО могут препятствовать способу Windows считывать и записывать данные на накопитель, вызывая симптомы, которые кажутся идентичными сбоям оборудования, включая низкую производительность, зависание системы, сбои загрузки и ошибки доступа к диску.
Как проверить:
- Откройте раздел «Безопасность Windows». Нажмите кнопку Пуск, введите
Windows Securityи откройте приложение. - Выберите пункт Защита от вирусов и угроз.
- В разделе Текущие угрозы выберите Быстрое сканирование. Для тщательной проверки выберите Параметры сканирования , а затем Полное сканирование.
- Следуйте инструкциям на экране, чтобы поместить обнаруженные угрозы в карантин или удалить их.
- После завершения сканирования перезапустите компьютер и проверьте, устранена ли проблема.
Если проблема устранена после устранения угрозы, причиной является вредоносное ПО. Отслеживайте повторения в системе и убедитесь, что включена защита в режиме реального времени.
Шаг 2. Восстановление отсутствующих или поврежденных системных файлов Windows
Используйте интегрированные средства Windows для сканирования и восстановления поврежденных файлов операционной системы.
В Windows имеются два средства командной строки — System File Checker (SFC) и Deployment Image Service and Management (DISM), которые могут обнаруживать и восстанавливать отсутствующие или поврежденные файлы операционной системы. Эти инструменты устраняют распространенную причину ошибок, связанных с накопителями, которые возникают на уровне программного обеспечения, а не оборудования.
Запуск средства проверки системных файлов (SFC)
SFC сканирует все защищенные системные файлы Windows и заменяет поврежденные или отсутствующие файлы кэшированными чистыми копиями.
- Перезагрузите компьютер и загрузите Windows.
ПРИМЕЧАНИЕ. Если Windows не запускается в обычном режиме, выполните сканирование SFC в безопасном режиме с загрузкой сетевых драйверов. Дополнительные сведения см. в разделе Запуск SFC в безопасном режиме с загрузкой сетевых драйверов.
- Нажмите Пуск и введите в поиске слова «Командная строка».
- Щелкните правой кнопкой мыши командную строку и выберите пункт Запуск от имени администратора.
- Если ваш компьютер зашифрован с помощью BitLocker, введите ключ восстановления при появлении запроса. Вы можете найти ключ, войдя в свою учетную запись на account.microsoft.com
и проверив раздел «Устройства».
- Введите
sfc /scannowв командной строке, а затем нажмите клавишу Enter - Средство проверки системных файлов сканирует все защищенные файлы операционной системы. Не закрывайте окно командной строки, пока сканирование не будет завершено на 100%.
- Перезагрузите компьютер. Если проблема решена, никаких дальнейших действий на этом шаге не требуется. Если проблема не устранена, перейдите к разделу DISM ниже.
Запуск DISM (обслуживание образов развертывания и управление ими)
DISM подключается к Центру обновления Windows онлайн для загрузки и замены поврежденных файлов образа системы, которые SFC не может восстановить самостоятельно. Требуется активное подключение к Интернету.
- Перезагрузите компьютер и загрузите Windows.
ПРИМЕЧАНИЕ. Если Windows не запускается в обычном режиме, выполните сканирование SFC в безопасном режиме с загрузкой сетевых драйверов. Дополнительные сведения см. в разделе Запуск DISM в безопасном режиме с загрузкой сетевых драйверов.
- Нажмите Пуск и введите в поиске слова «Командная строка».
- Щелкните правой кнопкой мыши командную строку и выберите пункт Запуск от имени администратора.
- Если ваш компьютер зашифрован с помощью BitLocker, введите ключ восстановления при появлении запроса. Вы можете найти ключ, войдя в свою учетную запись на account.microsoft.com
- Введите
DISM.exe /Online /Cleanup-image /Restorehealthв командной строке, а затем нажмите клавишу Enter - Дождитесь завершения DISM. Это может занять несколько минут в зависимости от скорости подключения. Не закрывайте окно и не отключайтесь от Интернета во время этого процесса.
- Перезапустите компьютер после завершения DISM и проверьте, устранена ли проблема.
Шаг 3. Восстановление компьютера с помощью функции восстановления системы Windows
Восстановление Windows до предыдущего рабочего состояния, не затрагивая личные файлы.
Восстановление системы Windows возвращает программное обеспечение компьютера, включая установленные приложения, записи реестра Windows и системные настройки, к сохраненной точке восстановления. Она не влияет на личные файлы, такие как документы, фотографии или музыка.
Восстановление системы эффективно в следующих случаях:
- Проблема возникла после недавнего обновления Windows, установки драйвера или изменения программного обеспечения
- SFC и DISM не решили проблему
- Компьютер может загрузиться в Windows (или в безопасном режиме с загрузкой сетевых драйверов).
Как запустить восстановление системы:
Пошаговые инструкции со снимками экрана см. в статье базы знаний Dell: Как использовать восстановление системы в Microsoft Windows.
Шаг 4. Восстановление на компьютере заводских настроек по умолчанию
Сброс до заводских настроек или чистая переустановка Windows устраняет проблемы, которые не могут быть исправлены с помощью исправления или восстановления файлов. Это целесообразно в следующих случаях:
- Все предыдущие действия выполнены, и проблема сохраняется
- Windows не может загрузиться, а восстановление системы недоступно
- Диагностика подтверждает, что накопитель исправен, но Windows серьезно повреждена
Варианты сброса настроек или переустановки Windows:
|
Способ |
Когда использовать |
Хранит личные файлы? |
|
Сбросить этот ПК (сохранить мои файлы) |
Windows может загрузиться; вы хотите переустановить Windows, не потеряв личные файлы. |
Да |
|
Выполнить сброс этого ПК (удалить все) |
Windows может загрузиться; Вам нужна полностью чистая установка. |
Нет |
|
Dell OS Recovery Tool |
Windows не может загрузиться; Необходимо создать USB-накопитель восстановления на другом компьютере. |
Нет |
|
Dell SupportAssist OS Recovery |
Доступно для некоторых систем Dell. загружается в среду восстановления, независимую от Windows |
Нет |
Полные пошаговые инструкции см. в статье базы знаний Dell Сброс к заводским настройкам, восстановление или повторная установка Microsoft Windows на компьютере Dell.
Запуск SFC в безопасном режиме с загрузкой сетевых драйверов
- Вначале компьютер должен быть выключен. Нажмите кнопку питания на компьютере и сразу же начните нажимать клавишу F12 один раз в секунду для доступа к меню загрузки.
- Выберите SupportAssist OS Recovery, чтобы загрузить приложение SupportAssist OS Recovery.
- В SupportAssist OS Recovery нажмите 3 точки
 в правом верхнем углу главного экрана восстановления ОС, чтобы открыть раскрывающееся меню.
 - Выберите Восстановление Windows.
- Компьютер перезагрузится в среду восстановления Windows (WinRE).
- Выберите Поиск и устранение неисправностей>Командная строка «Дополнительные параметры>» (рис. 1)
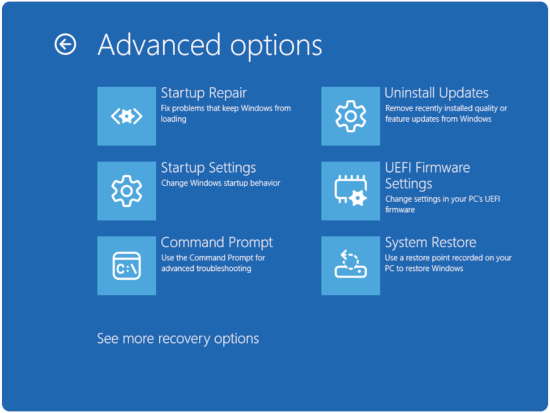
Рис. 1. Дополнительные параметры - Если ваш компьютер зашифрован с помощью BitLocker, введите ключ восстановления при появлении запроса. Вы можете найти ключ, войдя в свою учетную запись на account.microsoft.com
- Введите
sfc /scannowв командной строке, а затем нажмите клавишу Enter. - Средство проверки системных файлов сканирует все защищенные файлы операционной системы. Не закрывайте окно командной строки, пока сканирование не будет завершено на 100%.
- Перезагрузите компьютер. Если проблема решена, никаких дальнейших действий на этом шаге не требуется. Если проблема не устранена, перейдите к разделу DISM ниже.
Запуск DISM в безопасном режиме с загрузкой сетевых драйверов
- Вначале компьютер должен быть выключен. Нажмите кнопку питания на компьютере и сразу же начните нажимать клавишу F12 один раз в секунду для доступа к меню загрузки.
- Выберите SupportAssist OS Recovery, чтобы загрузить приложение SupportAssist OS Recovery.
- В SupportAssist OS Recovery нажмите 3 точки
 в правом верхнем углу главного экрана восстановления ОС, чтобы открыть раскрывающееся меню.
 - Выберите Восстановление Windows.
- Компьютер перезагрузится в среду восстановления Windows (WinRE).
- Выберите Поиск и устранение неисправностей>Командная строка «Дополнительные параметры>» (рис. 2)

Рис. 2. Дополнительные параметры - Если ваш компьютер зашифрован с помощью BitLocker, введите ключ восстановления при появлении запроса. Вы можете найти ключ, войдя в свою учетную запись на account.microsoft.com
- Введите
DISM.exe /Online /Cleanup-image /Restorehealthв командной строке, а затем нажмите клавишу Enter. - Дождитесь завершения DISM. Это может занять несколько минут в зависимости от скорости подключения. Не закрывайте окно и не отключайтесь от Интернета во время этого процесса.
- Перезапустите компьютер после завершения DISM и проверьте, устранена ли проблема.
Дополнительная информация
Рекомендуемые статьи
Ниже приведены некоторые рекомендованные статьи по этой теме, которые могут вас заинтересовать.
- Выявление и устранение неисправностей жесткого диска (HDD) или твердотельного накопителя (HDD или SSD) на компьютере Dell
- Как выполнять поиск и устранение неисправностей жесткого диска RAID на компьютере Dell
- Компьютер Dell не загружает ОС Windows 11 или Windows 10
- Замена жесткого диска на ноутбуке Dell
- Как настроить RAID на базе технологий Intel на компьютере Dell