Dell Inkjet Printers
A printed version of a document can ensure that important documents can be stored safely as it does not depend on electrical power to be accessible and can be easier to reference.
If you are experiencing any of the following symptoms, the suggested quick steps might help.
- General printing issues.
- Error codes.
- Print quality.
Many general printing issues can be resolved by performing the following quick steps.
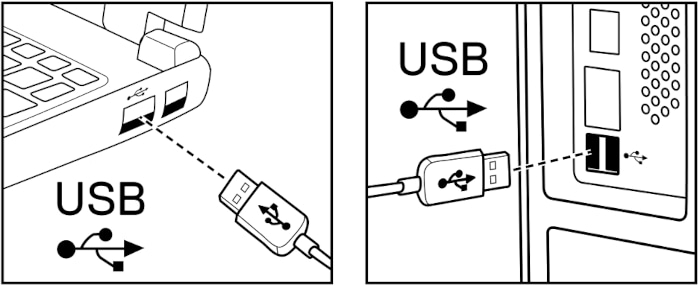
Fix 1: Reseat the USB printer cable to the computer.
When connected by a USB cable, reseat both ends of the cable going from the computer to the printer.
Your USB cable Figure 1 may have come loose. Reseating the connector will ensure good data transfer.

Figure 1: USB Cable Connection
Fix 2: Restart the Computer.
Restarting the computer clears out the computer memory and resets the connection between the computer and the printer.
- Save updates to any open documents.
- Close any open programs or applications.
- Select the Start icon.
- Select the Power icon.
- Select Restart.
Fix 3: Restart the Printer
Restarting the printer clears out the printer memory and resets the connection between the computer and the printer.
- Turn the printer off.
- Unplug the printer power cable from the AC outlet or surge protector and wait at least 30 seconds.
- Plug the printer power cable into the AC outlet or surge protector.
- Turn the printer back on.
Fix 4: Ensure that the wanted printer is set as the default printer.
There may be times when the default printer may have been assigned to another printer or fax, this will cause you not to be able to print.
- Press and hold the Windows key (Windows Button), and then press the R key.
- In the Run box type, shell:PrintersFolder, and then select OK.
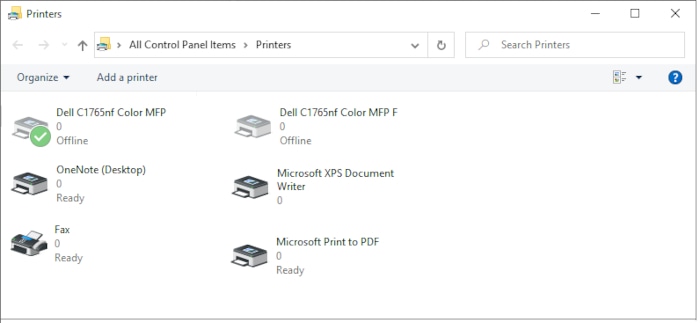
- Touch and hold or right-click the wanted printer Figure 2.
- Select Set as default printer.
NOTE: When Set as the default printer is not an option, it usually means that the printer is already set as the default printer and usually has a checkmark next to it.

Figure 2: Default Printer Option
Fix 5: Run the Printer troubleshooter.
The Printer troubleshooter helps diagnose and automatically correct any printer spooler issues.
- Press and hold the Windows key (Windows Button), and then press the Q key.
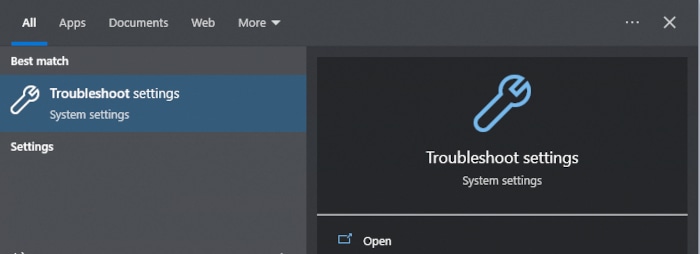
- Type troubleshoot in the search box.
- Select Troubleshoot settings (System settings) in the results list in Figure 3.
- Select Additional troubleshooters.
- Select Printer.
- Select Run the troubleshooter and follow the prompts.

Figure 3: Troubleshoot Search Results
Fix 6: Uninstall and reinstall the driver for your printer.
Sometimes the printer drivers have become corrupted and installing the printer drivers over the existing drivers will not correct the issue. The printer drivers need to be completely removed and then reinstalled.
For more information, see the Dell Knowledge Base article Getting Dell Printer Drivers, Software, User Guides and Firmware.
If these quick steps did not resolve your issue, we have more detailed information in the Other Resources section. You can also search for content related to the issue using the search bar at the top of this page.
Video Resources
Other Resources

How to Troubleshoot Dell Inkjet Printers
Learn how to get printer manuals, Find drivers, Print a test page, Perform Troubleshooting, or Setup your All-In-One (AIO) Inkjet or Photo Printer. How to Troubleshoot Dell Inkjet Printers
Downloading, Installing, and Uninstalling Printer Drivers, Software, Manuals, and Firmware
Driver and firmware releases are designed to update features and correct functionality. It is recommended to update to the latest versions. Downloading, Installing, and Uninstalling Printer Drivers, Software, Manuals, and Firmware
Windows 11 and Windows 10 Compatibility with Dell Printers
Learn which printers have Windows 11 and Windows 10 drivers. Windows 11 and Windows 10 Compatibility with Dell Printers


