AC Adapter
The AC adapter, also called a power adapter or laptop charger is used to provide sufficient power to operate the laptop for extended periods and to recharge the laptop battery. See the suggested quick steps below if you are experiencing any of the following symptoms.
- The AC adapter does not power on the laptop.
- Getting an error message such as ‘AC adapter type cannot be determined’.
- The laptop turns on but does not charge the battery.
- Buzzing noise from the ac adapter.
Follow these quick steps to help resolve your AC adapter issue.
Fix 1: Inspect the AC adapter and power port on the laptop for damage.
When there is damage to the wiring of your AC power adapter, it can cause a short, which can damage your computer or fail, leaving you without a means to charge your battery. Look for frayed cables (Figure 1), exposed wires (Figure 2), a cut in the cable (Figure 3), or a pin that is bent or broken (Figure 4).
For more information, see Dell Knowledge Base article How to Identify AC Adapter Damage on Dell Systems. 
Figure 1: Example of a frayed cable on an ac adapter

Figure 2: Example of an exposed wired on the ac adapter plug

Figure 3: Example of a cut in the cable

Figure 4: Example of a pin that is bent or broken inside the ac adapter plug
Fix 2: Verify that the AC adapter is working correctly.
Dell AC power adapters have a LED light to indicate whether the AC adapter is getting power and is on. The LED light may be on either the AC adapter brick or the adapter (DC) plug.
If the LED light is not on, perform the following steps to help resolve the issue.
- Remove the AC adapter from the wall outlet or surge protector.
- Remove the DC power cord from the computer.
- Remove the AC cord from the AC adapter brick and wait two mins.
- Reseat the AC cord into the AC adapter brick (ensure it goes all the way in).
- Plug the AC cord into an AC outlet that you know works (not into a surge protector for this test).
- Check to see if the LED light comes on.
For more information, see our AC Power Adapter Help and Support site.
Fix 3: Ensure you use the correct Dell AC adapter for your computer.
The AC adapter that came with your computer provides the correct voltage and amperage needed to work correctly. Ensure you are using the AC adapter shipped with your computer or another of the same model.
Dell does not recommend using incompatible or third-party AC adapters with Dell laptops.
Fix 4: Use the Dell AC adapter that came with your Dell docking station.
The following information only applies when you are using a docking station.
The AC adapter that came with your docking station provides the correct voltage and amperage needed to power the computer and docking station. Ensure you are using the AC adapter shipped with your dock or another of the same model.
Dell does not recommend using incompatible or third-party AC adapters with Dell laptops or docking stations.
For more information on the power requirements when using your Dell docking station, see the User Manual of the docking station.
Fix 5: Test with another AC wall outlet.
When the computer seems to be taking longer than normal to charge the battery, it may be due to a poor connection.
Perform the following steps to help resolve the issue.
- Remove the AC adapter from the wall outlet or surge protector.
- Plug the AC cord into another AC outlet that you know works (not into a surge protector for this test).
NOTE: When there is a difference in charging, it may be the surge protector or something interfering with the outlet making good contact.
Fix 6: Connect the DC power cord directly to the laptop.
Another poor connection could be caused by your docking station if you are using one.
Plug the DC power cord directly into the laptop, bypassing the docking station to see if the battery charges quicker and the computer works better.
Fix 7: Ensure you are using the correct charging port.
On some newer computers, the USB-C port is used to power the computer and charge the battery. On these newer computers, there may be more than one USB-C port. Not all USB-C ports can be used to power the computer. Ensure that the USB-C AC adapter is connected to the correct USB-C port on the laptop that supports charging. See the User Manual of the Dell laptop to identify which USB-C port supports charging.
Fix 8: Optimize your Dell computer using the SupportAssist application.
This application ensures your computer has the latest Dell driver and BIOS updates and checks settings to keep your computer efficient and reliable.
- Press and hold the Windows key (Windows Button), and then press the Q key.
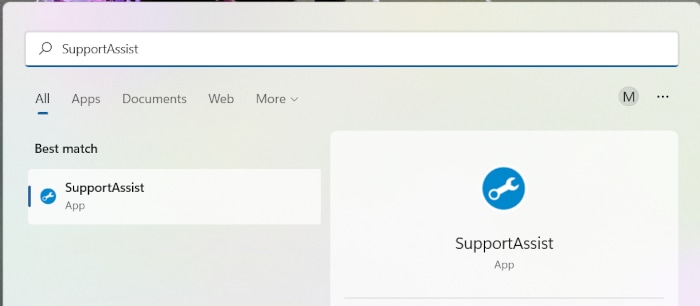
- Type SupportAssist in the search box.
- Select SupportAssist (App) in the list of results in Figure 5.
NOTE: If SupportAssist does not show up in the search results, go to the SupportAssist for PCs and tablets page to download and install SupportAssist.
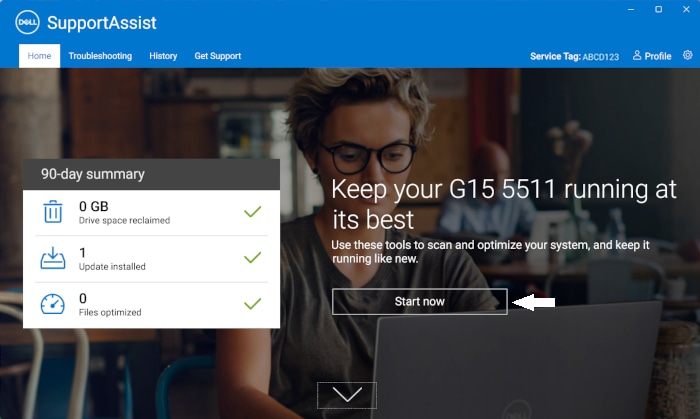
Figure 5: SupportAssist Search Results - Click Start Now to run the tests, Figure 6.
NOTE: You can touch or click the down arrow and then run the individual test. Dell recommends running a full computer test.
Figure 6: SupportAssist Main Screen - SupportAssist runs the tests one by one and provides the results and suggested actions.
Fix 9: Run the AC adapter diagnostics.
Running the AC adapter diagnostics ensures that your AC adapter and the hardware that supports it is working correctly.
To run the diagnostics, browse to the SupportAssist AC adapter hardware test page (the test starts automatically).
If the test fails, contact Dell Technical Support.
If these quick steps did not resolve your issue, we have more detailed information in the Other Resources section. You can also search for content related to the issue using the search bar at the top of this page.


