Ubuntu Server : Configuration d’un processeur graphique à l’aide de l’attribution d’appareil séparé (DDA) sur une machine virtuelle Ubuntu
Résumé: Cet article explique comment configurer un processeur graphique à l’aide de Discrete Device Assignment (DDA) sur une machine virtuelle (VM) Ubuntu Server version 18.04 s’exécutant dans Hyper-V. ...
Cet article concerne
Cet article ne concerne pas
Cet article n’est associé à aucun produit spécifique.
Toutes les versions du produit ne sont pas identifiées dans cet article.
Instructions
Objectif
DDA peut être utilisé pour transmettre un périphérique PCIe entier, dans ce cas un processeur graphique, à une machine virtuelle. Cela permet un accès hautes performances à l’appareil et la possibilité d’utiliser ses pilotes natifs.
Environnement dans cet exemple
Serveur : PowerEdge R740xd exécutant un processeur graphique Windows Server 2019
: NVIDIA Tesla P100
VM : 4 processeurs virtuels, 32 Go de RAM exécutant Ubuntu Server 18.04 LTS
Remarque : Dell Technologies vous recommande de mettre à jour le BIOS, le firmware, les pilotes et le système d’exploitation (OS) dans le cadre de votre cycle de mise à jour planifié. Ces mises à jour sont destinées à améliorer la fiabilité, la stabilité et la sécurité de votre système.
Étapes
-
Installez Windows Server 2019 sur l’hôte et mettez à jour le système d’exploitation. Installez les derniers pilotes de périphérique, tels que les pilotes de chipset et de processeur graphique.
-
Installez le rôle Hyper-V.
-
Créez une machine virtuelle de 2e génération. Désactivez Secure Boot dans les paramètres de la machine virtuelle, puis installez Ubuntu Server 18.04 LTS sur celle-ci.
-
Appliquez les mises à jour Ubuntu. Pour ce faire, exécutez les commandes suivantes dans la machine virtuelle :
$ sudo apt-get update
$ sudo apt-get upgrade
-
Arrêtez la machine virtuelle.
-
Ouvrez le Gestionnaire de périphériques sur l’hôte, développez Cartes graphiques, puis sélectionnez le processeur graphique qui sera présenté à la machine virtuelle.
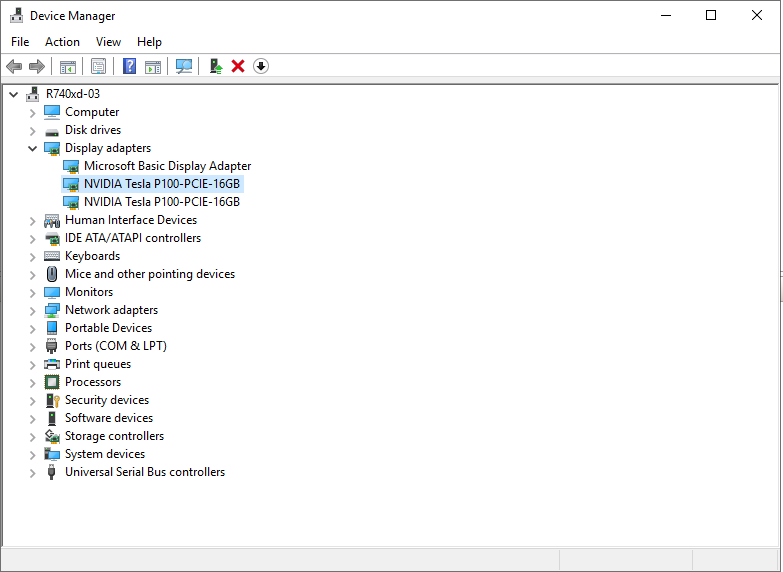
Figure 1 : Gestionnaire de périphériques avec le processeur graphique sélectionné -
Cliquez avec le bouton droit de la souris sur le processeur graphique à utiliser dans la machine virtuelle et sélectionnez Propriétés. Dans l’onglet Details , sélectionnez Property dans la liste déroulante Location paths. Copiez la valeur commençant par PCIROOT dans le Bloc-notes.

Figure 2 : Device Manager Device Properties : chemins d’accès à l’emplacement -
Cliquez avec le bouton droit de la souris sur le processeur graphique dans le Gestionnaire de périphériques et désactivez-le.
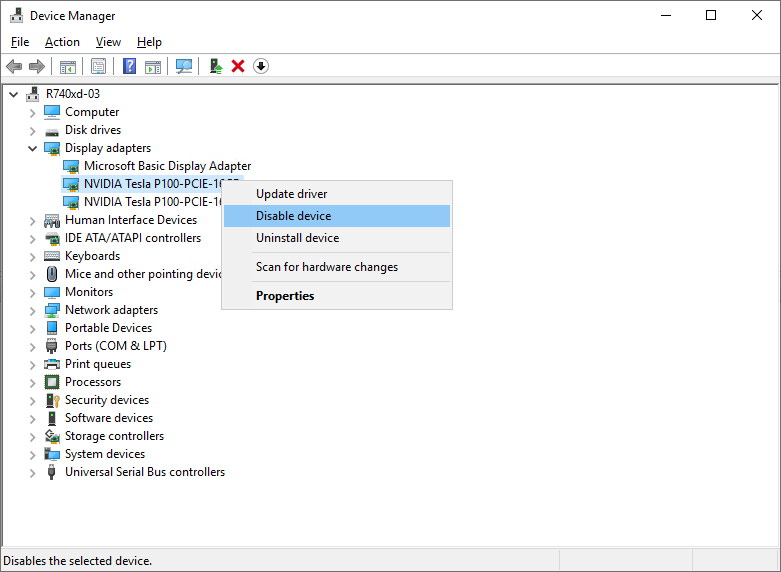
Figure 3 : Désactivation du processeur graphique dans le Gestionnaire de périphériques -
Configurez la machine virtuelle pour DDA à l’aide de PowerShell. Ouvrez PowerShell en tant qu’administrateur et exécutez les commandes suivantes :
# Configure the "Automatic Stop Action" of a VM to TurnOff. Set-VM -Name VMName -AutomaticStopAction TurnOff # Enable Write-Combining on the CPU. Set-VM -VMName VMName -GuestControlledCacheTypes $true # Configure the 32-bit MMIO space. Set-VM -VMName VMName -LowMemoryMappedIoSpace 128Mb # Configure greater than 32-bit MMIO space. Set-VM -VMName VMame -HighMemoryMappedIoSpace 18000Mb # Dismount the device. Dismount-VMHostAssignableDevice -force -LocationPath "step 7 location path goes here" # Assign the device to the VM. Add-VMAssignableDevice -VMName VMName -LocationPath "step 7 location path goes here" -
Démarrez la machine virtuelle.
-
Exécutez les commandes suivantes dans la machine virtuelle pour vérifier qu’elle a identifié le processeur graphique :
$ lspci
$ sudo lshw -C Display
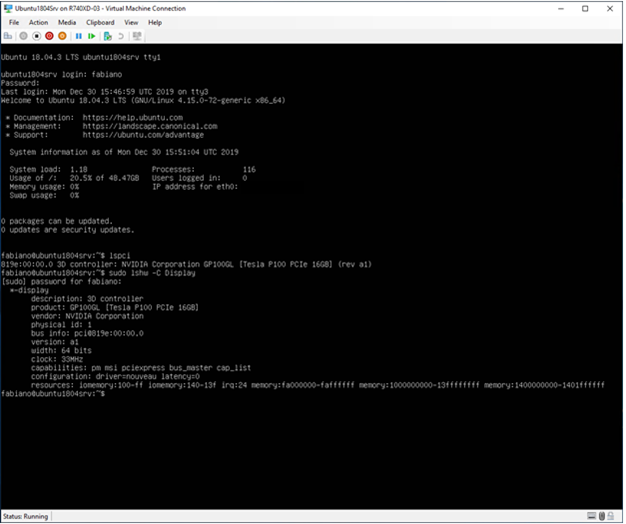
Figure 4 : Sortie de l'lspcietlshwCommandes -
Si la sortie de l’attribut
sudo lshw -C Displayà l’étape 11 indique que le pilote Nouveau est installé (voir Configuration de la Figure 4 ci-dessus) et qu’il doit être désactivé. Nouveau est un pilote gratuit et open-source pour cartes vidéo NVIDIA écrit par des ingénieurs logiciels indépendants. Ce pilote est installé par défaut et doit être désactivé pour pouvoir installer le pilote NVIDIA. Exécutez les commandes suivantes pour désactiver le pilote Nouveau.# Create a file at /etc/modprobe.d/blacklist-nouveau.conf. $ sudo nano /etc/modprobe.d/blacklist-nouveau.conf # Add the following to the newly created file, then save the file. blacklist nouveau options nouveau modeset=0 # Regenerate the kernel initramfs, then reboot. $ sudo update-initramfs -u $ reboot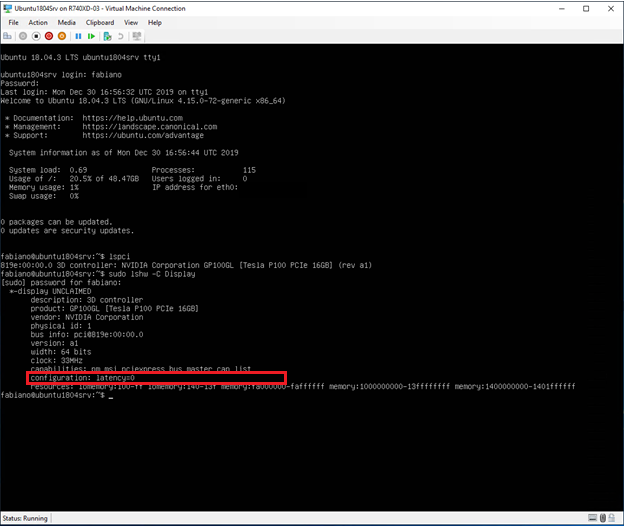
Figure 5 : Sortie de l'lspcietlshwune fois que le pilote Nouveau a été désactivé -
Téléchargez le pilote
NVIDIA, puis installez-le sur la machine virtuelle Ubuntu.
# Run these commands after the file has been copied to the VM. $ sudo dpkg -i nvidia-driver-local-repo-ubuntu1804-440.33.01_1.0-1_amd64.deb $ sudo apt-key add /var/nvidia-driver-local-repo-440.33.01/7fa2af80.pub $ sudo apt-get update $ sudo apt-get install cuda-drivers {Install all the dependencies $ sudo reboot -
Pour vérifier que le pilote est correctement installé, exécutez les commandes suivantes :
$ lspci
$ sudo lshw -C Display
$ nvidia-smi
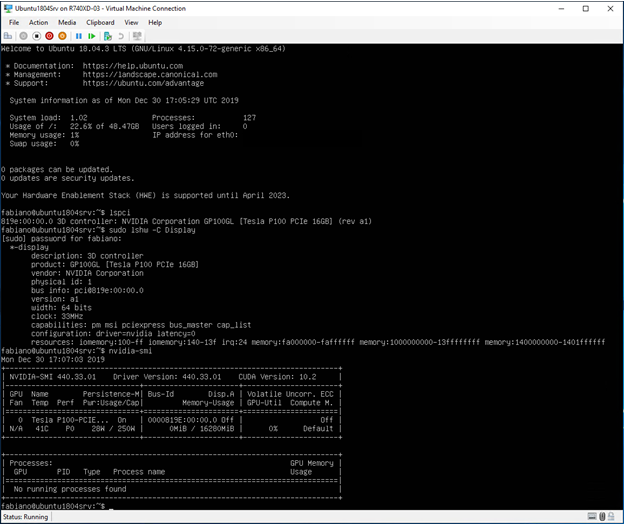
Figure 6 : Sortie de l'lspci,lshwetnvidia-smiaprès l’installation du pilote NVIDIA
Informations supplémentaires
Remplacement d’un processeur graphique dans le système PowerEdge R760 :
Durée : 00:03:10 (hh :mm :ss)
Lorsqu’ils sont disponibles, les paramètres de langue des sous-titres peuvent être choisis à l’aide de l’icône CC sur ce lecteur vidéo.
Produits concernés
Microsoft Windows Server 2019, Microsoft Windows Server 2022, PowerEdge R540, PowerEdge R550, PowerEdge R640, PowerEdge R6415, PowerEdge R650, PowerEdge R650xs, PowerEdge R6515, PowerEdge R6525, PowerEdge R740, PowerEdge R740XD, PowerEdge R740XD2
, PowerEdge R7415, PowerEdge R7425, PowerEdge R750, PowerEdge R750XA, PowerEdge R750xs, PowerEdge R7515, PowerEdge R7525, PowerEdge R840, PowerEdge R940, PowerEdge T640, PowerEdge XE2420, PowerEdge XE7100, PowerEdge XE7420, PowerEdge XE7440, PowerEdge XE8545, Ubuntu Server LTS
...
Propriétés de l’article
Numéro d’article: 000106925
Type d’article: How To
Dernière modification: 18 avr. 2026
Version: 12
Trouvez des réponses à vos questions auprès d’autres utilisateurs Dell
Services de support
Vérifiez si votre appareil est couvert par les services de support.