NetWorker: Unable to Restore ESXi VM Without vCenter Integration Due to Missing UUID
Summary: Save set Exists but unable to restore ESXi Virtual Machine without vCenter Integration on NetWorker due to missing UUID.
This article applies to
This article does not apply to
This article is not tied to any specific product.
Not all product versions are identified in this article.
Symptoms
- When performing a Virtual Machine restore from the NetWorker Management Console (NMC), the Virtual Machine is not listed as a recoverable option.
- The Virtual Machine has backups (save sets) available in NetWorker:
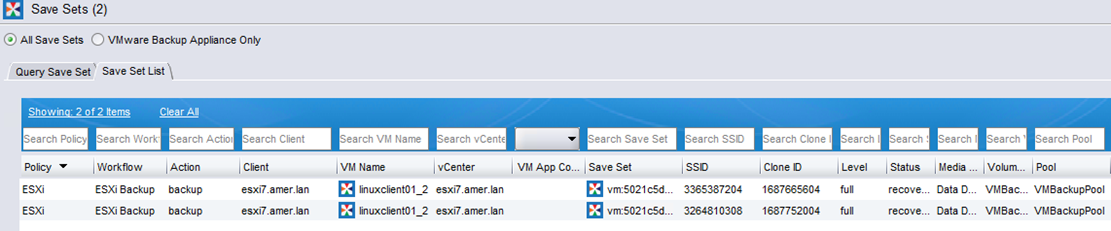
NOTE: Virtual Machine save sets can also be listed with the following NetWorker server command
mminfo -kot -q vmname=vm_name`.
- From VMware View in the NMC, the Virtual Machine does not show a "UUID" field under "Properties"

Cause
With ESX/ESXi integration without vCenter/vSphere, the backed-up Virtual Machine is missing the
vc.uuid parameter created in its vmx files.
The ESX/ESXi host does not configure this parameter during the creation of the Virtual Machine, unlike where Virtual Machines are restored with vCenter integration.
Resolution
NOTE: The following steps must be performed by the VMware admin.
- From the vSphere web client, shut down the Virtual Machine where the issue was encountered.
- Browse to the Virtual Machine's configuration files in the VMware datastore.
- Download the VMX file on the datastore related to the specific Virtual Machine.
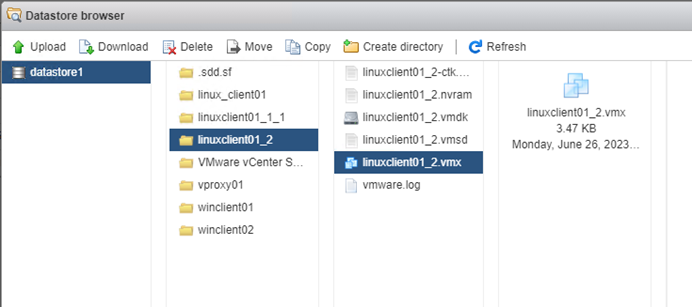
4. Make a copy of the original vmx file, then open the original file in a text editor.
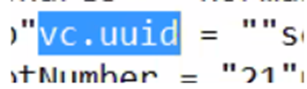
5. Search for
5. Search for
vc.uuid and it should be blank.
6. Manually add a new UUID that is not a duplicate to the ones ESXi is holding record of:

NOTE: VMware commands such as`esxcli vm process list` can be run on the ESXi host to return a list of all running VMs. This list will also show the current assigned UUIDs of VMs. The UUID cannot be a duplicate of another UUID. See VMware documentation for additional command options.
7. Delete the original vmx on ESXi and upload the new one we saved from editing.
8. Run the following command on the ESXi terminal to get the vm-id of the Virtual Machine which was modified:
vim-cmd vmsvc/getallvms
9. Run the following command to reload the Virtual Machine, specifying the vmid from the above command:
vim-cmd vmsvc/reload vmid
10. Power up the Virtual Machine and ensure that it is functioning correctly.
11. Refresh the VMware View on NetWorker Management Console, the Virtual Machine should now have the assigned "UUID" listed:

12. Perform the Virtual Machine restore.
Affected Products
NetWorker FamilyArticle Properties
Article Number: 000216124
Article Type: Solution
Last Modified: 05 Jun 2025
Version: 2
Find answers to your questions from other Dell users
Support Services
Check if your device is covered by Support Services.