Connectrix B-series: Utilisation de PuTTY pour l’authentification par clé SSH
Résumé: Comment utiliser PuTTY pour l’authentification par clé SSH.
Cet article concerne
Cet article ne concerne pas
Cet article n’est associé à aucun produit spécifique.
Toutes les versions du produit ne sont pas identifiées dans cet article.
Instructions
Générez des clés SSH à l’aide de la clé Putty Gen :
1. Exécutez l’outil de génération de clés PuTTY à partir de C :\Program Files\PuTTY\puttygen ou utilisez la commande puttygen à partir de la ligne de commande.
2. Sélectionnez Générer dans la fenêtre Générateur de clés PuTTY. Déplacez la souris pour créer les valeurs aléatoires utilisées pour développer la clé.
3. Sélectionnez des types de clés et des longueurs de bits spécifiques. Les options incluent RSA, l’algorithme de signature numérique, l’algorithme de signature numérique de la courbe elliptique et bien plus encore.
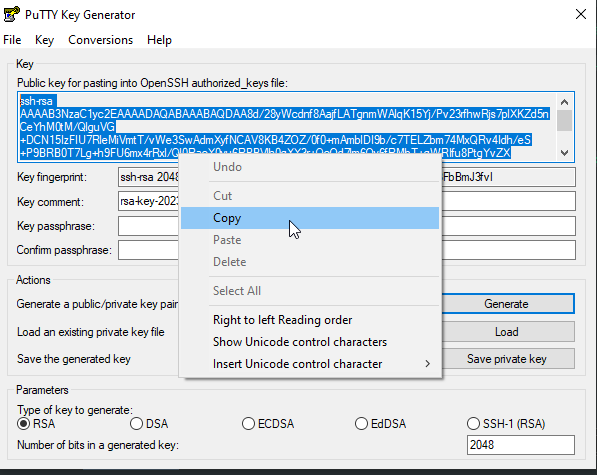
4. Sélectionnez l’intégralité du contenu de la « clé publique à coller dans le fichier authorized_keys OpenSSH » dans la fenêtre Key. Il s’agit de la clé publique. Copiez-le dans le presse-papiers pour le coller dans un fichier de bloc-notes « authorized_keys ».
5. Renommez le fichier authorized_keys en authorized_keys.pub
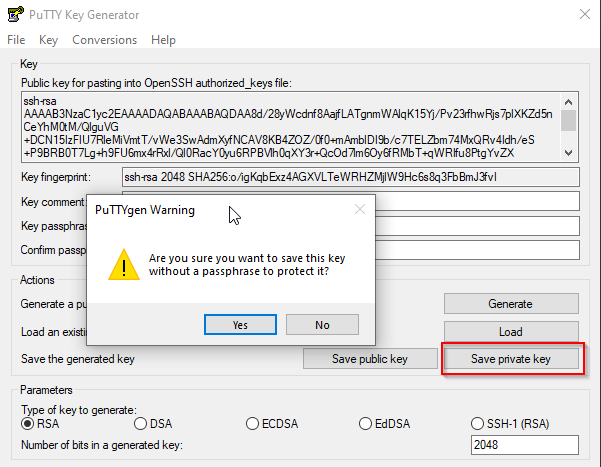
6. Sélectionnez Save private key. Sélectionnez Yes (Oui) dans la fenêtre PuTTYgen Warning (Avertissement PuTTYgen) concernant les phrases secrètes.
7. Connectez-vous au commutateur et importez la clé authorized_keys.pub à l’aide de la commande « sshutil importpubkey ».

Les étapes suivantes permettent de configurer Putty pour l’authentification SSH. L’exemple utilisé est pour putty version 0.79.
1. Lancez PuTTY, mais ne vous connectez pas à un système distant.
2. Dans la fenêtre Catégorie, accédez à Données de connexion>.
3. Définissez le nom d’utilisateur de connexion automatique sur le nom d’utilisateur SSH distant. Il s’agit de l’utilisateur pour lequel vous avez créé le fichier authorized_keys dans la clé putty gen.

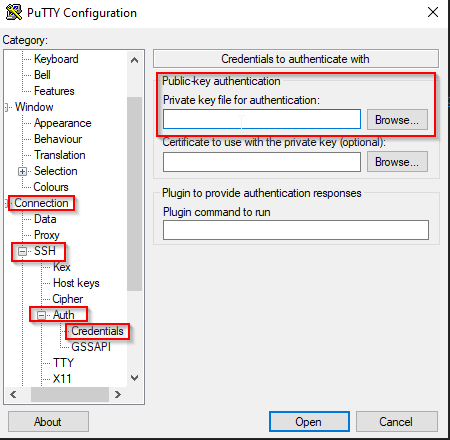
4. Accédez à Connection>SSH>Auth>Credentials. Sélectionnez Parcourir. Recherchez la clé privée enregistrée (.ppk) créée avec l’application PuTTYgen.
5. Tester l’authentification
par clé Vous êtes maintenant prêt à tester la connexion. Attendez-vous à ce que la connexion soit établie sans authentification par mot de passe.
En haut de la fenêtre Catégorie, sélectionnez Session pour revenir à la fenêtre de connexion principale. Dans la zone Nom d’hôte (ou adresse IP), saisissez le nom d’hôte ou l’adresse IP de destination.
6. Sélectionnez Ouvrir pour tester la session. Un message indiquant « Authentication with public key » s’affiche dans la fenêtre de connexion SSH si l’authentification basée sur clé a été configurée correctement.
7. Vous avez correctement configuré PuTTY pour utiliser l’authentification par clé.
1. Exécutez l’outil de génération de clés PuTTY à partir de C :\Program Files\PuTTY\puttygen ou utilisez la commande puttygen à partir de la ligne de commande.
2. Sélectionnez Générer dans la fenêtre Générateur de clés PuTTY. Déplacez la souris pour créer les valeurs aléatoires utilisées pour développer la clé.
3. Sélectionnez des types de clés et des longueurs de bits spécifiques. Les options incluent RSA, l’algorithme de signature numérique, l’algorithme de signature numérique de la courbe elliptique et bien plus encore.
4. Sélectionnez l’intégralité du contenu de la « clé publique à coller dans le fichier authorized_keys OpenSSH » dans la fenêtre Key. Il s’agit de la clé publique. Copiez-le dans le presse-papiers pour le coller dans un fichier de bloc-notes « authorized_keys ».
Remarque : Ne créez pas ou n’utilisez pas la clé publique créée en cliquant sur le bouton radial « Save public key » (Enregistrer la clé publique).
5. Renommez le fichier authorized_keys en authorized_keys.pub
6. Sélectionnez Save private key. Sélectionnez Yes (Oui) dans la fenêtre PuTTYgen Warning (Avertissement PuTTYgen) concernant les phrases secrètes.
7. Connectez-vous au commutateur et importez la clé authorized_keys.pub à l’aide de la commande « sshutil importpubkey ».
Les étapes suivantes permettent de configurer Putty pour l’authentification SSH. L’exemple utilisé est pour putty version 0.79.
1. Lancez PuTTY, mais ne vous connectez pas à un système distant.
2. Dans la fenêtre Catégorie, accédez à Données de connexion>.
3. Définissez le nom d’utilisateur de connexion automatique sur le nom d’utilisateur SSH distant. Il s’agit de l’utilisateur pour lequel vous avez créé le fichier authorized_keys dans la clé putty gen.
Remarque : Ignorez cette partie si vous souhaitez saisir le nom d’utilisateur manuellement chaque fois que vous vous connectez au commutateur.
4. Accédez à Connection>SSH>Auth>Credentials. Sélectionnez Parcourir. Recherchez la clé privée enregistrée (.ppk) créée avec l’application PuTTYgen.
5. Tester l’authentification
par clé Vous êtes maintenant prêt à tester la connexion. Attendez-vous à ce que la connexion soit établie sans authentification par mot de passe.
En haut de la fenêtre Catégorie, sélectionnez Session pour revenir à la fenêtre de connexion principale. Dans la zone Nom d’hôte (ou adresse IP), saisissez le nom d’hôte ou l’adresse IP de destination.
6. Sélectionnez Ouvrir pour tester la session. Un message indiquant « Authentication with public key » s’affiche dans la fenêtre de connexion SSH si l’authentification basée sur clé a été configurée correctement.
7. Vous avez correctement configuré PuTTY pour utiliser l’authentification par clé.
Produits concernés
Connectrix B-SeriesProduits
ConnectrixPropriétés de l’article
Numéro d’article: 000217157
Type d’article: How To
Dernière modification: 18 mai 2026
Version: 5
Trouvez des réponses à vos questions auprès d’autres utilisateurs Dell
Services de support
Vérifiez si votre appareil est couvert par les services de support.