PowerProtect: VM Restore Stuck at Queued with Zero Percent Progress
Summary: In PowerProtect Virtual Machine (VM) restore operations may remain in a Queued state with no progress. This affects all restore types including File Level Restore, Restore as New, and Instant Access. ...
This article applies to
This article does not apply to
This article is not tied to any specific product.
Not all product versions are identified in this article.
Symptoms
- VM restore jobs remain in Queued status with 0% progress
- Jobs may cancel automatically after 24 hours
- Affected restore types include:
- File Level Restore
- Restore as New
- Instant Access
- VM backups complete successfully
- No errors linked to the Job ID in
vmdm.log(in versions prior to 19.15)
Log: vmdm.log
Log Location: /var/log/brs/vmdm
- In newer versions of PowerProtect Data Manager (19.15 and later), errors as seen below can be observed:
ERROR - issue with certificate when execute request hostname: <DD IP>, username: ppdm-user
ERROR - The operation was unsuccessful because of an issue with certificate. Verify that the certificate was accepted.
ERROR - SSL handshake failed Read timed out
ERROR - unable to get thumbprint for datadomainfqdn:3009
Cause
A certificate mismatch or expired certificate between PowerProtect Appliance and the PowerProtect DD.
Common causes include:
- Missing or expired Data Domain certificate in PowerProtect
- Changed Data Domain certificate thumbprint
- Expired Data Domain certificate on the Data Domain itself
VM restores use REST Application Programming Interface (API) calls that require a valid DD certificate. VM backups use DD Boost and are unaffected.
Resolution
Renew or add the PowerProtect DD certificate to PowerProtect Data Manager.
Check if the DD certificate is expired on the DD:
- The DD administrator must renew the certificate
- Refer to: Data Domain: Web UI Inaccessible Due to Expired https Certificate
- After renewal, return to PowerProtect and follow steps 1–5 below
Check if using PowerProtect 19.14 or later:
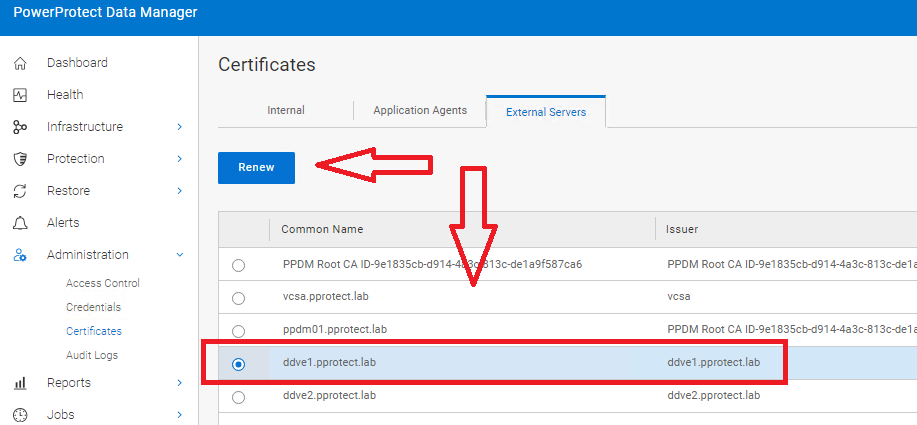
- In the PowerProtect UI, go to Administration > Certificates
- Select the External Servers tab
- Locate the affected Data Domain
- Click Renew
- Click Accept to trust the certificate
Check if using PowerProtect 19.13 or earlier or the certificate is missing:
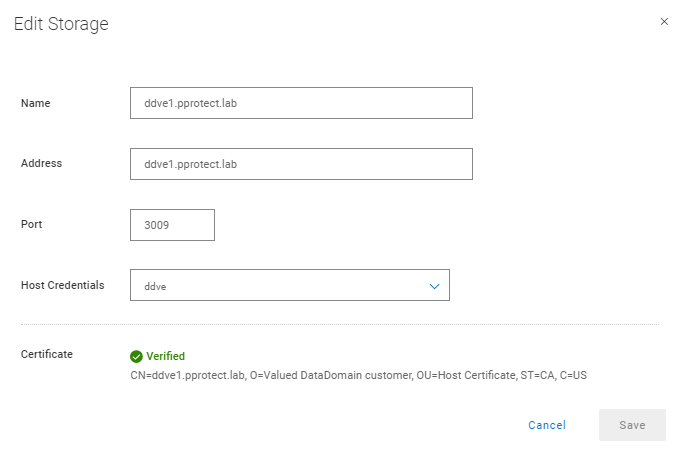
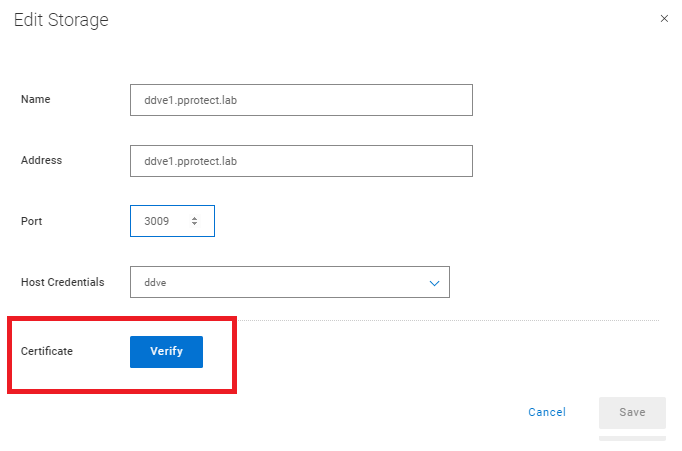
- In the PowerProtect Data Manager UI, go to Infrastructure > Storage
- Click the Data Domain name under the Managed By column
- In the Edit Storage screen:
- Change the port from 3009 to 3008, then back to 3009
- This reveals the Certificate Verify button
- Click Verify and then Accept the certificate
Screenshots of steps 3 and 4 mentioned above (19.13)
Click Verify and Accept the Data Domain certificate.
Additional Information
If VM restores are stuck at queued with 0% progress but this article's logs do not match, check Dell article PowerProtect: Virtual Machine Restore stops responding at 0 percent.
Affected Products
PowerProtect Data ManagerProducts
Data DomainArticle Properties
Article Number: 000223086
Article Type: Solution
Last Modified: 21 كانون الثاني 2026
Version: 3
Find answers to your questions from other Dell users
Support Services
Check if your device is covered by Support Services.