允許特定 Dell Latitude 筆記型電腦之 PXE 引導的 BIOS 設定
Summary: 本文說明如何配置 BIOS 設定以允許特定 Dell Latitude 筆記型電腦的 PXE 引導。
This article applies to
This article does not apply to
This article is not tied to any specific product.
Not all product versions are identified in this article.
Symptoms
如何存取 BIOS 或 UEFI (又稱為「系統設定」)?
若要在 Dell 電腦上存取 BIOS 或 UEFI,請在啟動期間於 Dell 標誌畫面按下 F2 鍵數次。
或者,您也可以在啟動期間於 Dell 標誌畫面按下 F12 鍵數次,然後從功能表中選取「BIOS Setup」或「System Setup」。
進入 BIOS 畫面後,下列 BIOS 設定應已準備就緒,可用於 Latitude 筆記型電腦的 PXE 引導。根據您使用的機型而定,Latitude 筆記型電腦會有不同的 BIOS 使用者介面。
注意:請確認您已從 Dell 支援下載並安裝適用於您 Latitude 筆記型電腦的最新 BIOS 更新 |BIOS 類別下的驅動程式與下載網站。
Cause
沒有可用的原因資訊。
Resolution
在 Latitude 7x10 和 7x00 的 BIOS 中啟用 PXE 引導
- 前往 一般 > 開機順序,然後選取以啟用 Windows 開機管理程式。

- 前往 一般 > 進階開機選項,然後選取下方的 啟用 UEFI 網路堆疊 :

- 由於這些較新的 Latitude 筆記型電腦機型沒有 NIC 連線,因此請核取以啟用 System Configuration >USB Configuration 下的 Enable USB Boot Support (圖 3):

- 勾選以在系統組態->Thunderbolt 配接卡組態下啟用 Thunderbolt、啟用 Thunderbolt 開機支援,以及啟用 TBT (以及 TBT 背後的 PCIE) 開機前模組,即使您沒有連接至 Thunderbolt 擴充基座:

- 根據 PXE 伺服器的設定方式而定,可能必須暫時停用 General-Secure> Boot-Secure> Boot Enable 下的 Secure Boot Enable,直到影像部署完成後 (圖 5):

- 在 Post Behavior 下, Fastboot 必須設為 Thorough:

注意:使用 Display-Link 驅動程式的 Dell 擴充基座 (例如 D6000 系列和 D3100) 將不允許 PXE 引導。這些擴充基座的驅動程式不會在進入 Windows 前的環境中載入。雖然 Dell 不建議透過擴充基座連接來進行 PXE 引導,但您可以使用 USB Type-C 轉乙太網路硬體鎖 (例如 Dell SKU# 470-ABND) 來完成此操作。
在 Latitude 7x20 和 7x30 的 BIOS 中啟用 PXE 引導
- 選取 連線,然後確定啟用 UEFI 網路堆疊已設為 啟用。

- 選取 Integrated Devices。
- 向下捲動以查看 USB/Thunderbolt Configuration,然後選取 Enable USB Boot Support。
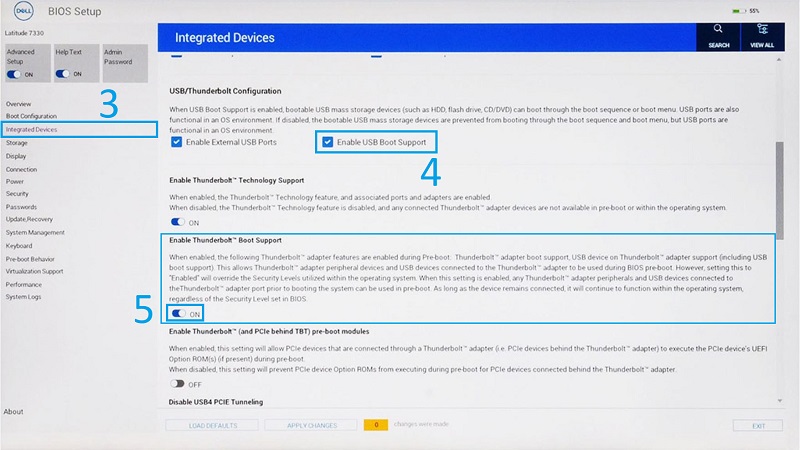
- 請確定 Enable Thunderbolt Boot Support (啟用 Thunderbolt 開機支援) 設為 ONn。
- 按一下 Apply Changes 以儲存變更。
Additional Information
建議的文章
以下是一些與本主題相關的建議文章,您可能會感興趣。
Affected Products
Latitude 7200 2-in-1, Latitude 7210 2-in-1, Latitude 7300, Latitude 7310, Latitude 7320, Latitude 7320 Detachable, Latitude 7330, Latitude 7400 2-in-1, Latitude 7400, Latitude 7410, Latitude 7420, Latitude 7430, Latitude 7520, Latitude 7530Article Properties
Article Number: 000131551
Article Type: Solution
Last Modified: 22 May 2025
Version: 7
Find answers to your questions from other Dell users
Support Services
Check if your device is covered by Support Services.