PowerStore: Jak włączyć logowanie SFTP bez hasła na serwerze NAS tylko SMB
Summary: Ten artykuł zawiera wskazówki dotyczące włączania logowania SFTP bez hasła dla konta SMB na serwerze NAS tylko SMB dla PowerStore.
Instructions
-
Wygeneruj parę kluczy SSH na dowolnym serwerze Linux
[administrator@my-linux-server ~]$ ssh-keygen -t rsa
Generating public/private rsa key pair.
Enter file in which to save the key (/home/administrator/.ssh/id_rsa):
Enter passphrase (empty for no passphrase):
Enter same passphrase again:
Your identification has been saved in /home/administrator/.ssh/id_rsa.
Your public key has been saved in /home/administrator/.ssh/id_rsa.pub.
The key fingerprint is:
SHA256:FGwVwmaboco...GC86v+4pc administrator@my-linux-server
The key's randomart image is:
+---[RSA 3072]----+
|     . =+o+o     |
|    . + @o.      |
| o + . O.*       |
|* . = +.B        |
|.= + o =So       |
|o . . o . .      |
|o. o ..          |
|+ +..E           |
|   :)            |
+----[SHA256]-----+
Oto, co powinno być widoczne w folderze .ssh:
[administrator@my-linux-server .ssh]# ls /home/administrator/.ssh/
id_rsa
id_rsa.pub
known_hosts
-
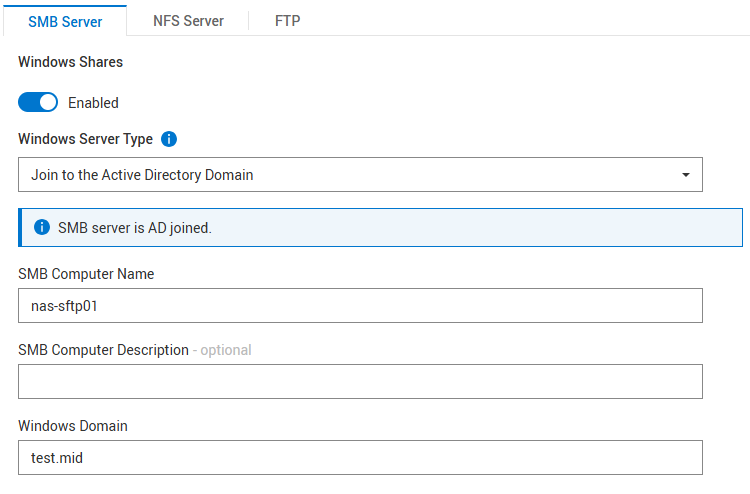
Utworzenie serwera NAS SMB przyłączonego do usługi Windows AD
Na przykład serwer NAS nas-sftp01:
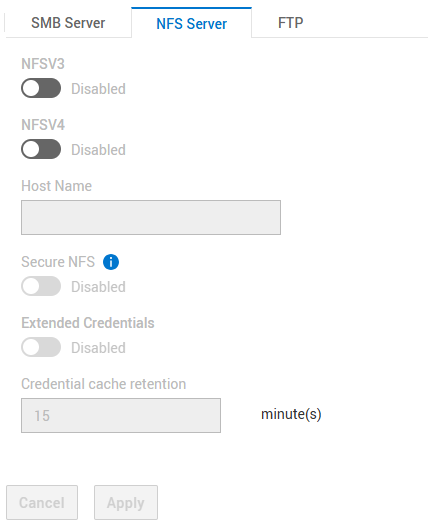
NFS nie jest wymagany
Ustawienia dla SFTP:
- Protokół SFTP włączony
- Dostęp do serwera FTP/SFTP: Użytkownicy SMB
- Ograniczenie katalogu głównego: Enabled
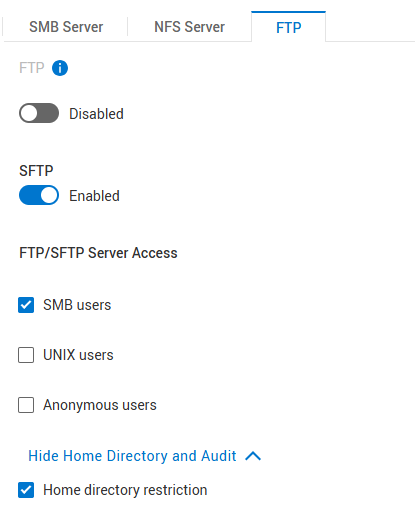
Opcja "Home Directory Restriction" umożliwia użytkownikowi tylko otwarcie folderu /Home/, ale nie widzi niczego ponad tym. Usuń zaznaczenie tej opcji, jeśli użytkownik powinien mieć dostęp do katalogu głównego serwera NAS i systemów plików.
-
Tworzenie systemu plików
Utwórz system plików w ramach utworzonego powyżej serwera NAS i utwórz udział SMB.
Przykładowa nazwa systemu plików: nas-sftp-fs01.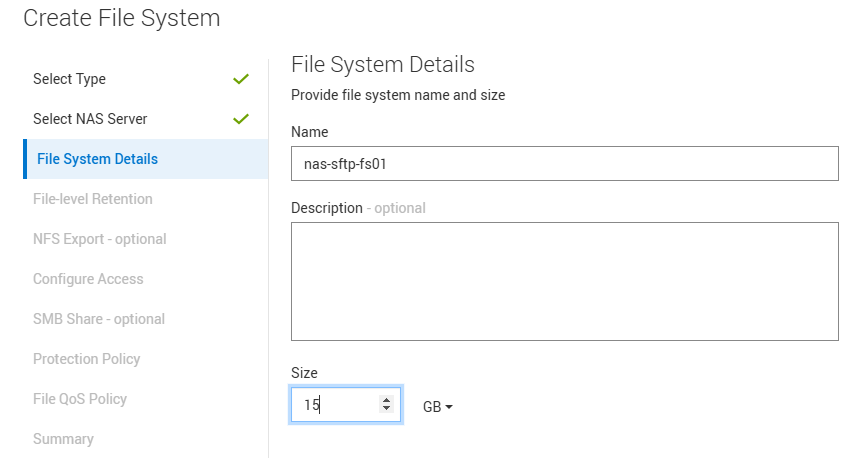
-
Włącz HomeDir dla serwera NAS nas-sftp01
Prześlij plik konfiguracyjny katalogu głównego do plików lokalnych usług > nazewnictwa serwera > NAS.
Zauważ, że umieszczasz tutaj tylko nazwę systemu plików nas-sftp-fs01. Skorzystaj z tego szablonu, aby uzyskać wskazówki:Examples: mydomain:*:/fs2/<d>/<u>:regex:create mydomain:usr1:/fs1/usr1 !:tom:/fs1/tom test:*:/nas-sftp-fs01/<d>/<u>:regex:create
-
Tworzenie użytkownika w usłudze Windows AD
Demonstracja na przykładzie testera użytkownika.
Zaloguj się z dowolnego klienta Windows (przyłączonego do Windows AD) za pomocą testera użytkowników i uzyskaj dostęp do katalogu domowego \\nas-sftp01\HOME , aby utworzyć katalog domowy testera użytkowników. -
Przejdź do serwera Linux, na którym utworzono parę kluczy SSH, a następnie przejdź do lokalizacji, w której klucz jest przechowywany.
Musisz zmienić nazwę pliku id_rsa.pub na autorized_keys
[administrator@my-linux-server]$ cd /home/administrator/.ssh/
[administrator@my-linux-server .ssh]$ pwd
/home/administrator/.ssh

[administrator@my-linux-server .ssh]$ ls -la
total 16
drwx------.  2 administrator administrator   57 Mar  4 09:58 .
drwx------. 20 administrator administrator 4096 Jan 23 08:21 ..
-rw-------.  1 administrator administrator 2622 Mar  3 08:19 id_rsa
-rw-r--r--.  1 administrator administrator  582 Mar  3 08:19 id_rsa.pub
-rw-r--r--.  1 administrator administrator  909 Mar  4 08:34 known_hosts

[administrator@my-linux-server .ssh]$ mv id_rsa.pub authorized_keys
-
Otwórz połączenie sftp z serwerem NAS dla nowo utworzonego użytkownika
Utwórz folder .ssh i przenieś nowy authorized_keys plików do folderu .ssh/ z powyższej lokalizacji (w tym przykładzie jest to /home/administrator/.ssh/).
Zastąp xx.xx.xx.xx ciągiem adres IP lub nazwę serwera NAS.[administrator@my-linux-server .ssh]$ sftp test\\tester@xx.xx.xx.xx test\tester@xx.xx.xx.xx's password: Connected to xx.xx.xx.xx. sftp> sftp> mkdir .ssh sftp> cd .ssh/ sftp> put /home/administrator/.ssh/authorized_keys Uploading /home/administrator/.ssh/authorized_keys to /.ssh/authorized_keys /home/administrator/.ssh/authorized_keys 100% 582 863.0KB/s 00:00 sftp> ls -la drwxrwxrwx 2 2147483653 2147483653 2147483653 152 Mar 4 10:19 . drwxr-xr-x 3 2147483653 2147483653 2147483653 152 Mar 4 10:19 .. -rw-r--r-- 1 2147483653 2147483653 2147483653 582 Mar 4 10:19 authorized_keys
-
Ustaw uprawnienie 700 do folderu .ssh i 600 do pliku .ssh/authorized_keys za pomocą polecenia "chmod" w SFTP
sftp> ls -la
drwxr-xr-x   3 2147483650 2147483650 2147483650           8192 Mar  4 12:30 .
drwxr-xr-x   3 2147483650 2147483650 2147483650           8192 Mar  4 12:30 ..
drwxrwxrwx   2 2147483650 2147483650 2147483650            152 Mar  4 12:30 .ssh
-rw-r--r--   1 2147483650 2147483650 2147483650              9 Mar  4 12:22 TESTER_HOME_dir.txt

sftp> chmod 700 .ssh/
Changing mode on /.ssh/
sftp> chmod 600 .ssh/authorized_keys
Changing mode on /.ssh/authorized_keys
sftp> ls -la
drwxr-xr-x   3 2147483650 2147483650 2147483650           8192 Mar  4 12:30 .
drwxr-xr-x   3 2147483650 2147483650 2147483650           8192 Mar  4 12:30 ..
drwx------   2 2147483650 2147483650 2147483650            152 Mar  4 12:30 .ssh
-rw-r--r--   1 2147483650 2147483650 2147483650              9 Mar  4 12:22 TESTER_HOME_dir.txt

sftp> cd .ssh/
sftp> ls -la
drwx------   2 2147483650 2147483650 2147483650            152 Mar  4 12:30 .
drwxr-xr-x   3 2147483650 2147483650 2147483650           8192 Mar  4 12:30 ..
-rw-------   1 2147483650 2147483650 2147483650            582 Mar  4 12:30 authorized_keys
-
Testowanie dostępu
Teraz powinno być możliwe otwarcie serwera sftp bez podawania hasła.
Możesz użyć opcji sftp -v, aby wyświetlić dane logowania.[administrator@my-linux-server .ssh]$ sftp -v test\\tester@xx.xx.xx.xx OpenSSH_8.0p1, OpenSSL 1.1.1k FIPS 25 Mar 2021 debug1: Reading configuration data /etc/ssh/ssh_config debug1: Reading configuration data /etc/ssh/ssh_config.d/05-....conf debug1: Reading configuration data /etc/crypto-policies/back-ends/openssh.config debug1: configuration requests final Match pass debug1: re-parsing configuration debug1: Reading configuration data /etc/ssh/ssh_config debug1: Reading configuration data /etc/ssh/ssh_config.d/05-....conf debug1: Reading configuration data /etc/crypto-policies/back-ends/openssh.config debug1: Connecting to xx.xx.xx.xx [xx.xx.xx.xx] port 22. debug1: Connection established. debug1: identity file /home/administrator/.ssh/id_rsa type -1 debug1: identity file /home/administrator/.ssh/id_rsa-cert type -1 debug1: identity file /home/administrator/.ssh/id_dsa type -1 debug1: identity file /home/administrator/.ssh/id_dsa-cert type -1 debug1: identity file /home/administrator/.ssh/id_ecdsa type -1 debug1: identity file /home/administrator/.ssh/id_ecdsa-cert type -1 debug1: identity file /home/administrator/.ssh/id_ed25519 type -1 debug1: identity file /home/administrator/.ssh/id_ed25519-cert type -1 debug1: identity file /home/administrator/.ssh/id_xmss type -1 debug1: identity file /home/administrator/.ssh/id_xmss-cert type -1 debug1: Local version string SSH-2.0-OpenSSH_8.0 debug1: Remote protocol version 2.0, remote software version OpenSSH_8.4 debug1: match: OpenSSH_8.4 pat OpenSSH* compat 0x04000000 debug1: Authenticating to xx.xx.xx.xx:22 as 'test\\tester' debug1: SSH2_MSG_KEXINIT sent debug1: SSH2_MSG_KEXINIT received debug1: kex: algorithm: curve25519-sha256 debug1: kex: host key algorithm: ecdsa-sha2-nistp256 debug1: kex: server->client cipher: aes256-gcm@openssh.com MAC: <implicit> compression: none debug1: kex: client->server cipher: aes256-gcm@openssh.com MAC: <implicit> compression: none debug1: kex: curve25519-sha256 need=32 dh_need=32 debug1: kex: curve25519-sha256 need=32 dh_need=32 debug1: expecting SSH2_MSG_KEX_ECDH_REPLY debug1: Server host key: ecdsa-sha2-nistp256 SHA256:xyc9xUOiKbYg4TEvY8wahgq9ous3ocRTbTWBEmK5wgk debug1: Host 'xx.xx.xx.xx' is known and matches the ECDSA host key. debug1: Found key in /home/administrator/.ssh/known_hosts:6 debug1: rekey out after 4294967296 blocks debug1: SSH2_MSG_NEWKEYS sent debug1: expecting SSH2_MSG_NEWKEYS debug1: SSH2_MSG_NEWKEYS received debug1: rekey in after 4294967296 blocks debug1: Will attempt key: /home/administrator/.ssh/id_rsa debug1: Will attempt key: /home/administrator/.ssh/id_dsa debug1: Will attempt key: /home/administrator/.ssh/id_ecdsa debug1: Will attempt key: /home/administrator/.ssh/id_ed25519 debug1: Will attempt key: /home/administrator/.ssh/id_xmss debug1: SSH2_MSG_EXT_INFO received debug1: kex_input_ext_info: server-sig-algs=<ssh-ed25519,sk-ssh-ed25519@openssh.com,ssh-rsa,rsa-sha2-256,rsa-sha2-512,ssh-dss,ecdsa-sha2-nistp256 ,ecdsa-sha2-nistp384,ecdsa-sha2-nistp521,sk-ecdsa-sha2-nistp256@openssh.com,webauthn-sk-ecdsa-sha2-nistp256@openssh.com> debug1: SSH2_MSG_SERVICE_ACCEPT received debug1: Authentications that can continue: publickey,password debug1: Next authentication method: publickey debug1: Trying private key: /home/administrator/.ssh/id_rsa debug1: Authentication succeeded (publickey). Authenticated to xx.xx.xx.xx ([xx.xx.xx.xx]:22). debug1: channel 0: new [client-session] debug1: Requesting no-more-sessions@openssh.com debug1: Entering interactive session. debug1: pledge: network debug1: Sending environment. debug1: Sending env LANG = en_IE.UTF-8 debug1: Sending subsystem: sftp Connected to xx.xx.xx.xx. sftp> ls TESTER_HOME_dir.txt