Ubuntu 서버: Ubuntu 가상 머신에서 DDA(Discrete Device Assignment)를 사용하여 GPU를 구성하는 방법
Summary: 이 문서에서는 Hyper-V에서 실행되는 Ubuntu Server 버전 1804 VM(가상 머신)에서 DDA(불연속 디바이스 할당)를 사용하여 GPU를 구성하는 방법을 보여 줍니다.
Instructions
목적
DDA는 전체 PCIe 디바이스(이 경우 GPU)를 VM에 전달하는 데 사용할 수 있습니다. 이를 통해 디바이스에 고성능 액세스하고 기본 드라이버를 활용할 수 있습니다.
이 예제의 환경
서버: Windows Server 2019
GPU를 실행하는 PowerEdge R740xd: NVIDIA Tesla P100
VM: vCPU 4개, Ubuntu ®18.04 LTS를 실행하는 32GB RAM
단계
-
호스트에 Windows Server 2019를 설치하고 OS를 업데이트합니다. 칩셋 및 GPU 드라이버와 같은 최신 디바이스 드라이버를 설치합니다.
-
Hyper-V 역할을 설치합니다.
-
2세대 VM을 만듭니다. VM 설정에서 보안 부팅을 사용하지 않도록 설정한 다음, VM에 Ubuntu ®18.04 LTS를 설치합니다.
-
Ubuntu 업데이트를 적용합니다. 이렇게 하려면 다음 명령을 실행합니다.
$ sudo apt-get update
$ sudo apt-get upgrade
-
VM을 종료합니다.
-
호스트에서 장치 관리자를 열고, 디스플레이 어댑터를 확장하고, VM에 표시할 GPU를 선택합니다.

그림 1 : GPU가 선택된 디바이스 관리자 -
VM에서 사용할 GPU를 마우스 오른쪽 버튼으로 클릭하고 속성을 선택합니다. Details 탭의 Location paths 드롭다운 목록에서 Property를 선택합니다. PCIROOT로 시작하는 값을 메모장에 복사합니다.

그림 2 : 장치 관리자 디바이스 속성 - 위치 경로 -
디바이스 관리자에서 GPU를 마우스 오른쪽 버튼으로 클릭하고 비활성화합니다.
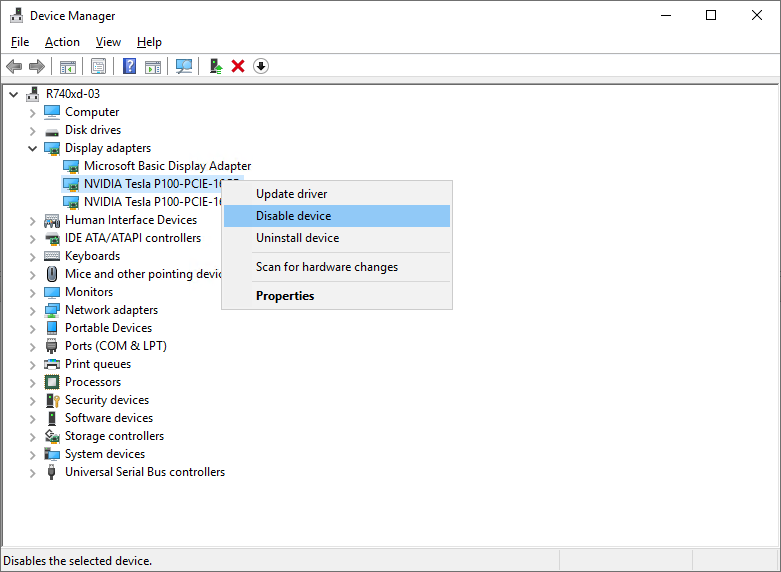
그림 3 : 디바이스 관리자에서 GPU 비활성화 -
PowerShell을 사용하여 DDA용 VM을 구성합니다. 관리자 권한으로 PowerShell을 열고 다음 명령을 실행합니다.
# Configure the "Automatic Stop Action" of a VM to TurnOff. Set-VM -Name VMName -AutomaticStopAction TurnOff # Enable Write-Combining on the CPU. Set-VM -VMName VMName -GuestControlledCacheTypes $true # Configure the 32-bit MMIO space. Set-VM -VMName VMName -LowMemoryMappedIoSpace 128Mb # Configure greater than 32-bit MMIO space. Set-VM -VMName VMame -HighMemoryMappedIoSpace 18000Mb # Dismount the device. Dismount-VMHostAssignableDevice -force -LocationPath "step 7 location path goes here" # Assign the device to the VM. Add-VMAssignableDevice -VMName VMName -LocationPath "step 7 location path goes here" -
VM을 시작합니다.
-
VM 내에서 다음 명령을 실행하여 GPU를 식별했는지 확인합니다.
$ lspci
$ sudo lshw -C Display

그림 4: 의 출력lspci및lshw명령을 -
의 출력인 경우
sudo lshw -C Display11단계의 명령은 Nouveau 드라이버가 설치되었음을 나타내며(위 그림 4의 구성 참조), 비활성화해야 합니다. Nouveau는 독립 소프트웨어 엔지니어가 작성한 NVIDIA 비디오 카드용 무료 오픈 소스 드라이버입니다. 이 드라이버는 기본적으로 설치되며 NVIDIA 드라이버를 설치하려면 비활성화해야 합니다. 다음 명령을 실행하여 Nouveau 드라이버를 비활성화합니다.# Create a file at /etc/modprobe.d/blacklist-nouveau.conf. $ sudo nano /etc/modprobe.d/blacklist-nouveau.conf # Add the following to the newly created file, then save the file. blacklist nouveau options nouveau modeset=0 # Regenerate the kernel initramfs, then reboot. $ sudo update-initramfs -u $ reboot
그림 5: 의 출력lspci및lshwNouveau 드라이버가 비활성화된 후의 명령 -
NVIDIA 드라이버를
다운로드한 다음 Ubuntu VM에 설치합니다.
# Run these commands after the file has been copied to the VM. $ sudo dpkg -i nvidia-driver-local-repo-ubuntu1804-440.33.01_1.0-1_amd64.deb $ sudo apt-key add /var/nvidia-driver-local-repo-440.33.01/7fa2af80.pub $ sudo apt-get update $ sudo apt-get install cuda-drivers {Install all the dependencies $ sudo reboot -
드라이버가 올바르게 설치되었는지 확인하려면 다음 명령을 실행합니다.
$ lspci
$ sudo lshw -C Display
$ nvidia-smi
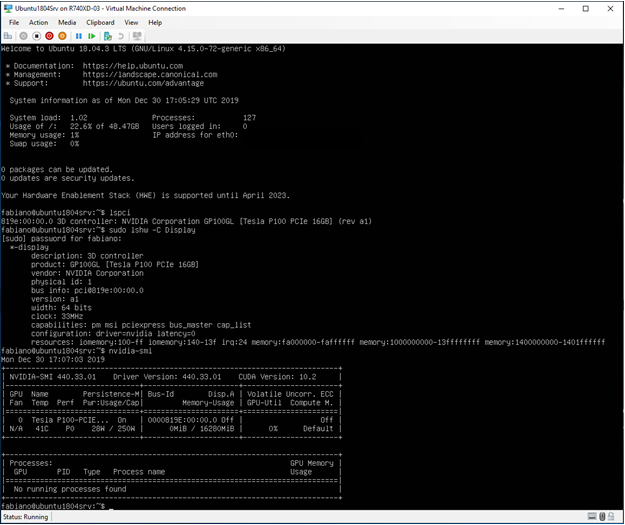
그림 6: 의 출력lspci,lshw및nvidia-smiNVIDIA 드라이버가 설치된 후 명령
Additional Information
PowerEdge R760용 GPU를 교체하는 방법
시간: 00:03:10 (hh:mm:ss)
사용 가능한 경우 이 비디오 플레이어의 CC 아이콘을 사용하여 선택 자막(자막) 언어 설정을 선택할 수 있습니다.